DIY Herringbone Brick Porch
Our exterior porch tiles were over 30 years old and badly damaged so we knew we would replace them eventually. We decided to use Old Mill Brick for our porch remodel to DIY a herringbone brick porch. This was my first time installing thin brick from Old Mill Brick and it was easier than I thought! In this post, I share how to install a herringbone brick patio and links to all the tools needed to complete Old Mill Brick installation. Keep reading and watch the video to see our Porch Remodel with Old Mill Brick Herringbone Brickwebb!
This shop has been compensated by Old Mill Brick. All opinions are mine alone.
If you’re curious (or in a hurry)…
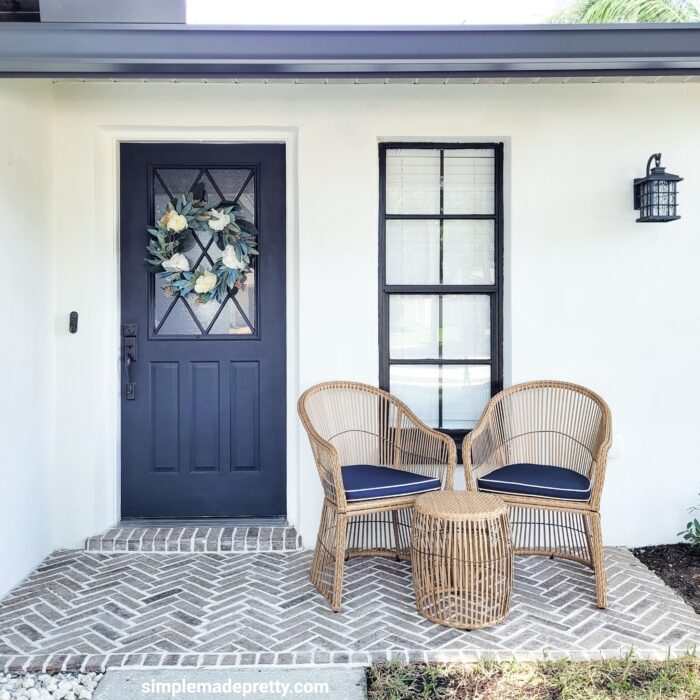
The Herringbone Brickwebb from Old Mill Brick was my #1 choice to redo our porch because of the quality, style, and ease to do it yourself.
Can old mill brick be used outside?
Yes, we used Old Mill Brick on our outdoor covered patio. Just make sure you seal the finished brick and grout.
How do you grout Old Mill bricks?
We piped the grout into Old Mill bricks. Old Mill Brick recommends sealing the brick, then grout, then seal the grout and the brick. Sealing the brick before grouting will ensure the brick does not soak up any grout and change the brick color to look white-washed.
How do you seal an Old Mill thin brick?
Old Mill Brick recommends using 511 Impregnator Sealant by Miracle since it is a non-gloss sealant and doesn’t leave a shiny finish.
How do you mix old mill brick adhesive?
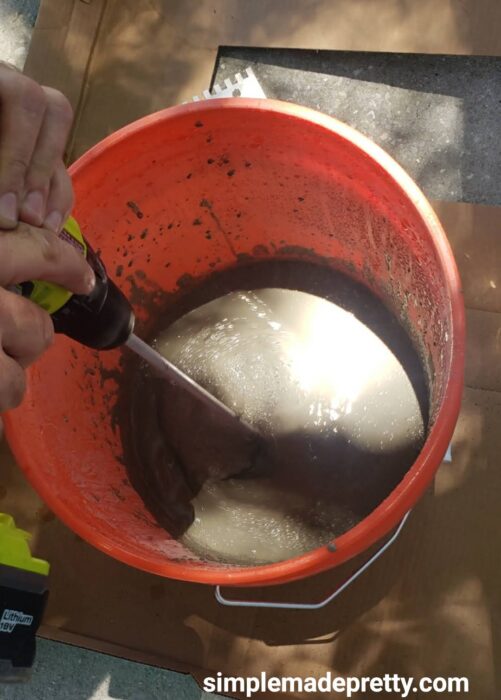
Use a large bucket (like the orange buckets from Home Depot), add the powder adhesive (mortar) into the bucket, and slowly add water. Use a mortar paddle mixer that attaches to a drill and mix until you reach the consistency of a thick pancake mix.
How do you lay herringbone pavers?
Old Mill Brick makes it easy to lay herringbone pavers with their Brickweb Herringbone Sheets. I used Old Mill Brickweb sheets to remodel our porch in a herringbone pattern.
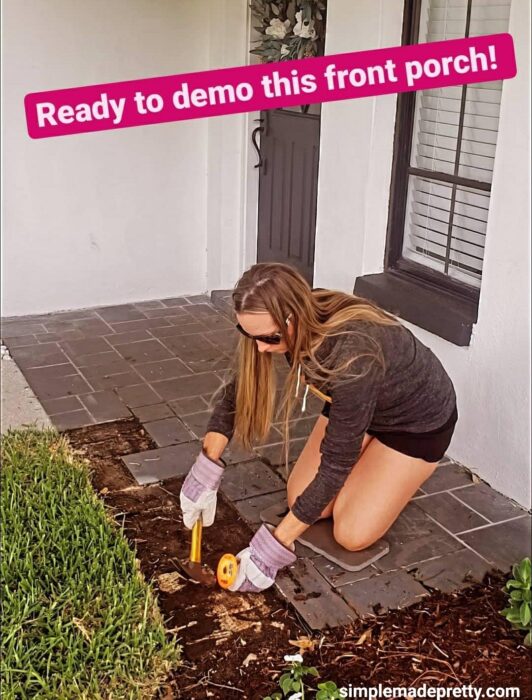
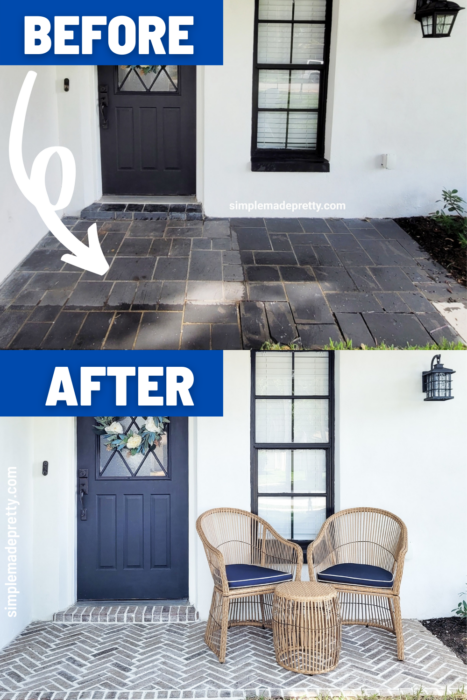
This is what our front porch looked like before we remodeled it (this picture was taken right before demolition)…
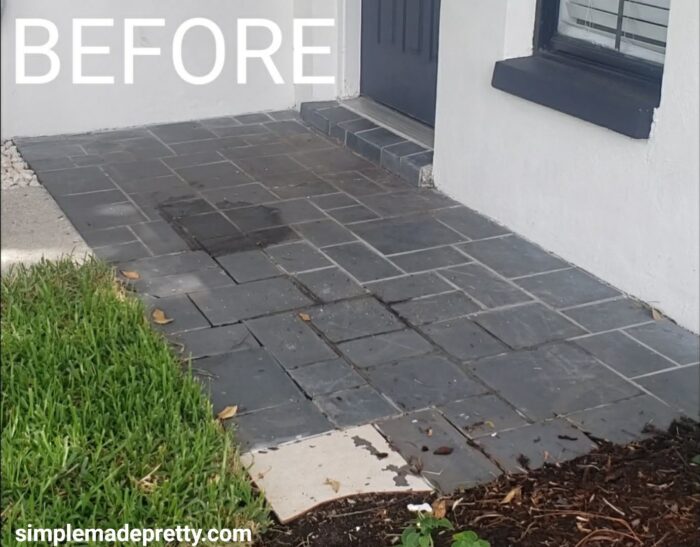
The slate tile was nice but it had a lot of issues.
Many tiles in the front by the flower bed had come up and there was water damage in that area so we knew we’d have to remove the tiles eventually.
The grout between the slate tiles was in bad shape and many of the slate tiles had paint stains that I could never remove (even with a pressure washer and paint remover!).
The previous owners had replaced some of the slate tiles with White tiles and painted them gray to match!
So it was time to demo the porch rather than fix the existing tiles.
Minor Updates to our front porch
We did some minor updates to our porch during the 3 years we lived here before doing this remodel.
Here are the minor updates I did to our porch until we were ready to redo the tiles:
- Painted the exterior of the house
- Painted the front door
- Replaced the Outdoor Lantern
- Added a cute wreath
- Use a large rug to cover the damaged slate tiles
- Add a cute welcome mat
Shop our Front Porch Decor:

Watch the video below to see a quick Before and After of our DIY Herringbone Brick Porch!
How to Install a Herringbone Brick Patio
Supplies:
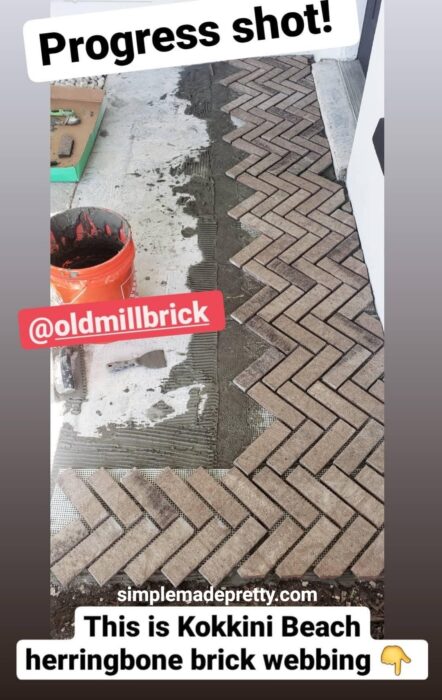
- Old Mill Brick Herringbone BrickWebb Sheets (we used 4 boxes of Kokkini Beach)
- Old Mill Brick Singles/Corner Bricks (optional – we used 1 box of Kokkini Beach)
- Angled Grinder or Tile Saw
- Diamond Blade (if using an angled grinder)
- Adhesive
- Grout (color used: Snow White)
- Trowel
- Mixing Paddle
- Drill
- Bucket
- Piping Bag
- Rags
- Water
- Spacer (I used a 5-gallon paint stick as a spacer guide)
- Brick Sealant
- Face Masks
Directions:
- Gather Supplies.

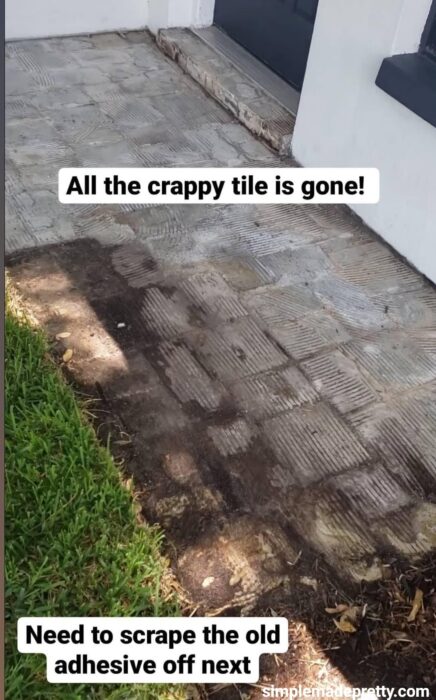
- Clean and clear the surface where you plan to install the brick. We had to do demolition of the damaged slate tiles before we could install the Old Mill Bricks.

- We started the demo by removing the old tiles.

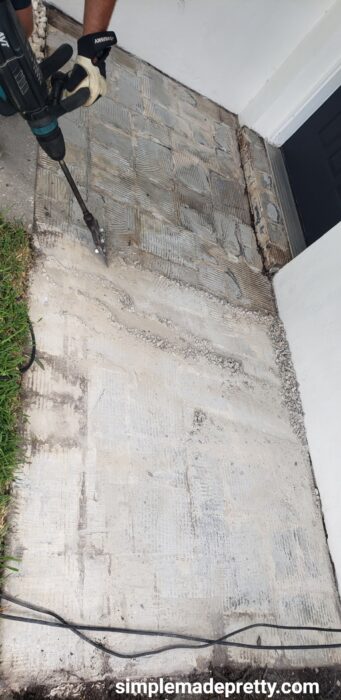
- Then we rented a jackhammer from Home Depot to scrap the old mortar and level the concrete pad. You can also use leveling concrete if you don’t want to do the manual labor to scrap the old adhesive off. Using a machine like that requires a lot of effort and manual labor FYI. Keep in mind that using leveling concrete will increase the height of the area so in our case, the porch wouldn’t have been level with the sidewalk.


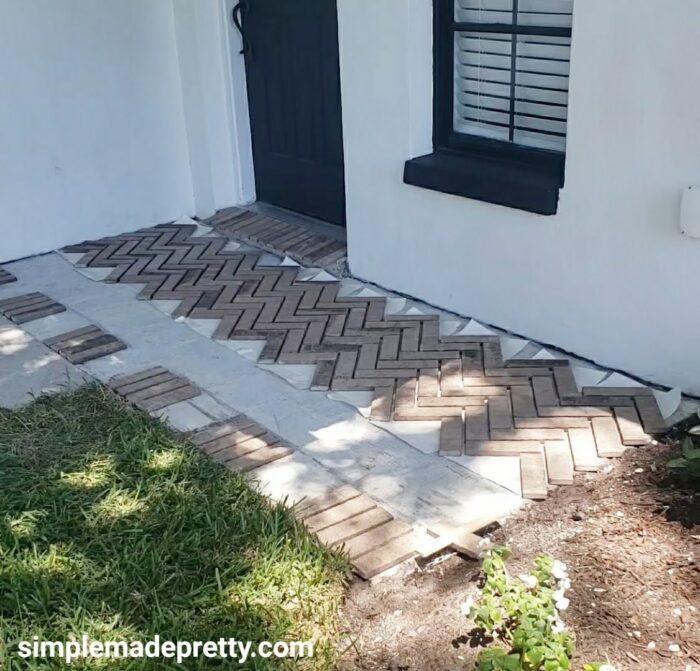
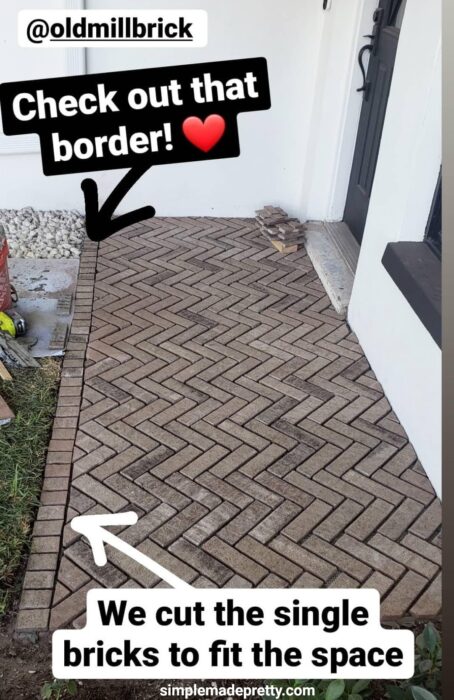
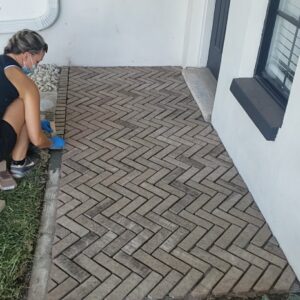
- If desired, lay the brick on the surface to determine the pattern you wish to create. We decided to have the herringbone pointing toward the front door and added a border to the front and step using a straight pattern.

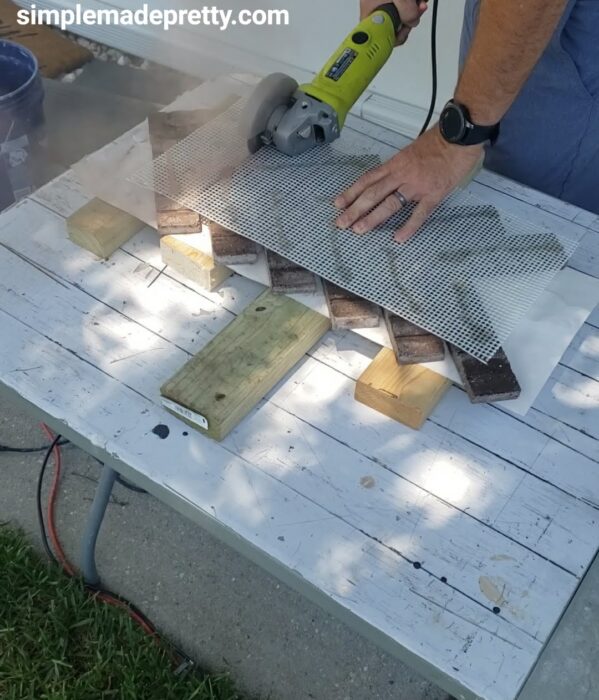
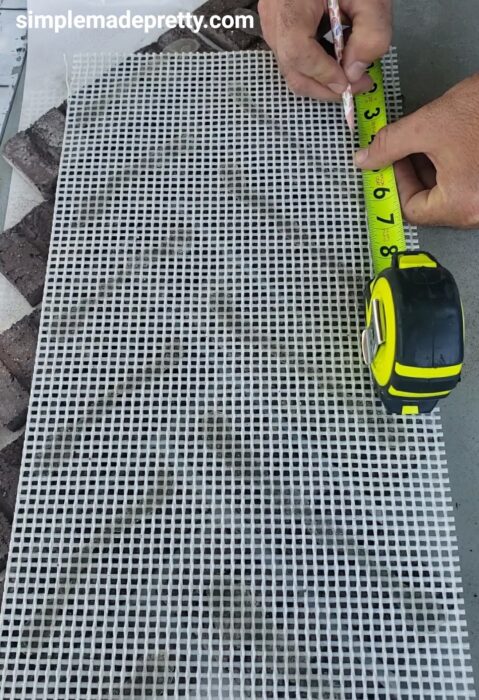
- This is where things might get messy…Use an Angled Grinder fitted with a Diamond Blade or Table Tile Saw to cut the first piece of the herringbone brickwebb sheet. We cut 3.25 inches from the top to start with a straight cut. You can see in the below picture that dust comes off the bricks. We wore masks and cut in a ventilated area (right in the front yard) so we didn’t breathe in the dust. We had to hose off the area afterward too.


measure and draw the line where to cut on the back of the brickwebb - Use a large bucket (like the orange buckets from Home Depot), add the powder adhesive (mortar) into the bucket, and slowly add water (less is more to start!). Use a mixing paddle attached to a drill to mix until you reach a consistency of a thick pancake mix. If it’s too liquidy, add more adhesive powder.

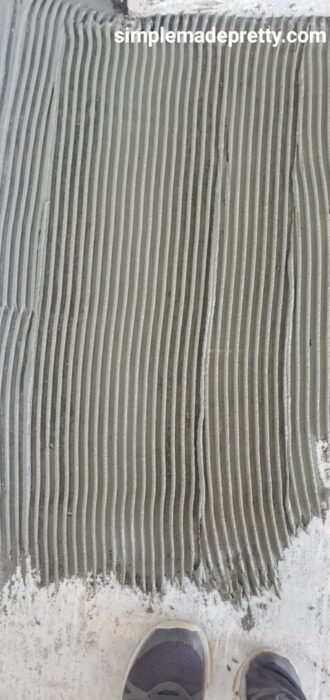
- Use a trowel to apply a .25 inch thick layer of mortar to the surface. Use the notched side of the trowel to create ridges in the mortar layer. This gives it air to help it dry.

- Lay the first brickwebb sheet on the mortar. I started on the right side because the mesh on the brickwebb sheets would’ve overlapped and I would’ve fidgeted with it to get it under the bricks if I started in the middle and worked left to right. Luckily, I had laid the bricks out beforehand so I knew where I could start my bricks. **You typically want to start tiling in the center**

- Finish the row then start with the next row under that. Finish off with that little piece of the herringbone brickwebb that you cut off the top of the first row.

- NOT SHOWN: We had to cut the last row so that it was even. We used the same angled grinder and cut the bricks on the end in the last row before adding the single brick border.

- We cut the bricks on the border to fit the space… it was a little under 1/2 brick for each.
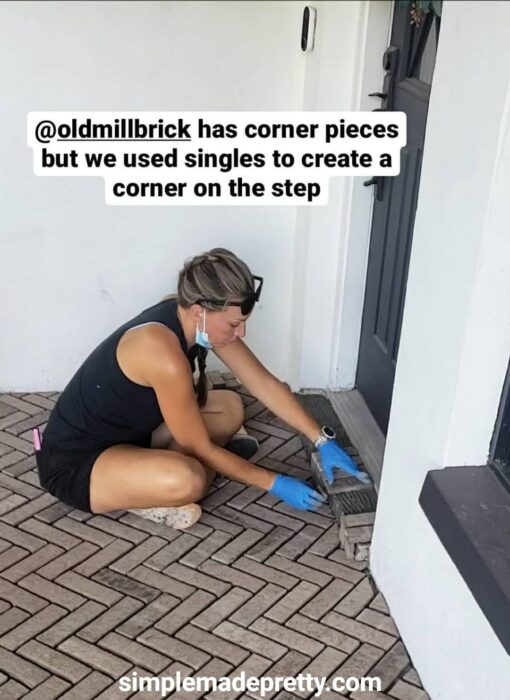
- For the step, we used singles and created a corner brick. Old Mill Brick has corners that you can purchase but the Kokkini Beach at the time of install was not available in corner bricks.

- We cut single bricks to fit the step and used mortar on the sides where the bricks met.
- After the bricks have been attached using the adhesive, you should let the adhesive dry and do not step on it so the bricks don’t shift. We let ours dry for 24 hrs.
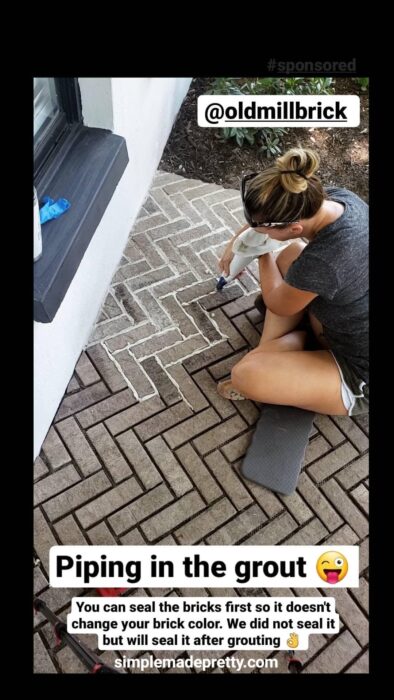
- Now you can seal the brick before grouting or you can skip that step like we did if you are careful grouting and don’t mind a little grout getting in your bricks.
- When you are ready to grout, mix the grout the same way you mixed the mortar. We made our grout a little runnier/thinner since we were piping it in. If the grout is too thick, it’s going to be hard to squeeze through the piping bag!
- Pour or scoop the grout into the piping bag by stepping on the tip of the bag so nothing comes through the hole.
- To pipe into place, angle the piping bag while grasping the top to keep it closed and pipe it into the grooves like you are icing a cake 🙂 You want the groove to be filled with a ridge.

- I let the grout dry for about 15 minutes and then I used my finger (with latex gloves on) to scrape the excess grout from each groove. You can purchase a tool to scrape the top of the grout away from the brick but I just used my finger.
- Let the grout dry for 24 hours before applying the sealant.
- Follow the instructions on the sealant to seal the bricks.


Wrap up about our Herringbone Front Porch
I hope you enjoyed this DIY herringbone brick patio tutorial! Although it looks like I did most of the work, my hubby did a majority of the demo and cut all the bricks. The entire process took 3 days, 5 hours each day. If I didn’t have him there to help me, it probably would’ve taken me 5 days, lol. That said, if I can do a brick patio project like this, anyone can! I love how easy Old Mill Brick sheets are to use and the quality of the real bricks will last for years to come!
Shop Our Front Porch Decor:
- LED Lantern
- 3-Piece Wicker Outdoor Seating Set
- Yay You’re Here Welcome Mat
- Eucalyptus Wreath
- House Paint Color: Sherwin Williams Pure White
- Front Door Color: Behr Carbon
- House Trim Color: Benjamin Moore Gray
- Old Mill Brick in Kokkini Beach
Watch the video and print the supply list for this porch remodel
DIY Herringbone Brick Porch
Supplies
- Old Mill Brick Herringbone BrickWebb Sheets (we used 4 boxes of Kokkini Beach)
- Old Mill Brick Singles/Corner Bricks (optional - we used 1 box of Kokkini Beach)
- Angled Grinder or Tile Saw
- Diamond Blade (if using an angled grinder)
- Adhesive
- Grout (color used: Snow White)
- Trowel
- Mixing Paddle
- Drill
- Bucket
- Piping Bag
- Rags
- Water
- Spacer (I used a 5-gallon paint stick as a spacer guide)
- Brick Sealant
- Face Masks
Instructions
- Clean and clear the surface where you plan to install the brick. We had to do demolition of the damaged slate tiles before we could install the Old Mill Bricks. We started the demo by removing the old tiles. Then rented a jackhammer from Home Depot to scrap the old mortar and level the concrete pad. You can also use leveling concrete if you don't want to do the manual labor to scrap the old adhesive off. Using a machine like that requires a lot of effort and manual labor FYI. Keep in mind that using leveling concrete will increase the height of the area so in our case, the porch wouldn't have been level with the sidewalk.
- Next, things might get messy...Use an Angled Grinder fitted with a Diamond Blade or Table Tile Saw to cut the first piece of the herringbone brickwebb sheet. We cut 3.25 inches from the top to start with a straight cut. You can see in the below picture that dust comes off the bricks. We wore masks and cut in a ventilated area (right in the front yard) so we didn't breathe in the dust. We had to hose off the area afterward too.Angled Grinder or Tile Saw, Diamond Blade (if using an angled grinder)
- Use a large bucket (like the orange buckets from Home Depot), add the powder adhesive (mortar) into the bucket, and slowly add water (less is more to start!).
- Use a mixing paddle attached to a drill to mix until you reach a consistency of a thick pancake mix. If it's too liquidy, add more adhesive powder.
- Use a trowel to apply a .25 inch thick layer of mortar to the surface. Use the notched side of the trowel to create ridges in the mortar layer. This gives it air to help it dry.
- Lay the first brickwebb sheet on the mortar. I started on the right side because the mesh on the brickwebb sheets would've overlapped and I would've fidgeted with it to get it under the bricks if I started in the middle and worked left to right. Luckily, I had laid the bricks out beforehand so I knew where I could start my bricks. **You typically want to start tiling in the center**
- Now you can seal the brick before grouting or you can skip that step like we did if you are careful grouting and don't mind a little grout getting in your bricks.
- When you are ready to grout, mix the grout the same way you mixed the mortar. We made our grout a little runnier/thinner since we were piping it in. If the grout is too thick, it's going to be hard to squeeze through the piping bag!
- Pour or scoop the grout into the piping bag by stepping on the tip of the bag so nothing comes through the hole.
- To pipe into place, angle the piping bag while grasping the top to keep it closed and pipe into the grooves like you are icing a cake 🙂 You want the groove to be filled with a ridge.
- Let the grout dry for 24 hours before applying the sealant.
- Follow the instructions on the sealant to seal the bricks.
Video
Pin this post with this Porch Remodel
Here are More Home Improvement Tips You Might Like…
How to pick the right paint colors
Have you ever had trouble picking the right paint colors for your home? Choosing the right paint colors for your home can be overwhelming. There are so many different “whites” and “grays” these days, how can anyone know they are making the right paint color choice?
That’s why I put together the best tips on How to Choose Interior Paint Colors in this post.
Every home is different… the entryway in our first home was much different than the entryway in our second home, and both of those were very different from the entryway in our third home! So I chose a different paint color for each entryway in all three of our homes. Not to mention, from the time that we bought our first home, to the time that we bought our third home, home paint color trends changed drastically. The colors that I used back then are no longer a trendy color and well, I just didn’t like the brown-ish tan that was in our first home, haha.
So if you need help choosing paint colors for the rest of your home, head on over to this post to see my paint-picking tips and what has worked for me in all three of our homes 🙂 My post with how to choose paint colors for your home is one of my most popular posts and readers have benefited from reading it before heading to the store to buy paint that ends up not working out.
I also have some ideas for choosing paint color combinations for bedrooms (with themes!)
Paint Versus Peel & Stick Wallpaper
Peel and stick wallpaper has become very popular recently since not everyone has access to tools to build their own Shiplap walls (thanks Chip and Joanna) or wants to tile an entire wall with subway tile. I love tiling but if I could slap up some wallpaper and call it a day, that would make me, the hubby, and my wallet happy!
You can find peel and stick wallpaper online at Target, Amazon, Home Depot, and more! I’ve linked my favorite peel and stick wallpaper and the ones I’ve used personally below.
How To Paint Kitchen Cabinets Without Sanding
If you love white farmhouse kitchens and want to paint your kitchen white, then you will love this post that teaches you How To Paint Kitchen Cabinets White Without Sanding! I’ll show you how to paint old kitchen cabinets and answer how much does it cost to paint kitchen cabinets (it’s much cheaper than you think!). I also have lots of pictures of painting kitchen cabinets before and after!
You don’t have to worry about how to paint kitchen cabinets without brush strokes because I have a secret in this post that reveals a step-by-step DIY tutorial with how to paint kitchen cabinets like a pro.
–>> Learn how to Paint Kitchen Cabinets without Sanding here!
Cheap Home Hacks that’ll Increase Value
Renovating a home can come with a high price tag if you’re not budgeting and deciding which updates bring the best return on investment. After selling our updated first home in just 4 years, we bought an even bigger house that needed a lot of updating. We sold our second home after 4 years while doing the much-needed work to produce a profit by following the same strategies we did in our first home.
If you enjoy updating your home, want to increase your home value or just want your home to look better, you should check out thee 10 Cheap Home Hacks That’ll Make Your House Look So Much Better.
Tour Our Homes
Take a Tour of our Second Home here
Psssssttt…Right now I’m offering FREE access to our Digital Resource Library to all of our newsletter subscribers. Your private access includes dozens of free printable crafts, home decor and organization guides. Hurry up and grab your freebies here! (Access instructions are sent after subscribing).
Disclaimer: This post may contain affiliate links or a sponsored post. All opinions are always 100% mine and I don’t partner with any product or company that I don’t use and love. Please see our Full Disclosure for more information.
 Father’s Day Gift Guide 2026: Thoughtful & Budget-Friendly Picks for Every Dad