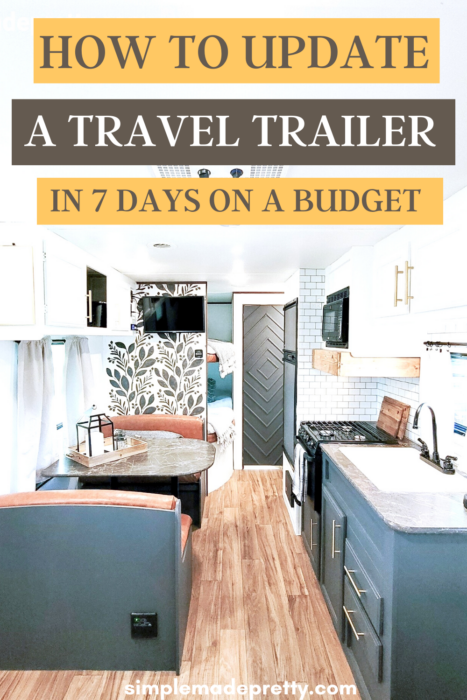
How to Remodel a Travel Trailer
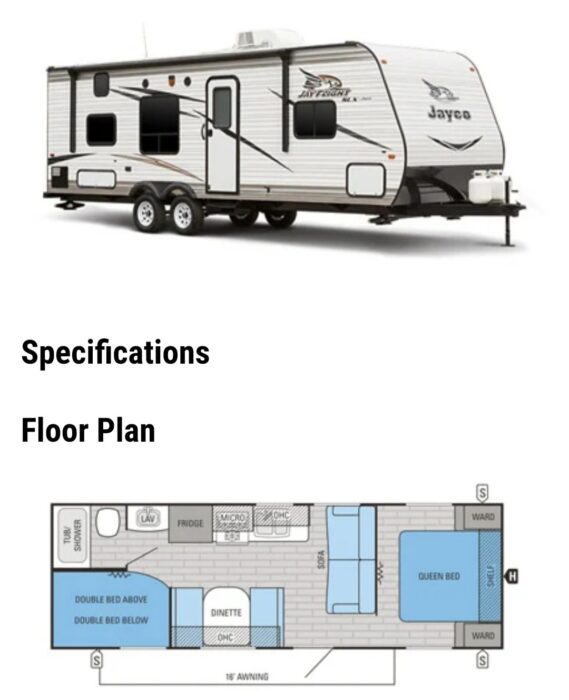
We purchased a 2016 30-foot Jayco Travel Trailer and went right to work to remodel the interior. I shared all of my DIY travel trailers remodel ideas in my Instagram stories and my followers loved it so much that I decided to put together this post and video with our travel trailer remodel before and after pics. Keep reading and watch the video to see how I did this camper remodel on a budget in 7 days!
I was able to update our camper in just 7 days! I spent around 7 hours each day working on the Travel Trailer Remodel.
Before starting the Travel Trailer Makeover, I did some research on Pinterest to find some camper restoration ideas and the best camper makeover ideas.
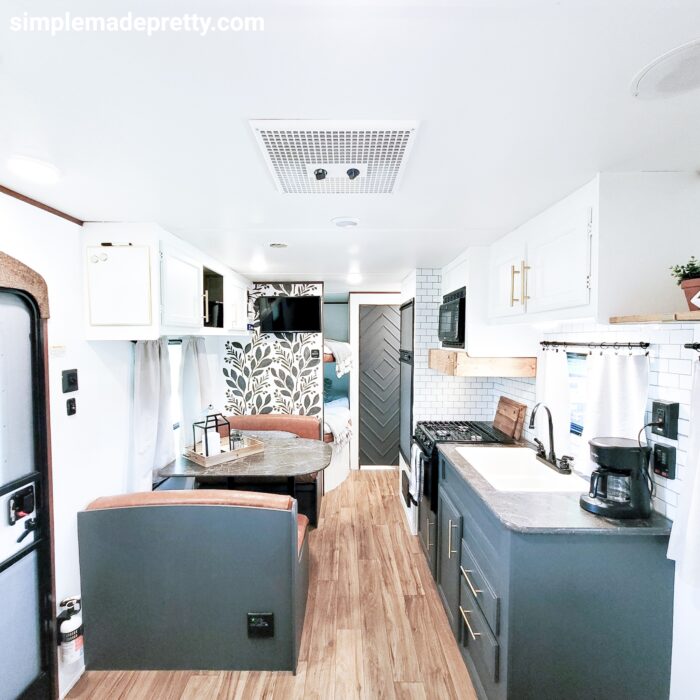
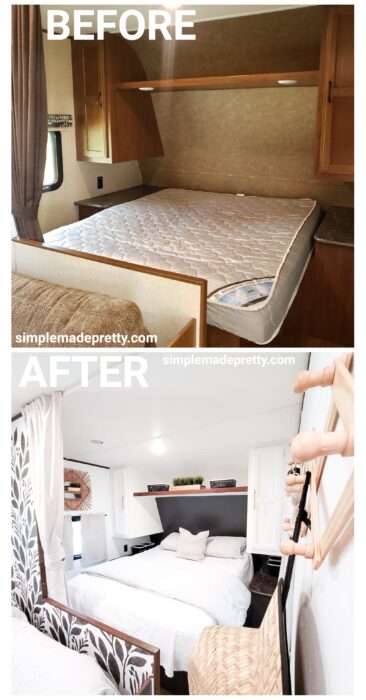
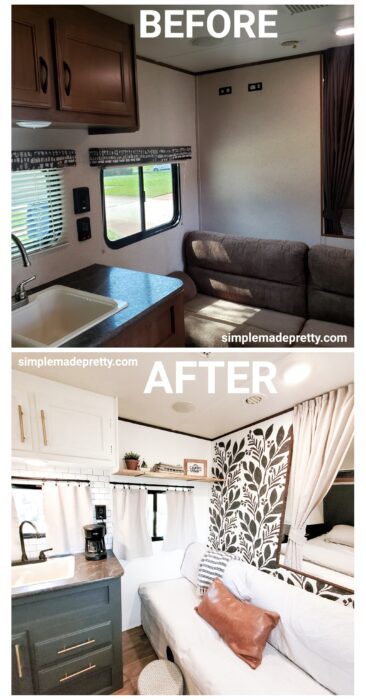
I created a mood board with the camper remodel color scheme I wanted: dark lower cabinets, white upper cabinets, wood accents, white textures, with a bright and clean look. I envisioned cognac-colored leather cushions and trim along with a sofa slipcover and stenciled walls.
Jayco Camper Remodel
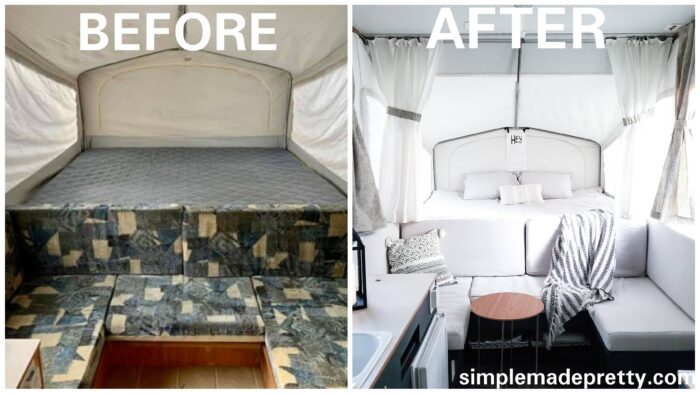
Before we purchased our 30-Foot Jayco Travel Trailer, we had a Jayco Pop Up Camper that we updated as well. You can see how I updated our Pop Up Camper in 5 days in this blog post!
I followed a similar method to update our travel trailer that I did with our pop up camper.
Travel Trailer Makeover
Our travel trailer was in really good shape and didn’t need a remodel but I wanted to makeover our travel trailer to make it more my style decor. The easiest way to update a travel trailer is to paint the walls and the cabinets. Painting everything was the most time-consuming part of the update but it also made the biggest impact.
Is Jayco the best travel trailer?
We looked at several campers and travel trailers before deciding on a Jayco travel trailer. Our pop-up camper before this camper was Jayco brand and we found that Jayco is a very durable and high-quality camper.
How do you update a travel trailer?
If you are serious about fixing up a travel trailer, I highly recommend finding one that is in good condition so you have less of the major fixes to do, lol.
How do you update an older travel trailer?
The first thing to look for when purchasing an old camper is water damage. You can usually tell if the walls are discolored in certain areas or if the wood has soft spots. Those are warning signs that the plywood floor might need to be replaced which is a huge job!
Our travel trailer was in great shape and since it is less than 5 years old, there is little wear and tear on the interior and exterior. If you can find a used travel trailer that is less than 20 years old and was well-taken care of (or garage kept) that is your best bet.
–>>See the entire process of our Travel Trailer Update in my Instagram Highlight PART 1 HERE and Travel Trailer Update PART 2 HERE
How much does it cost to renovate a travel trailer?
I spent less than $500 to update the interior of our travel trailer. This does not include the cost of a new queen mattress or TV. I reused paint and other supplies that I already had or shopped at our local Home Discount Warehouse.
How Do You Update a Camper?
We updated our camper by giving it a complete face-lift inside and taking care of maintenance, and normal wear and tear issues.
My hubby did most of the exterior, plumbing, and electrical updates. I did all of the cosmetic updates inside the travel trailer.
Where to Start when you update a Camper?
Here is the timeline that I followed to update our Travel Trailer in 7 Days:
- Day 1: Deep clean inside and outside. Make a list of items that need to be replaced and order those items if they are only available online.
- Day 2: Primer the walls and cabinets.
- Day 3: Paint the walls and cabinets.
- Day 4: Polyurethane the walls and cabinets.
- Day 5: Install floors (optional) and sew curtains.
- Day 6: Sew or install cushion covers and replace items from the list on Day 1.
- Day 7: Add bedding, accessories, and organizational items in the cabinets.
It seems easy once you make a list 🙂
Day 1: Deep clean inside and outside.
In order to deep clean, I removed all of the cushions, all of the curtains/blinds, and anything that was left by the previous owner in the cabinets and drawers.
I sprayed the cushion inserts with some essential oils linen spray and room spray (find the recipes here).
I used cleaning items that I already had to clean inside the camper.
Make a list of items that need to be replaced and order those items if they are only available online.
We also had new tires and new spare tires installed on our travel trailer before taking our first trip. We went to a local tire shop for travel trailer tires.
Shop our Travel Trailer Camper:

Day 2: Primer the walls and cabinets.
Priming the walls and the cabinets took around 7 hours for our 30-foot travel trailer. I painted over the “wallpaper.” Many people have asked about painting over wallpaper that has a border design… however, ours did not have a border. I DO NOT recommend trying to remove the “wallpaper.” You will end us with a huge mess that you will probably need to cover with shiplap or some other wall solution. The wallpaper in RV’s and Travel Trailers is built into the camper and there is no easy way to remove it.
Drying time is the MOST IMPORTANT part of the painting process when updating a camper. I’ve seen many camper DIY fails from hose trying to do what I did in a hurry and not allowing the time for primer, paint, and polyurethane to dry.
Please let each coat of primer, paint, and polyurethane dry for at least 24 hours between applications!
If you miss any of these steps you will end up with paint chipping or peeling and all that hard work will need to be repeated
How to Paint Camper Cabinets
No sanding was necessary to paint the camper cabinets. I used PPG Gripper primer for the walls and the cabinets and let them dry for 24 hours.
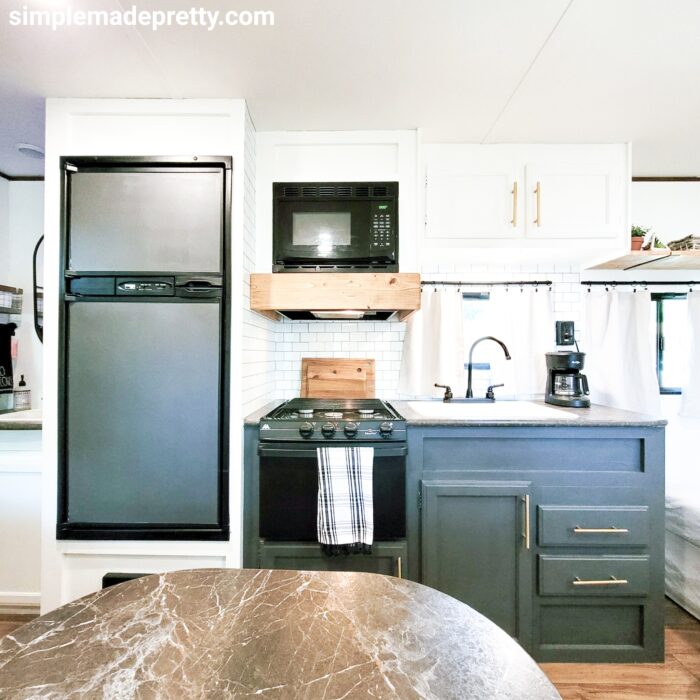
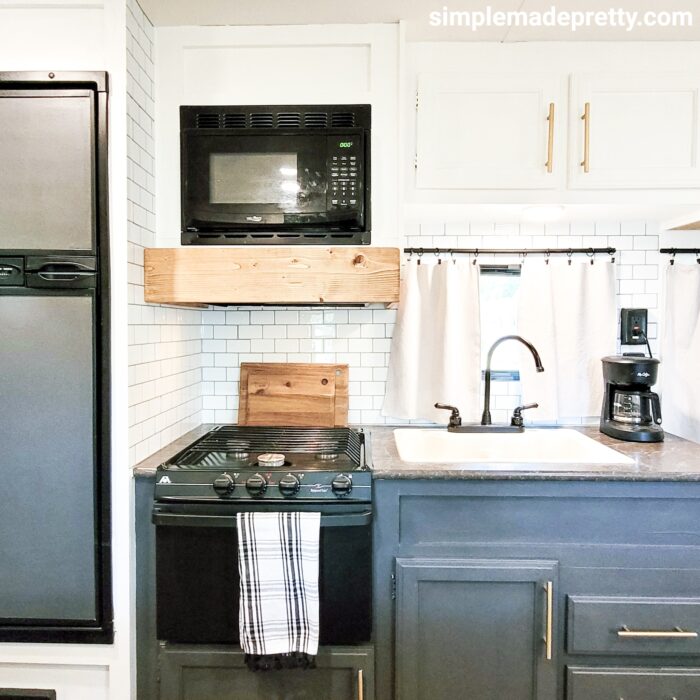
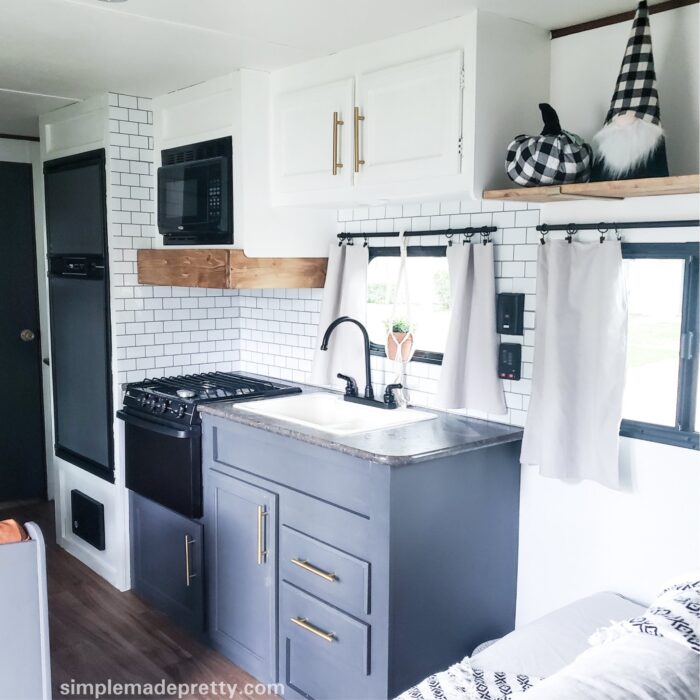
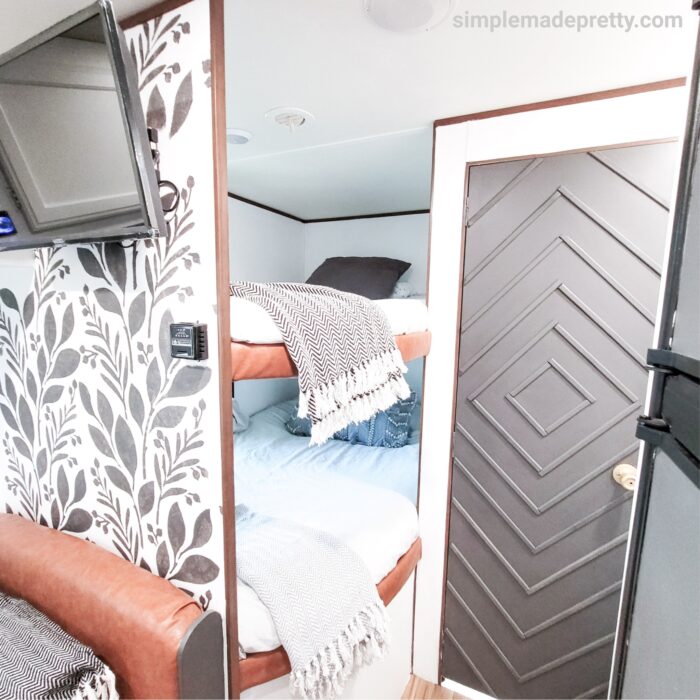
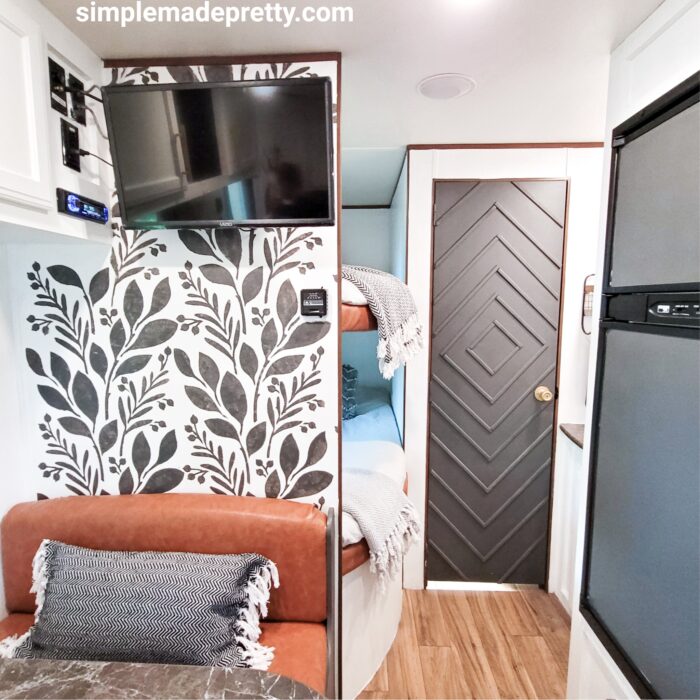
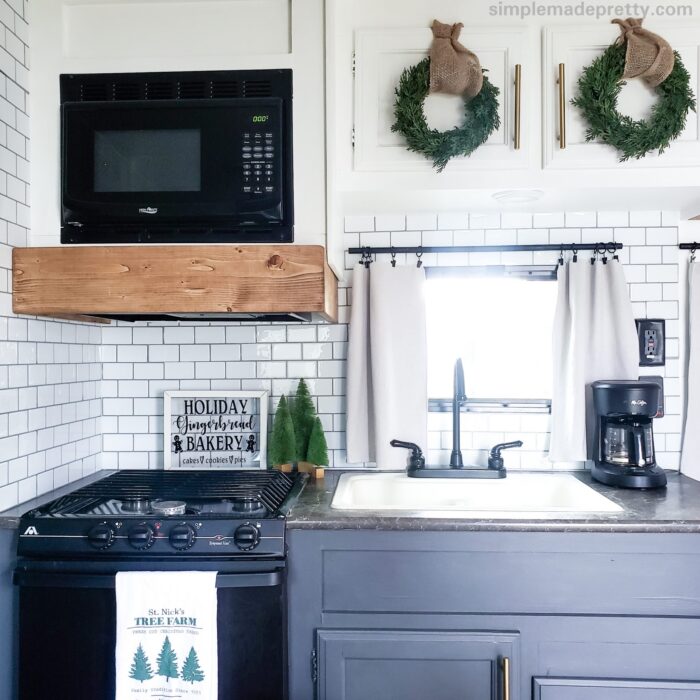
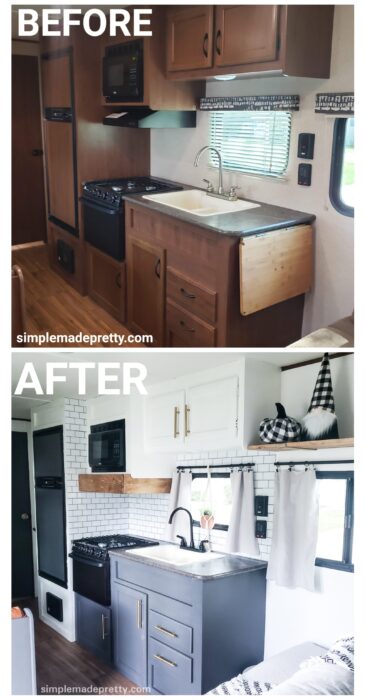
Our Travel Trailer Color Scheme ended up being Black, White, Gold, with Wood accents 🙂
Day 3: Paint the walls and cabinets
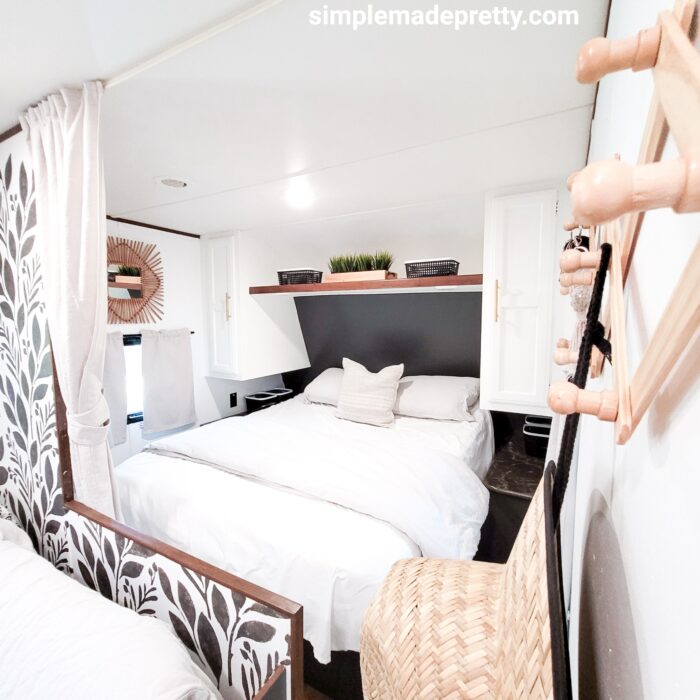
I painted the lower cabinets in Glidden Paint and Primer in One with an Eggshell finish in the color Benjamin Moore Gray (I had Home Depot color match the color). I painted the upper cabinets and the walls in Glidden Eggshell finish in white (I used the paint can off-the-shelf so no color mixing was used!).
I gave the walls and cabinets 2 quick coats of paint and let it dry for 24 hours.

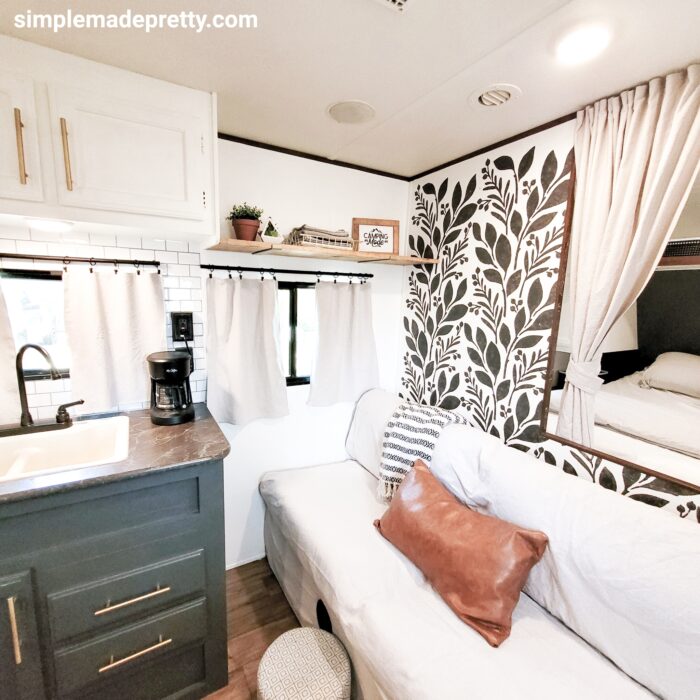
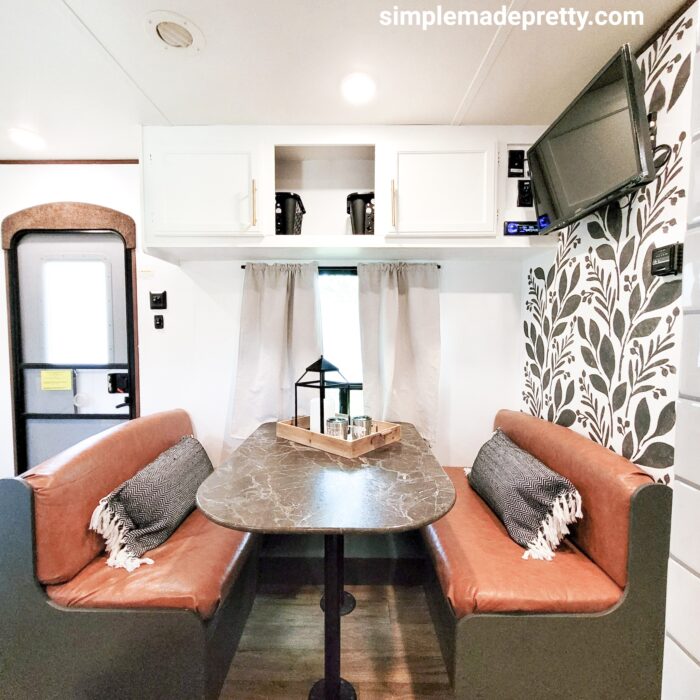
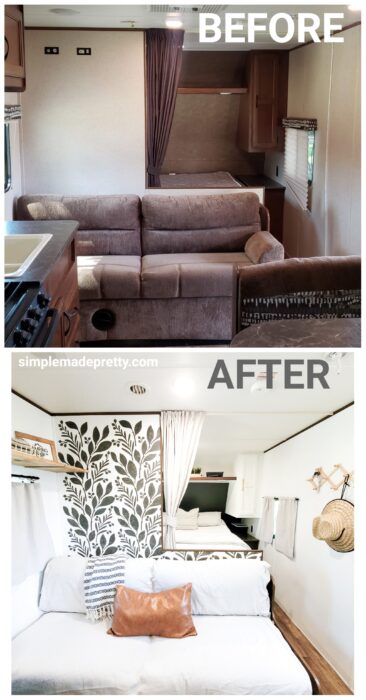
I also stenciled this stencil design on the wall behind the couch and the wall behind the dinette. I used the same BM Gray color to stencil the wall.
Shop our Travel Trailer Camper:
Day 4: Polyurathane the walls and cabinets
After the paint was dry for at least 24 hours, I used Triple Thick Water-Based Polyurethane on the walls and the cabinets.
The polyurethane made a huge difference since we are constantly shoving things around the cabinets and they are easily scratched and bumped. I highly recommend polyurethane on camper cabinets because the space is so small!
I used black matte high-heat spray paint on the kitchen sink faucet while it was still attached. I used rags and painter’s tape to cover the areas around the faucet and spray-painted the faucet without removing it. I typically wouldn’t do something like that but I was trying to avoid removing the faucet and possibly having an issue reattaching it (having a leak, etc) so I left it in place.
Day 5: Install floors (optional) and sew curtains
Our floors were in great shape so we skipped installing floors. However, our pop-up camper needed new flooring I used peel and stick floor tiles that look like wood.
–>> I used this peel and stick flooring.
I used my paper trimmer to slice the perfect straight edge! Many DIYers use a box cutter or scissors to cut peel and stick tiles, but the paper trimmer saved me SO much time and it resulted in the perfect cut!
–>>You can find my paper trimmer here.
It took around 45 minutes and only $34 to install the floors!
Sewing Curtains…
I sewed curtains for our Travel Trailer using a canvas drop cloth and black-out curtains. I cut 2 panels from each of the black-out curtains and drop cloth to fit each window and sewed them together.
I used clips to hang the curtains so you don’t need to sew curtain loops or an opening.
The curtain rods are wooden dowels cut to size, spray painted and hung with hooks.
Day 6: Sew or install cushion covers and replace items from the list on Day 1
Instead of sewing cushion covers, I opted to use a staple gun and staple fabric to the camper cushions. I had my hubby cut a thick piece of plywood to fit the bottom of the cushions and I used the wood as the base to staple the faux leather.
If you’d like to sew cushion covers… FYI sewing the cushion covers was the most time-consuming part of our Pop Up Camper update. We had 11 cushions in our camper and I made new covers for all of them using Canvas Drop Cloth.
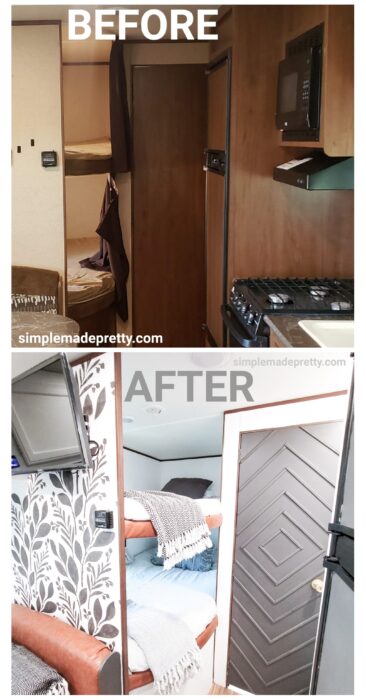
I had leftover faux leather that I used on the bunk bed trim which I hot-glued in place.
Sewing a Slipcover…
Sadly, I don’t have a video or pictures showing how I made the drop cloth couch slipcover but it was fairly simple. I cut pieces of drop cloth to fit around the sofa, pinned them together, then sewed the seems.

This slipover slips right off so we can easily wash it, however, the bottom piece is stapled on since there is a heat vent on the bottom of the sofa.
Day 7: Add bedding, accessories, and organizational items in the cabinets.
I used the bedding from our Pop Up Camper which I made cheap by doing the following…
I went to Ikea looking for inexpensive comforters and I came up with a solution that saved us so much money! I used these Ikea comforters in this DIY.
I was able to DIY:
- 1 King Comforter for $16
- 1 Queen Comforter $16
- 1 Twin Comforter $8
–>>I shared the bedding hack in this Instagram Highlight!
Add Accessories and Organizational Items…
This was a fun day because I added my own personalized touch to the camper! 🙂
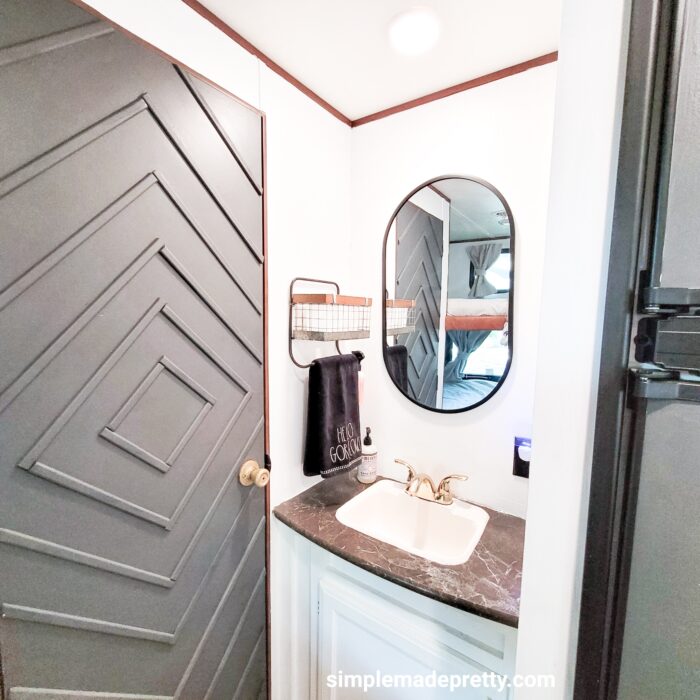
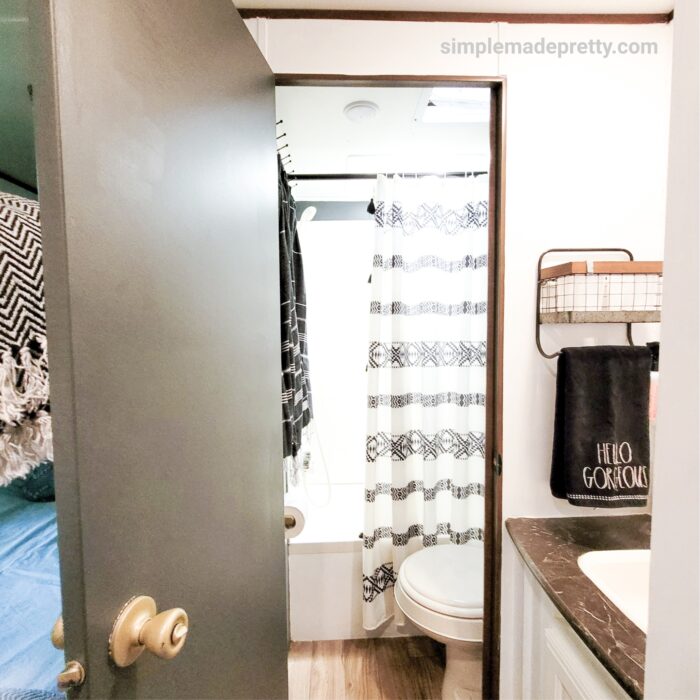
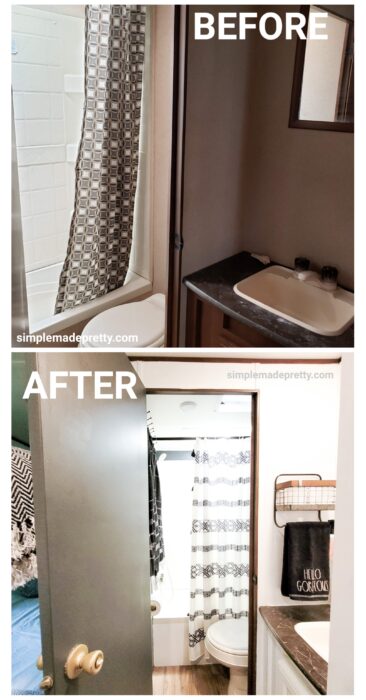
The bathroom door was kinda “blah” after painting so I cut some leftover wood trim from this window project and glued it to the bathroom door in a fun design.
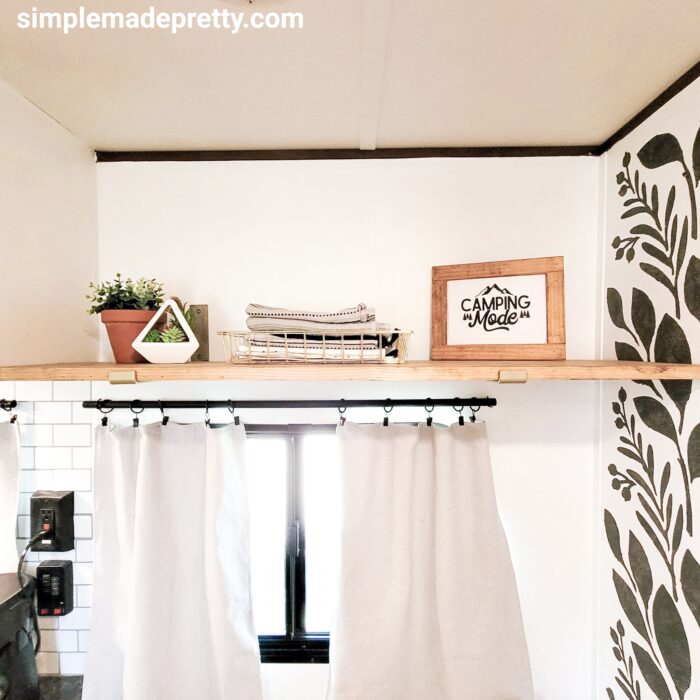
We added a wood shelf above the couch for additional storage. We used these brackets but keep in mind the walls in a travel trailer are not regular drywall and can easily damage if you try to hang heavy items like a shelf or hooks. We don’t put anything heavy on this shelf for that reason.
I also had the hubby cut and attach a piece of wood that wrapped around the stive hood to add some character. Be sure to polyurethane wood if you add anything extra like this 🙂
A quick way to update the kitchen wall was to add peel and stick subway tile to the back of the kitchen wall.
I added a new mirror and shelf in the bathroom vanity area to hold toothbrushes and handtowels.
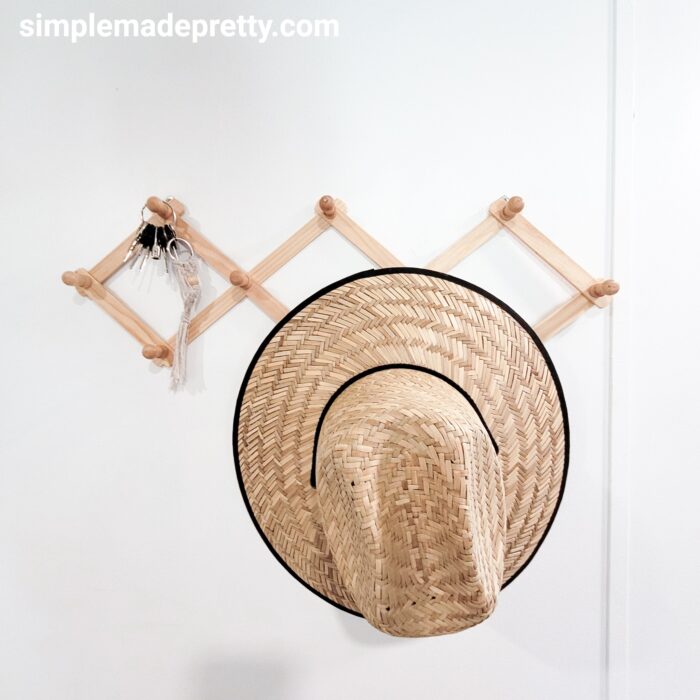
We secured a hat/jacket hook by the door.
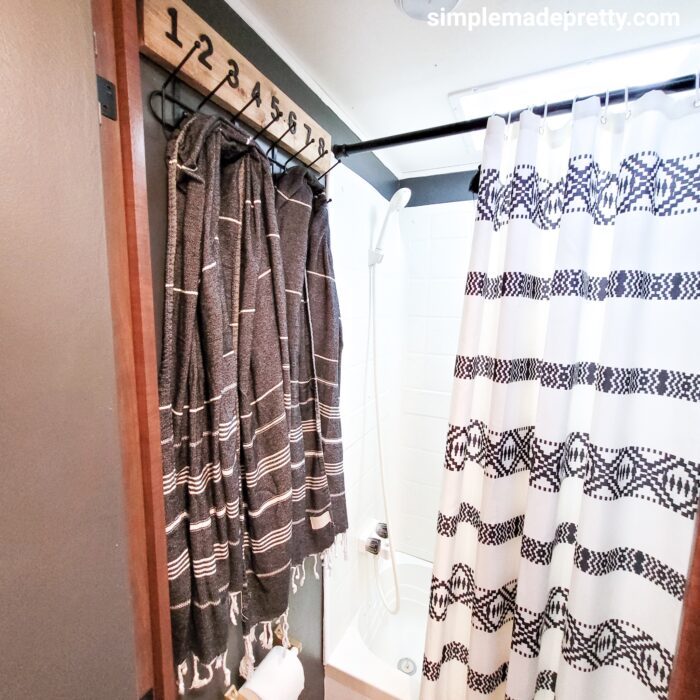
I made some decorated hooks using Dollar Tree supplies to use as bathroom towel hooks.
You can find a REEL video on my Instagram page showing how to make these hooks.
I found this camper wood sign in the clearance section for $2 and added Dollar Tree hooks to the back of it. We use it to hold extra toilet paper, a small mirror, and other items behind the toilet.
You can find a REEL video on my Instagram page showing how to make these hooks.
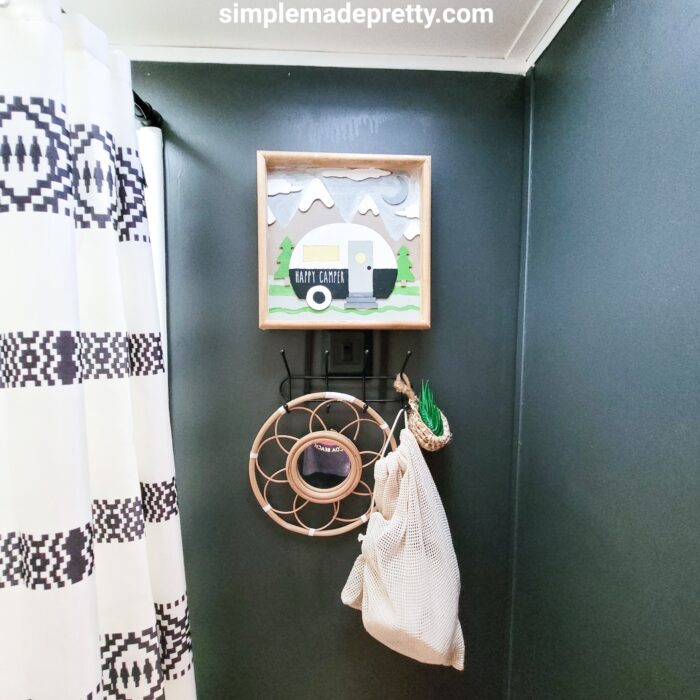
The shower curtain was removed and I used a tension rod to hang a new shower curtain.
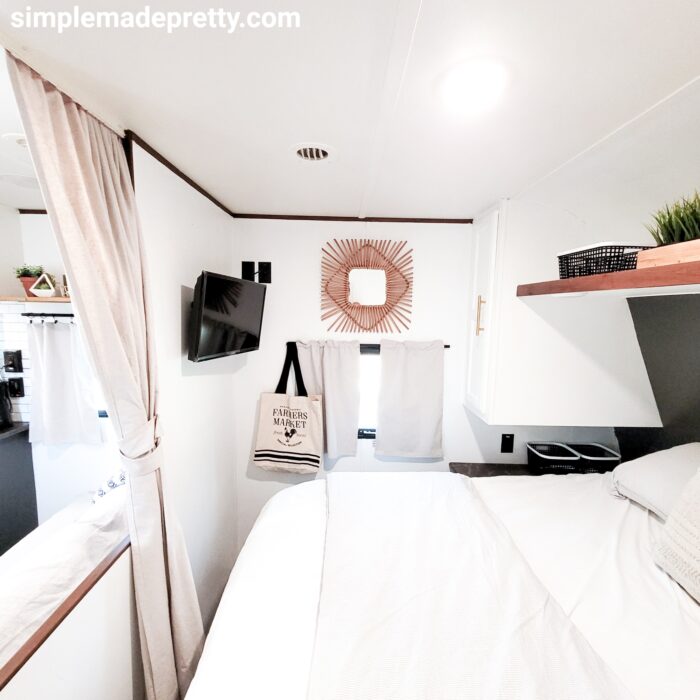
In the bedroom, I added a rattan mirror on the wall, hung a fabric bag from the curtain rod as an emergency bag, and added Dollar Tree bins by the bed to use for small items and undergarments.
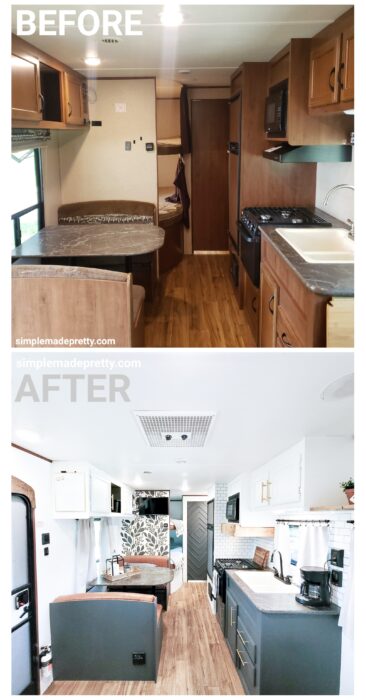
Travel Trailer Remodel Before and After Pictures
Here are all the Before and After pictures!
Is it Worth Buying a Camper?
We searched Facebook Marketplace and Craiglist for several months before we bought our used camper. We had a price in mind that we were willing to spend and we looked at a few used campers before finally purchasing this travel trailer.
Purchasing a camper was worth it for our family because it gives us the ability to travel and spend more time outdoors doing family activities.
We moved to Florida in 2018 and we want to explore areas in Florida that we’ve never been to before. Camping allows us to travel and site-see without spending a ton of money.
So far, we’ve enjoyed using our Travel Trailer, and updating the camper BEFORE our first camping trip made a huge difference in the quality of our camping experiences!
Did you update a camper inspired by this post? I would love to see it! Send me a picture on Facebook, Instagram, or email and I’ll share it with my followers 🙂
Shop our Camper:
SOURCES:
- PPG Gripper Primer
- Lower Cabinet Paint Color: BM Gray Eggshell finish
- Water-Based Polyurethane Matte finish
- High-Heat Black Matte Spray Paint
- Magnolia and Berries Stencil
- Peel and Stick Subway Tile
- Peel and Stick Flooring
- Paper Trimmer (to cut peel and stick flooring)
- Cushions Canvas Drop Cloth
- Cognac Faux Leather
- Boho Pillow Cover
- Boho Blankets
- Outdoor Lantern
- Large Battery Operated Candle
- Ikea Comforter
- Ikea Duvet Cover
- Shower Curtain
- Camper-sized Shower Curtain Liner
- Curtain rings
- Shelf brackets
- Accordion Hat Hook
WATCH THE FULL VIDEO TOUR OF OUR TRAVEL TRAILER CAMPER AFTER THE RENOVATION!
Pin this post for later
FOLLOW ME FOR MORE INSPO!
FACEBOOK: https://www.facebook.com/simplemadeprettyblog/
INSTAGRAM: https://www.instagram.com/simplemadepretty/
PINTEREST: https://www.pinterest.com/SMPblog/
YOUTUBE: https://www.youtube.com/c/simplemadepretty
TIKTOK: https://www.tiktok.com/@simplemadepretty?
Psssssttt…Right now I’m offering FREE access to our Digital Resource Library to all of our newsletter subscribers. Your private access includes dozens of free printable crafts, home decor and organization guides. Hurry up and grab your freebies here! (Access instructions are sent after subscribing).
Disclaimer: This post may contain affiliate links or a sponsored post. All opinions are always 100% mine and I don’t partner with any product or company that I don’t use and love. Please see our Full Disclosure for more information.
 Porch Remodel with Old Mill Brick Herringbone