Are you thinking of starting a blog? Maybe you’ve heard how easy it is to start a blog and get paid or maybe you just like to write or express your creative side? The main reason I started blogging was to inspire others and share creative ideas and if I made a few extra bucks on the side, then that’s even better! If you are thinking of starting a blog, keep reading for how to start a blog in less than 5 minutes (you don’t need any techy computer skills either!).
In this post, I will share step-by-step How to start a blog and how to start a profitable blog.
It doesn’t matter what type of blog you want to start, whether you want to know how to start a beauty blog, how to start a food blog, how to start a craft blog, how to start a home decor blog, or how to start a DIY blog.
I teach other bloggers how to start a blog and get paid. I’ve been blogging full-time since March of 2016 and making a full-time income and helping others do the same. If you want to know how to start a blog on Instagram… use these instructions plus start an Instagram account associated with your blog name. If you want to learn how to start a video blog, use these instructions and start a YouTube account associated with your blog name.
This post explains how to start a blog for money and links to my popular post, How Bloggers Make Money Blogging. Keep reading for how to successfully start a blog and how to start a profitable blog!
Already have a blog? Yasss! Keep reading for more info to make the most of your blog and freebies 🙂 and be sure to check out my Bloggers Toolkit, which is full of useful resources and plugins that you may not already use AND check out ALL of my blogging tips here!

Here’s a little background on my blogging journey…
Back in 2010, I started a mommy blog and I admit now that had no idea what I was doing. I love writing and wanted to make money online while being a new stay-at-home-mommy (my daughter was born that year) so I monetized my site with Google AdSense and Amazon Associates. I wrote a few sponsored posts for retailers that offered free products/giveaways in exchange for product review posts.
That blogging journey quickly ended when I started working full-time again 11 months after starting the blog. I gave up when it came to that first blog because I didn’t really think I was helping others by posting product reviews, I also didn’t know how to make a profit from it, and I felt like I needed to make use of my college degree by working in the corporate world. Fast-forward to 4 years later, and the blogging world was calling my name, so I started blogging again in January 2015.
My main reason for starting another blog was to promote my handmade products (I opened an Etsy shop the same time I started blogging in 2015) and to share ideas for home improvement, crafts, and DIY projects. Well, a year after blogging part-time, things started to get crazy at my full-time job and my Etsy shop was keeping me REALLY busy during my free time. I was stressed out and needed a major change. I was determined to make REAL money from my blog so I could quit my stressful day job to become a full-time blogger.
So in March 2016, I quit my day job to pursue my blog full-time. During that time my blog went through some MAJOR changes, including changing my blog name, and that’s when the real growth finally started to happen for me and my blog.
How my life changed…
I’ve come A LONG way through my blogging journey and it was a lot of hard work (and still is) but it is also SO WORTH IT! My life has completely changed since I took the leap to quit my day job and start blogging full time.
I get to make my own schedule, which means I see my kids and hubby more while working from home, AND my insane 2-hour daily commute is now history! I’m at the happiest point in my entire life… and life is really good ?
I will admit that making my own schedule and working from home was a HUGE transition for me. I talk more about how I was able to overcome the transition roadblocks in my post The One Rule that Changed the Way I Work a Home.
Time management is a struggle for most bloggers (especially newbies!) and finding the perfect work-life balance will make or break your success. Since I like helping my readers (that’s you!), I’m going to share my time management process with as you start (or if you are still deciding to start) your blogging journey and give you my Blogging for Business Time Management Guide as a FREE BONUS!
Get my Blogging for Business Time Management Guide for Free!
All you have to do is subscribe HERE and I’ll send you my guide for how to manage your time and create a work-life balance while creating your blog business!
How to Start a Blog
The easiest way to start a blog is by following the same simple steps I took:
- Determine Your Niche
- Pick a Blog Name
- Get Website Hosting
- Get WordPress
- Pick a Blog Theme
- Create a Logo
- Start Writing
There are a few more tips after you start writing, keep reading for more! Bookmark this page or Pin for future reference if you don’t have time to complete these steps right away!

Decide Your Niche
If you’re not sure what you want to write about, sit down and write a few key words about some things that you are passionate about. Also, include things that you are really good at. Think of subjects, activities, and hobbies that you love sharing with your friends or family. Think about things that you are really good at or your friends and family have said you are really good at.
In my case, I love creating things and making my home pretty. I also had previous experience and as a professional organizer and am passionate about being clutter-free with less stuff. I also love helping others grow. I have over 20 years of business management experience and training employees were one of my favorite parts about being a manager. I loved seeing my employees grow and get promoted. So naturally, that’s why I also write about how (you) can start a blog and grow too.
Choose Your Blog Name
I made a huge mistake when I started blogging again in 2015 and picked a name that was totally unrelated to my niche. It didn’t explain what my blog was about at all! So when I started to grow my blog in 2016, I was given the courage to change the blog name. I’m not very technical so that side of changing the name was holding me back (you can read more about everything else that goes into changing your blog name here). But I got it done and it was the best decision for my blog. Honestly, if I had to do it all over again, I would’ve left the old blog and started fresh with a new blog (it was quite costly to hire someone to help me with the transfer).
Okay, now that I’ve given you anxiety about making sure you come up with the perfect blog name, here are a few tips to come up with your blog name:
- Think about using the keywords you wrote down for your niche
- Do an online search for “another word for____” to come up with synonyms
- Arrange the keywords together to make an aesthetic sounding phrase or name
- Go for a walk and brainstorm ideas with a friend (the hubby helped me come up with my name on a walk!)
- Do a domain and social media name checker to make sure your name is available
Get Website Hosting
Now that you’ve chosen your name and checked that it’s available, you need to buy your domain and web hosting!
What is Web Hosting you ask? If you are totally new to the Internet and the blogging world, you might be wondering WHY you need web hosting. Well, basically your web host is the company that will make your website LIVE and viewable on the Internet. You should pick a web host that has a good reputation (I’m talking website speed, no downtime issues, doesn’t increase your rates, etc). Picking a good Webhost is crucial because if you go through what I went through (I switched web hosts after 12 months of blogging because my site wasn’t loading images), you’ll quickly realize that without a good host, you have no blog!
That’s why I recommend these next few hosts (whom all have a good reputation and range from beginner to advance web hosting needs).

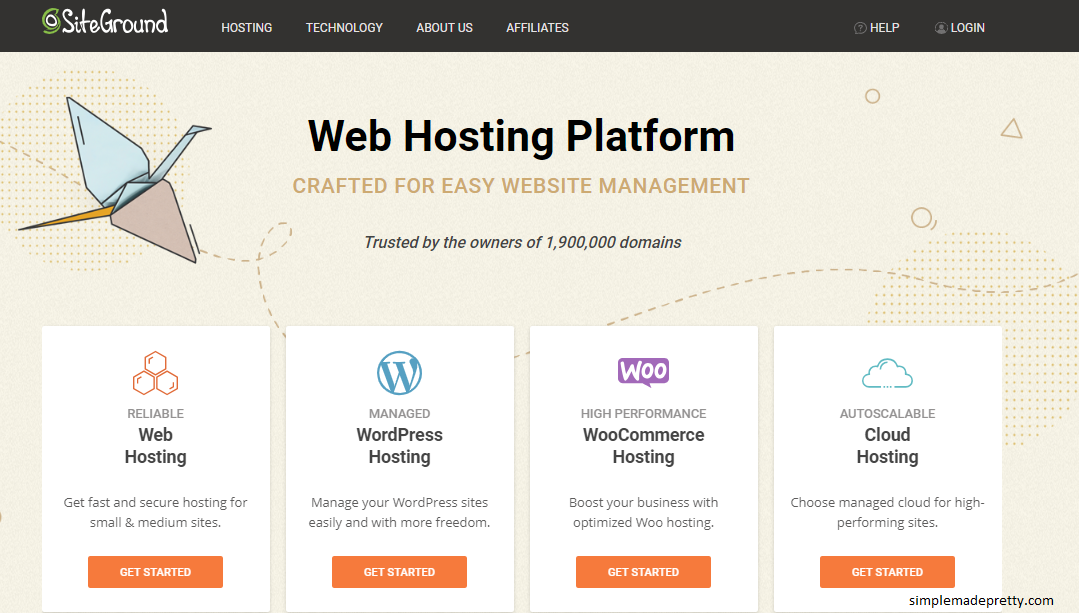
SiteGround
Many new bloggers choose SiteGroung as a host for their blog because they have great service and VERY affordable rates. When you are just starting your blog, you are probably trying to save as much money as possible with your investment in the beginning and SiteGround helps you do that!
Not only does Site Ground have the best hosting rates, but they will help you with setting up your blog, creating a secure (https) for your site at no additional charge, and they are just a phone call or Live chat away if you need assistance with anything.
–>>Try SiteGround for just $3.95 a month!
If you are not technical at all and want the fastest, easiest, and cheapest way to get your domain and web hosting, then go with SiteGround.
I started my blog with BlueHost (I do not recommend them anymore) and ended up switching from BlueHost a year after because my images started to be slow to load on my site.
Here’s how to get your domain and hosting in 6 Simple Steps…
(Keep reading for next steps after hosting!)
Here’s how I started my blog, it was super easy and you don’t need any technical skills to set up your new blog:
- Pick a Hosting site
- Choose a Domain (your www.name.com)
- Download WordPress
- Start Blogging!
–>>Start a Blog in Less than 5 Minutes by following these 6 Easy Steps! ????
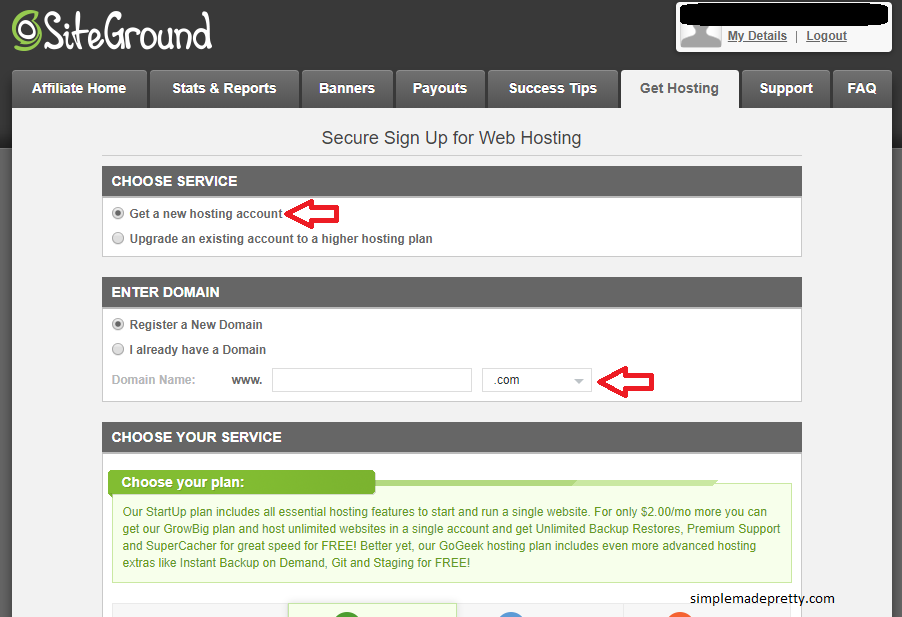
- Go to SiteGround to get started. You will need to pick a domain name – you should pick something that describes your blog – many bloggers use their personal name as well. SiteGround will let you know if the domain is available. Be sure to read my post I Changed My Blog Name and This Happened for more blogging advice on choosing a name and the pros and cons if you are thinking about changing your blog name.

- Choose to Get Started with Web Hosting and you’ll see the below packages…

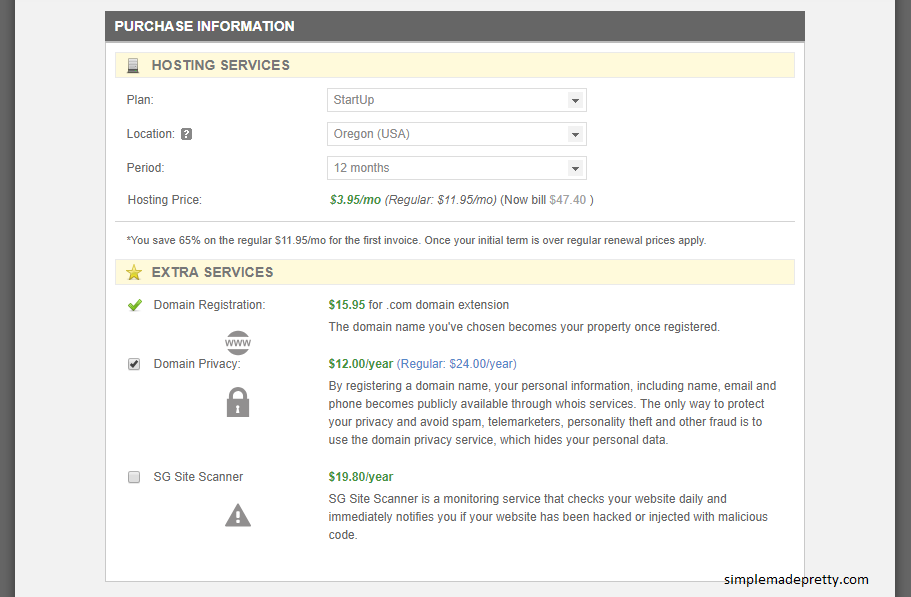
- Choose a package (most new bloggers start with the StartUp plan) and select Get Plan.
- Enter your domain name. SiteGround will let you know if the domain is available. If you purchased a domain previously (like on GoDaddy) you can also enter it here.

- Choose additional services. This is optional but I chose to have my domain as private and pay for the extra privacy fee. Check the box if you would like your domain information (your name, address, etc) to be private if someone searches who the domain belongs to.

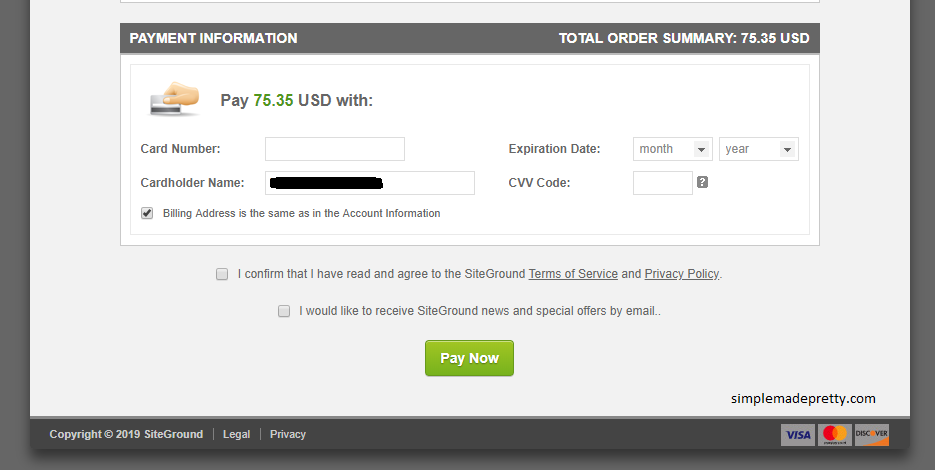
- Enter your payment information and the Pay Now button to complete your domain and web hosting purchase.

- BAM – you have a website!

Install WordPress Next
Now that you have a domain and hosting, you need to install WordPress.
Once WordPress is installed, you can start writing and sharing valuable content! Have fun getting to know the basics of using WordPress. WordPress is very user-friendly and you can search for topics in their Support Forum if you are stuck.
That’s all you need to do to if you want to start writing! Otherwise, I highly recommend picking a (paid) theme and customizing your site with a brand new logo. Keep reading for even more tips and don’t forget to check my Bloggers Toolkit for more resources and WordPress must-have plugins!
Pick a Blog Theme
WordPress has some really nice-looking free themes that you can add to your blog, but I recommend paying for a theme. The reason you will hear lots of bloggers say you should go with a paid theme is that…
- It helps your blog stand out
- Looks more professional
- Helps you seem legit (some of the free ones look spammy)
- Easier to set up pages, widgets, etc. with already set font/colors/etc.
Also, let’s face it, take a look at your favorite blogs and those sites are freaking beautiful (eh hem, I know mine is!). Haha, for reals, you can find an amazing theme at StudioPress (that’s where I got mine). Just make sure whatever theme you pick has the Genesis framework because there are some kickass plugins that only work with Genesis Framework themes.
![]()
Create a Logo
OMG! If you made it this far then you are rocking your blog setup and are ready to make a logo! I made my logo through Canva. If you have experience using another photo editing program, then use that. I like PicMonkey because you can find tons of free useful tutorials on how to make logos, make Pinterest images, Facebook images, Instagram images, marketing images, and so much more!
Start Writing
Start writing and start making Pin-Perfect images! If you want to wait to officially “launch” your blog until you have some kickass posts on it, then go for it. I just started writing but I’d recommend anyone just starting out to write 30 blog posts with amazing “what’s in it for me” titles and pin-perfect pictures. The “what’s in it for me” and good images is what are going to bring readers to your post.
A word of advice…
Blogging is not a way to get rich quickly. Many bloggers are making between $1k-$100k+ a month (yes, a month!) but it doesn’t happen overnight and there are many streams of income for bloggers to make money (see my post with 4 Simple Ways I Make a Full-Time Income as a Blogger).
It’s going to take A LOT of hard work in the beginning and you need to be committed to blogging for the long term! If you get frustrated that you are not making money right away, just remember, the successful bloggers are the ones that NEVER GAVE UP! So stay focused on the other reasons you start a blog (mine was freedom from the corporate world and increased the quality of life!).
Woohoo! The fun has just begun! Congratulations, this is the beginning of your blogging journey! Don’t forget to check out my Bloggers Toolkit and my blogging tips!
Here are some posts that might interest you in your next steps:
Grab my Blogging for Business Time Management Guide for FREE! All you have to do is subscribe HERE and I’ll send you my guide for how to manage your time and create a work-life balance while creating your blog business!
Disclaimer: This post may contain affiliate links or a sponsored post. All opinions are always 100% mine and I don’t partner with any product or company that I don’t use and love. Please see our Full Disclosure for more information.