How to Make No-Sew Floor Poufs Using Rugs | Easy DIY Floor Cushions
Floor poufs are everywhere in modern home decor — from cozy boho living rooms to relaxed family spaces. The only downside? Many retail floor cushions cost $60–$150 each.
The good news is you can make your own no-sew floor poufs using inexpensive rugs and a glue gun. This beginner-friendly DIY creates soft, durable floor pillows that work as extra seating, footrests, or decorative accents.
If you’ve ever wanted stylish floor seating without learning how to sew, this project is the perfect place to start.

🔽 WATCH ON YOUTUBE 🔽
🎥 Watch the 4-minute video above — then scroll for more freebies, links & resources below!
If you’re curious (or in a hurry)…
It’s an excellent brand glue gun and yet, you’ll also find that it is one of the cheapest options you’ll find online.
A Note About Using High-Temperature Glue Guns
High-temperature glue guns should be used with caution and children should not use high-temperature glue guns.
I highly recommend wearing finger protectors when using glue guns to protect your fingers from burns. Do not use your hands to hold glued items together or you could sustain burns on your hands as well.
A detailed tip on a glue gun makes application easier and in my opinion, might reduce the chance for burns.
What is a floor pouf?
A floor pouf is a soft cushion used for seating or as a footrest. They are popular in boho, farmhouse, and modern homes because they add casual seating without bulky furniture.
Can you make a floor pouf without sewing?
Yes. You can create a no-sew floor pouf by gluing rugs or fabric together and filling the cushion with pillow inserts or stuffing.
What fabric works best for floor poufs?
Durable materials like woven rugs, canvas, upholstery fabric, or drop cloths work best because they hold their shape and resist wear.
Where should you use floor poufs?
Common places include living rooms, playrooms, reading nooks, dorm rooms, and family rooms.
Budget Decorating, Elevated
Want your home to feel more high-end?
I created Budget to Boutique to help you turn budget-friendly finds and simple DIYs into a home that feels warm, polished, and pulled together.
No Sew DIY floor Pillows
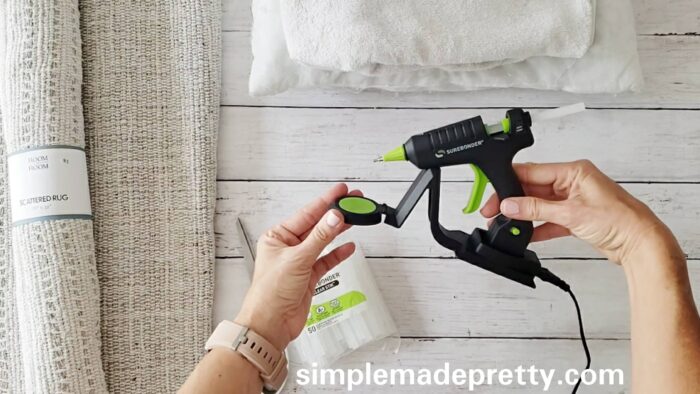
I’m using my favorite glue gun from Surebonder in this tutorial which is a mini cordless glue gun with a detailed tip. I also used a full-size dual temperature glue gun for this project to finish off the seam so it gives a stronghold if someone were to jump on these cushions.
I’m using a clear glue stick from Surebonder with the cordless mini glue gun so the initial application of glue doesn’t show on the fabric seam. You don’t want globs of glue showing… you want it to look like you sewed the fabric and that’s exactly what the Surebonder clear glue and the detailed tip glue gun does for this project. Surebonder also has a fabric glue state that you can use, but the clear sticks work fine.
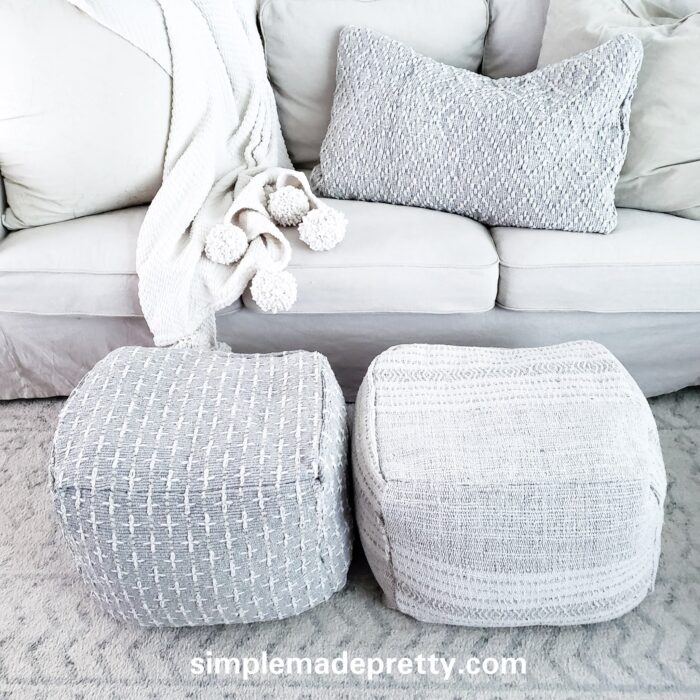
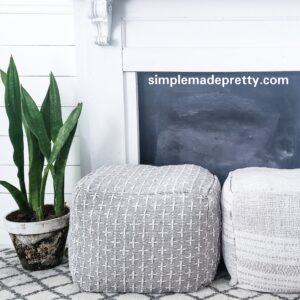
I used 3 scatter rugs found at my local Five Below store, 6 old throw pillows, and 2 old bath towels. Alternatively, you can use pillow stuffing, old blankets, or foam. I chose to recycle some old pillows that I had since I’ve collected throw pillows over the years and the hubby always complains that we have too many pillows, LOL.
Floor Pillow Tutorial
I’m including a detailed video below sharing how to make DIY No Sew Floor Pillows.
Let’s get started so you can see how easy and affordable it is to make these popular rug floor poufs!
DIY Tutorial to Make No Sew Floor Poufs
If you want to learn how to make cheap floor pillows with a no-sew method, make sure to follow my tips below! I use 2 different glue guns to achieve these no-sew rug pillow covers and I include glue gun tips after the tutorial.
Supplies:
- Cordless Mini Glue Gun
- Full-Size High Temp Glue Gun
- Clear Mini Glue Sticks
- Tough Stik Glue Sticks
- (3) Scatter Rugs (mine are 20″ x 32″)
- (6) Throw Pillow Inserts
- (2) old bath Towels
- Scissors
- Finger Protectors (to prevent glue gun burns on fingertips)
Directions:
Gather Supplies. 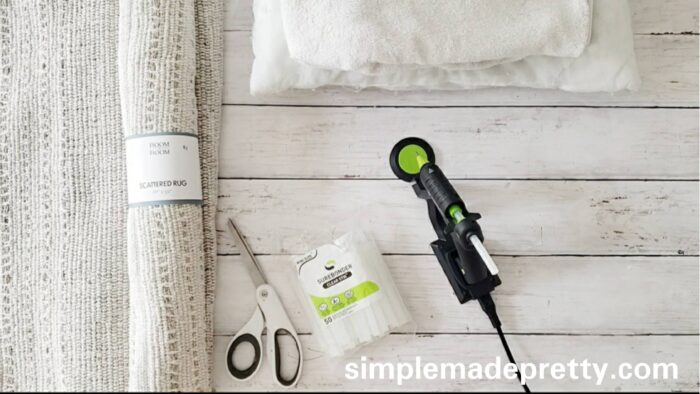
Place 2 of the rugs together, right-sides together, and glue the outside edges. Make sure the seam is completely glued and you don’t have gaps or holes. I used this high-temperature full-size glue gun and the tough stick glue stick as a second step to adhere the seam together with a strong bond. 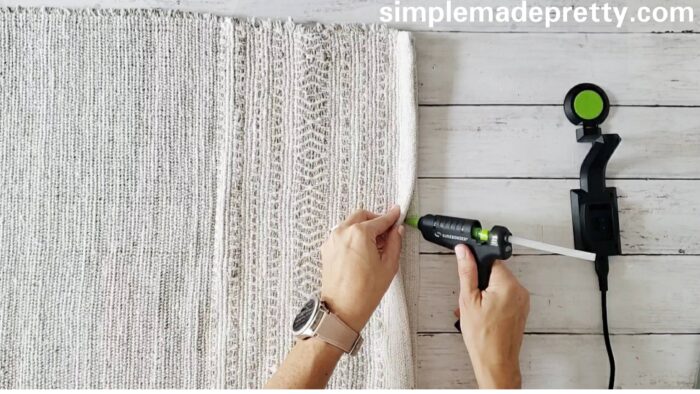
Flip the glued rugs right-side out. What I did next is a little trick that I did when I was making some cushions for our Pop Up camper recently. 
Create a fake seam by folding a little crease on the end and then glue it together. Once the folded area flue is dry, you can spread it apart and it looks as if there’s a seam there 🙂 This is a sewing hack that I did when I was sewing our camper cushions and it worked out really well. I didn’t have to cut the fabric and there wasn’t a big mess trying to sew a million pieces together. 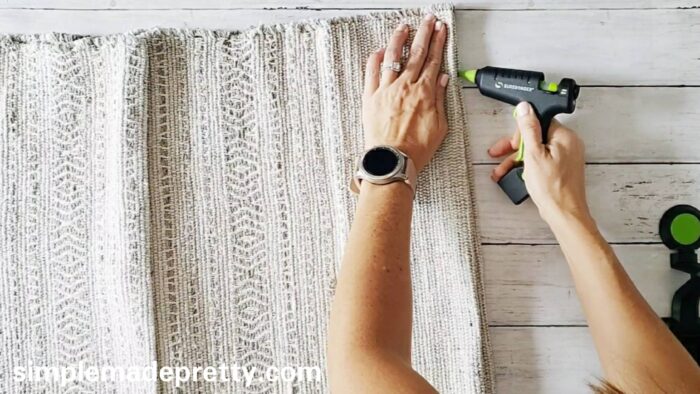
Once you have all 4 of those corners glued together, you can start stuffing your pouf. One side is going to be open while you’re working on the other side. 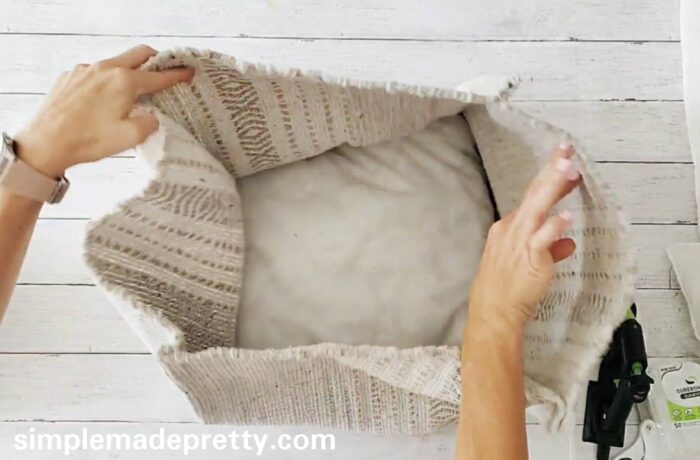
I just started putting my pillows inside with the other end open on the table. I used 18-20 inch sized throw pillows.
Take the third rug and cut it in half. 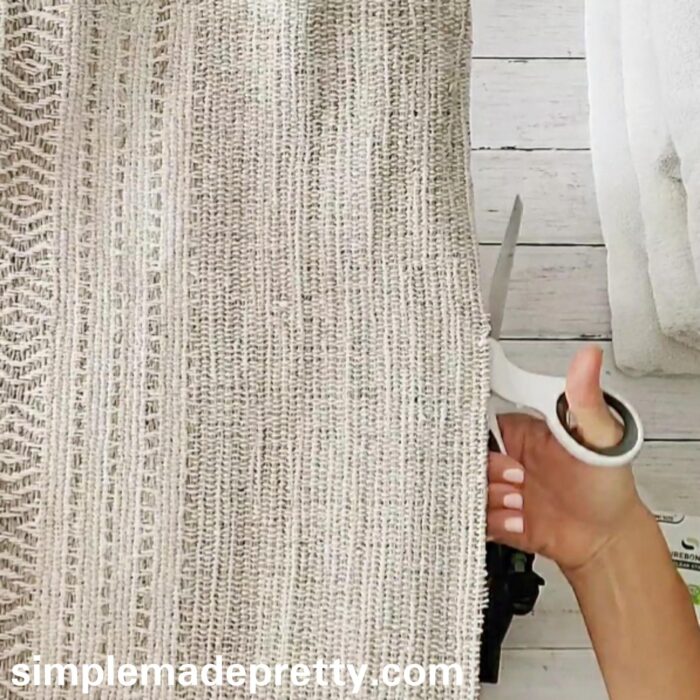
Glue the third rug half to the top of the pouf (glue all 4 sides). I ended up cutting a little strip off the end and you can actually use that little strip as a little pull handles on the sides of your pouf if you want to. I chose to skip that step, but you can add something extra to the pouf using those strips 🙂 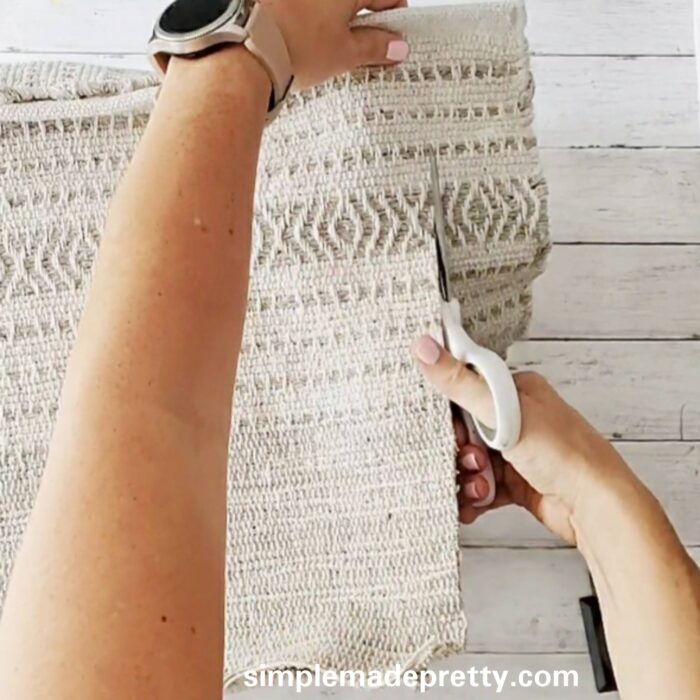

Flip the pouf over and glue the remaining third rug half to the pouf, but this time, only glue 3 sides. Remember, the pouf is still inside out. 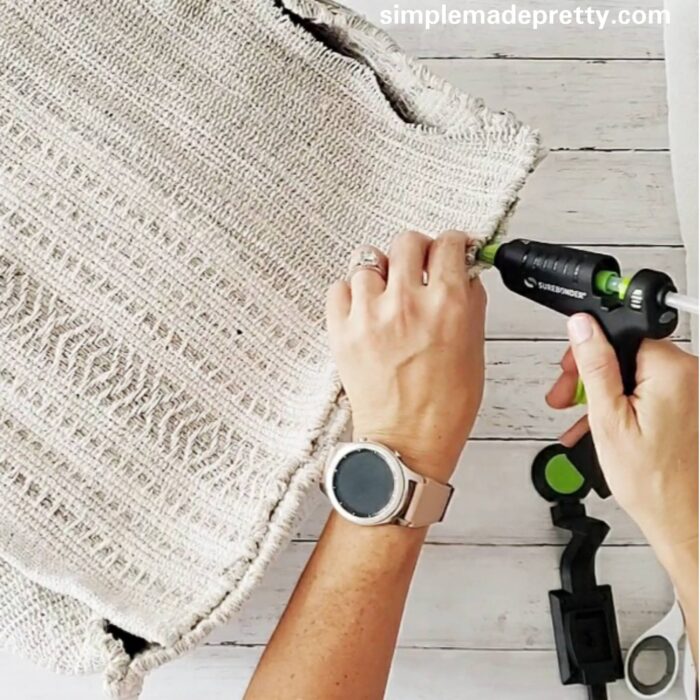
Remove all the pillows through the one opening you left unglued. 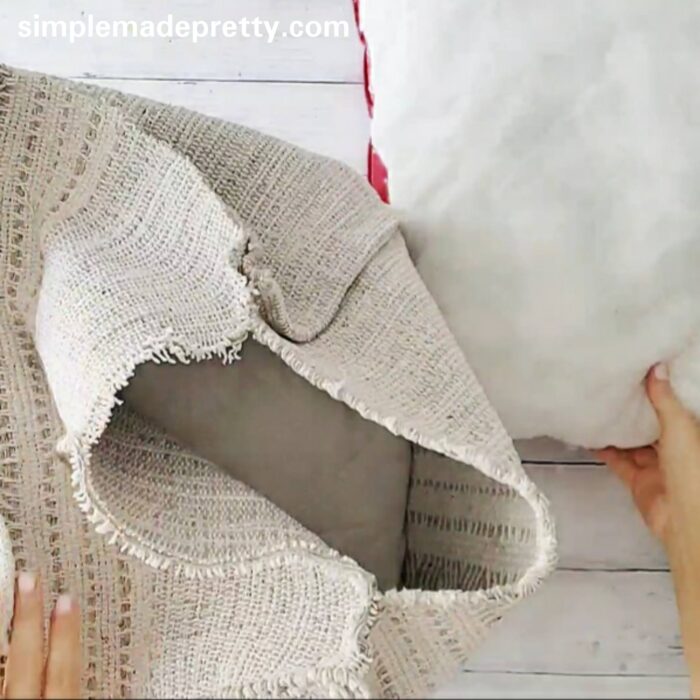
Flip the pouf right-side-out to reveal the cute little poof case that you created.
Make sure all the corners are completely closed and there are no gaps or holes.
Restuff the pouf. I used 6 throw pillows on each side so it wasn’t lumpy on the sides but it gave it a smooth appearance. I put 2 old towels in the center of all the pillows. Once I was finished with the towels in the middle, I put a pillow on top as well. So again, there’s a pillow on each side. 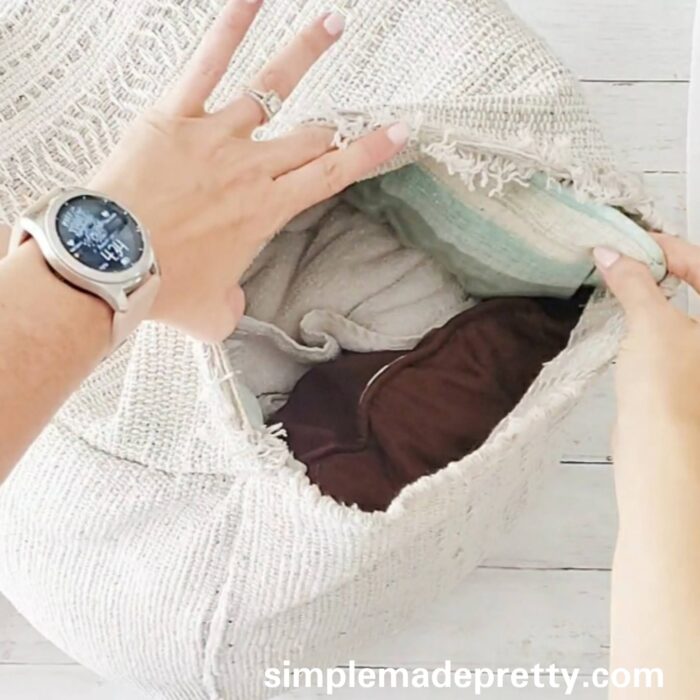
Lastly, fold down the material in the opening that you left and glue the ends to close the seam. 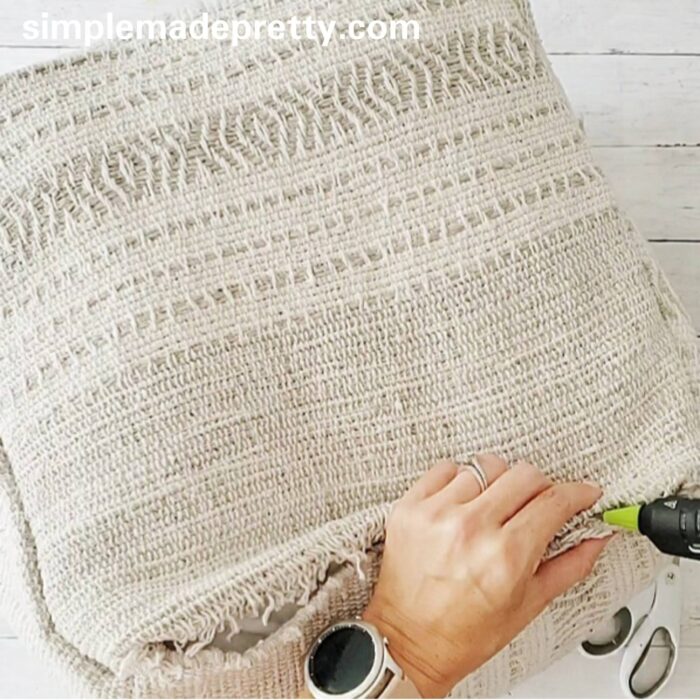
These poufs ended up costing $9.00 each to make so they are really affordable to DIY 🙂
And I also made a huge Boho pillow below using the same rugs and my Surebonder Cordless Mini Glue Gun. I stuffed the “rug pillow” with some blankets that I had sitting around the house which gave it a natural slouchy appearance. Doesn’t it look beautiful?!
Budget Decorating, Elevated
Want your home to feel more high-end?
I created Budget to Boutique to help you turn budget-friendly finds and simple DIYs into a home that feels warm, polished, and pulled together.
No-Sew Floor Poufs Tutorial Wrap Up
DIY projects like these no-sew floor poufs are proof that cozy home decor doesn’t have to come with a high price tag. With a few simple supplies and less than an hour of work, you can create comfortable floor seating that looks like it came from a boutique home store.
If you enjoy budget-friendly DIY decor, be sure to explore more projects on Simple Made Pretty — from Dollar Tree crafts to easy home organization ideas.
If you’d like to see more DIY ideas, be sure to follow me on Instagram and subscribe to my YouTube channel.
–>>You can follow me on Instagram here
Did you make this DIY or a similar one? I would love to see it! Send me a picture on Facebook, Instagram, or email and I’ll share with my followers 🙂
Print the Tutorial and Watch the Video to Make the DIY No Sew Floor Poufs
No-Sew Floor Poufs
Supplies
- Cordless Mini Glue Gun
- Full-Size High Temp Glue Gun
- Clear Mini Glue Sticks
- Tough Stik Glue Sticks
- 3 Scatter Rugs (mine are 20" x 32")
- 6 Throw Pillow Inserts
- 2 Old Bath Towels
- Scissors
- Finger Protectors (to prevent glue gun burns on fingertips)
Instructions
- Gather Supplies.
- Place 2 of the rugs together, right-sides together, and glue the outside edges. Make sure the seam is completely glued and you don't have gaps or holes. I used this high-temperature full-size glue gun and the tough stick glue stick as a second step to adhere the seam together with a strong bond.
- Flip the glued rugs right-side out. What I did next is a little trick that I did when I was making some cushions for our Pop Up camper recently.
- Create a fake seam by folding a little crease on the end and then glue it together. Once the folded area flue is dry, you can spread it apart and it looks as if there's a seam there 🙂 This is a sewing hack that I did when I was sewing our camper cushions and it worked out really well. I didn't have to cut the fabric and there wasn't a big mess trying to sew a million pieces together.
- Once you have all 4 of those corners glued together, you can start stuffing your pouf. One side is going to be open while you're working on the other side. I just started putting my pillows inside with the other end open on the table. I used 18-20 inch sized throw pillows.
- Take the third rug and cut it in half. Glue the third rug half to the top of the pouf (glue all 4 sides). I ended up cutting a little strip off the end and you can actually use that little strip as a little pull handles on the sides of your pouf if you want to. I chose to skip that step, but you can add something extra to the pouf using those strips 🙂
- Flip the pouf over and glue the remaining third rug half to the pouf, but this time, only glue 3 sides. Remember, the pouf is still inside out.
- Remove all the pillows through the one opening you left unglued. Flip the pouf right-side-out to reveal the cute little poof case that you created. Make sure all the corners are completely closed and there are no gaps or holes.
- Restuff the pouf. I used 6 throw pillows on each side so it wasn't lumpy on the sides but it gave it a smooth appearance. I put 2 old towels in the center of all the pillows. Once I was finished with the towels in the middle, I put a pillow on top as well. So again, there's a pillow on each side.
- Lastly, fold down the material in the opening that you left and glue the ends to close the seam.
Don’t forget!
✅ This is the glue gun used to make no-sew floor pillows and I use it for the DIY floor poufs in this post.
Here are More Home Improvement Tips You Might Like…
- How to Choose Interior Paint Colors
- How to Paint Kitchen Cabinets without Sanding
- Cheap Home Hacks That’ll Make Your House Look So Much Better
Pin this post with No Sew Floor Poufs for later…

Psssssttt… Want more inspiration delivered directly to your inbox? Subscribe to our FREE weekly newsletter! We provide simple ideas for Organizing, Handmade Projects, Crafts, Home Decor, and more! Hurry up and sign up here!
Disclaimer: This post may contain affiliate links or a sponsored post. All opinions are always 100% mine and I don’t partner with any product or company that I don’t use and love. Please see our Full Disclosure for more information.
 15 Ways to use the Dollar Tree Master Plan Sign