Best Paint for Pop-Up Camper Exterior
We purchased a 2005 Jayco Swift Pop Up Camper and went right to work to restore the Pop Up camper. I’m sharing my secret pop-up camper hacks and pop-up camper remodel ideas in this post! I painted the outside of our Jayco Pop Up Camper Remodel and share the Before and After pics. Investing in painting the exterior of your pop-up camper is not just about aesthetics; it’s about safeguarding your mobile haven, enhancing its longevity, and ensuring that every journey is as vibrant and welcoming as the destinations you explore. Keep reading and watch the video to see How to Paint a Pop Up Camper Exterior!

Shop our Pop Up Camper:

Can you paint the outside of a pop up camper?
Yep! I’m not going to lie though, it was a lot of work! You need to prep everything and painting to top requires a ladder and paint roller extension.
What paint to use on the exterior pop-up camper?
I used a specific brand and type of paint on our pop-up camper. Keep reading for all the details!
How do you paint the outside of an old camper?
I’ll go through the steps I took to paint the exterior of our pop-up camper. Follow each step to transform your pop-up camper. The power of paint of amazing!
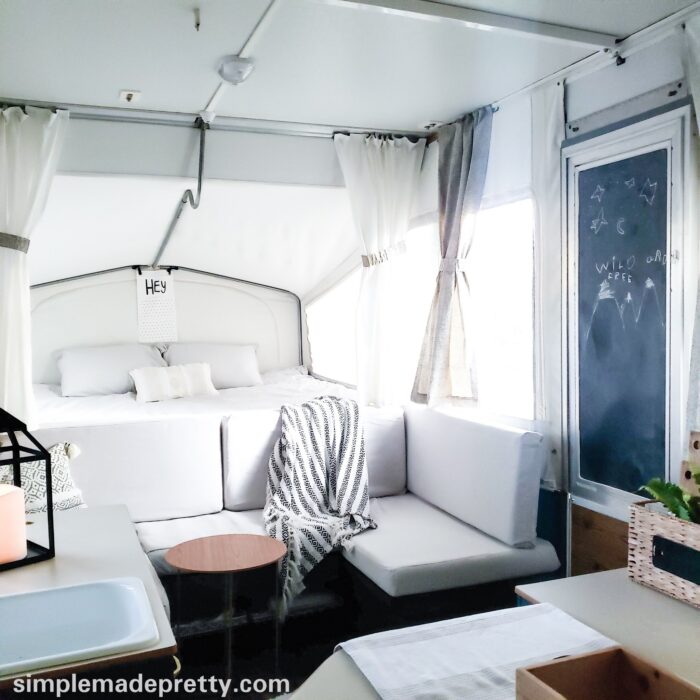
SEE OUR POP UP CAMPER INTERIOR MAKEOVER HERE!
Why Bother Painting the Exterior of a Pop-Up Camper?
Painting the exterior of a pop-up camper is more than just a cosmetic upgrade; it’s a crucial step in maintaining and revitalizing your mobile getaway. Over time, the ravages of the road, coupled with the relentless beating from the sun and the elements, can leave the exterior of your camper looking weathered and worn.
A fresh coat of paint not only breathes new life into its appearance, making your camper stand out in the great outdoors, but it also serves as a protective barrier. This layer of protection can help prevent rust and damage from moisture, ensuring that your pop-up camper remains a sturdy and inviting retreat for many adventures to come.
-> See the entire process for our Pop Up Camper Interior (and some exterior) in this post.


Steps to Paint a Pop-Up Camper Exterior
Painting the exterior of a pop-up camper can breathe new life into an old friend, transforming it into a vibrant companion for your outdoor adventures. This project requires patience, preparation, and a bit of elbow grease, but the results can be incredibly rewarding. Here’s how to go about it:
Supplies:
- High Performance Spray Paint
- Heat Gun
- PPG Timeless Exterior Paint + Primer in Semigloss
- Automotive Enamel
- Preparation is Key: Begin by thoroughly cleaning the exterior of your camper. Use a mild detergent and water to remove any dirt, grease, and grime. It’s crucial to start with a clean surface to ensure the paint adheres properly. Once clean, inspect the exterior for any signs of damage or rust. Use sandpaper to smooth out rough spots, and apply a rust-inhibiting primer to any areas affected by rust. This step is essential for preventing future corrosion.

- Remove Existing Decals and Vinyl. Use a heat gun to remove the vinyl decals from the exterior of the camper. Be careful not to scratch the metal and follow the instructions on the heat gun. I used this heat gun.

- Sanding and Priming: After cleaning and repairing the surface, the next step is to sand the entire exterior. This will help to create a smooth base for the primer and paint to adhere to. Use a fine-grit sandpaper and sand the surface lightly. Once sanded, wipe down the exterior with a tack cloth to remove any dust. I had to remove some of the caulking so keep that in mind that you will need to recaulk if you remove any old caulk.
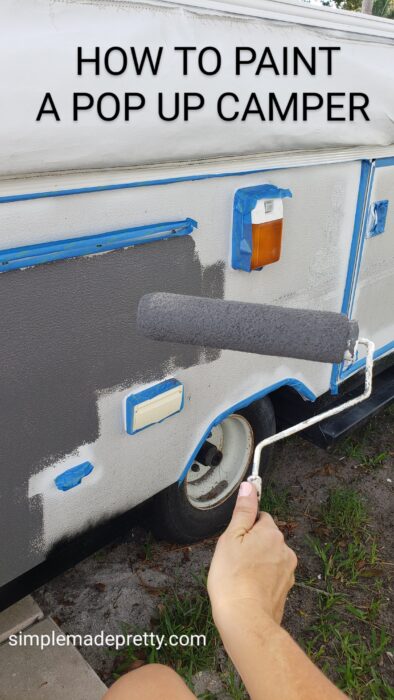
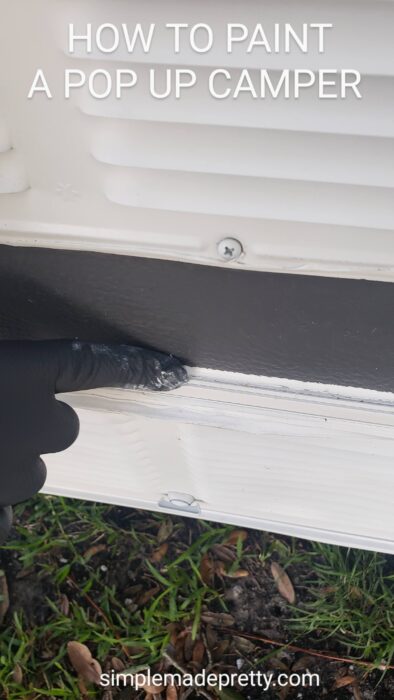
- Painting: Now, the fun part begins—painting! Choose a high-quality exterior paint suitable for the material of your camper. It’s essential to select a paint that can withstand the elements and the wear and tear of the road. I used white spray paint for the trim and let it dry.

- Then I used painter’s tape around the trim to paint the rest.
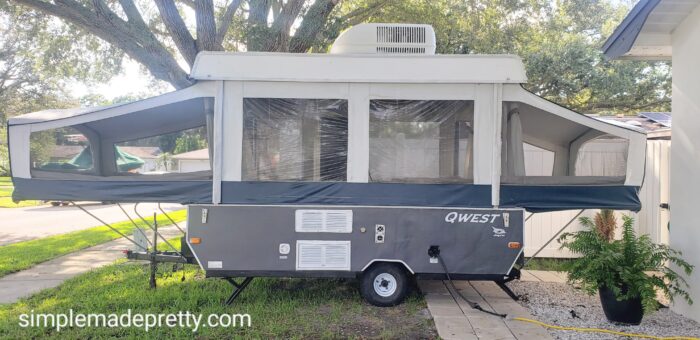
- I used PPG Timeless Exterior Paint + Primer in Semigloss with a color match of Benjamin Moore Gray for the lower half, and white roof paint for the roof. I also painted the wheel wells with the same white spray paint that I used on the trim.
- When applying the paint, use a roller for large, flat surfaces and a brush for smaller areas and corners. Apply the paint in thin, even coats, allowing each coat to dry completely before applying the next. Depending on the color and type of paint, you may need several coats to achieve the desired finish. I applied 2-3 coats.
- Final Touches: Once you’re satisfied with the paint job, consider applying a clear coat after letting the paint dry for 24 hours for added protection against the elements. This step is optional but recommended for extending the life of your paint job. Allow the paint to cure completely, which could take several days, before using the camper. I used a clear coat spray but apply evenly to avoid streaks.
- Fill in spaces with new caulk and smooth the surface.
- Add new decals to complete the exterior of the camper. I downloaded the Jayco logo and used my Cricut Machine to cut a decal to size for our camper. I used Oracal 651 permanent white vinyl.


 I also painted the wheel wells with the same white spray paint that I used on the trim.


Painting a pop-up camper is a gratifying project that can significantly improve the appearance of your camper and protect it for years to come. With the right preparation, materials, and approach, you’ll be ready to hit the road in style.


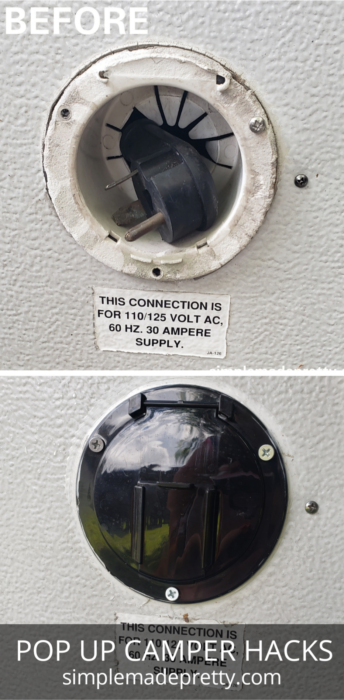
Update a Pop Up Camper Exterior
Don’t forget to update the Pop Up Camper exterior parts as well. This means replacing broken lights, covers, hinges, etc.
Pop Up Camper Exterior Paint Ideas
There are many options for pop up camper exterior paint ideas, depending on your personal style and preferences. Some popular choices include bright and bold colors, classic stripes or patterns, or nature-inspired themes. You can also consider using vinyl wraps or decals for a unique look. Ultimately, the choice is yours and should reflect your individual tastes.
Wrap Up About Painting the Exterior of a Pop Up Camper
Investing in a fresh coat of paint for the exterior of a pop-up camper is not just a matter of aesthetics; it’s a practical decision that holds significant value for any camper owner. A new paint job not only revitalizes the appearance of the camper, making it look brand new and more personalized, but it also serves as a protective layer against the elements. This shield helps prevent rust and damage from sun exposure, extending the life of the camper. Furthermore, enhancing the exterior with a quality paint job can increase the resale value of the camper, making it a wise financial decision. In essence, painting the exterior of a pop-up camper is a multifaceted investment that enhances its appearance, longevity, and value, ensuring many more memorable adventures on the road.
Shop our Pop Up Camper:
WATCH THE FULL VIDEO TOUR OF OUR POP UP CAMPER AFTER THE RENOVATION!
FOLLOW ME FOR MORE INSPO!
FACEBOOK: https://www.facebook.com/simplemadeprettyblog/
INSTAGRAM: https://www.instagram.com/simplemadepretty/
PINTEREST: https://www.pinterest.com/SMPblog/

Psssssttt…Right now I’m offering FREE access to our Digital Resource Library to all of our newsletter subscribers. Your private access includes dozens of free printable crafts, home decor and organization guides. Hurry up and grab your freebies here! (Access instructions are sent after subscribing).
Disclaimer: This post may contain affiliate links or a sponsored post. All opinions are always 100% mine and I don’t partner with any product or company that I don’t use and love. Please see our Full Disclosure for more information.
 Transform Your Backyard into a Modern Oasis