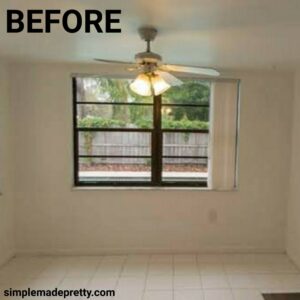
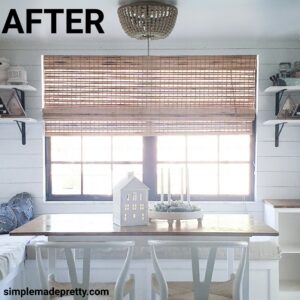
DIY Window Panes
Black window trim is very trendy and I’ve seen many home decorators changing windows from white to black and even painting white windows black. Luckily, our windows are originally black but they did not have window muntins to give them the extra cottage character I wanted. I found a window mullions kit online but the price was too high for my frugal home decor budget! So I came up with these DIY window panes and saved a ton of money while updating the look of our home! Keep reading and watch the video below to see how to make window grills (or DIY window muntins)!
Fake French Windows/Faux French Doors
You can use this technique to DIY your own Fake French Windows. Check out our sliding glass doors that now look like Faux French Doors!

In case you’re in a hurry…
How do you make faux window mullions?
I made some faux window mullions using wood trim from Home Depot and paint. See how I attached them in my tutorial below!
Can you add mullions to Windows?
Yep! Adding mullions to windows is super easy and cheap if you follow my tutorial. You don’t need any power tools either!

Can you add window grids to existing Windows?
Yes, I added window grids (window mullions) to our 30+-year-old windows.
Vertical Mullions
Our windows already have horizontal trim (window mullions) so I only needed to add vertical muntins to complete the look I was going for.
However, I made some DIY grids for our sliding glass door which required both vertical and horizontal grids. This was a bit more difficult and I had to use a level to make sure the grids weren’t slanted.
What is the difference between a mullion and a Muntin?
A mullion is a heavy vertical or horizontal piece that adjoins two windows together and a muntin is the very narrow strips of wood that divide up the individual panes within a sash (sometimes referred to as lights or lites). So technically, the window grids that I made are called muntins.
DIY Window Muntin
Before we dive into the tutorial, I want to give you a heads up about the way I installed these DIY window muntins on our windows. I put all of the grids on the inside of the windows.
So, in order to OPEN the window, you must remove the grids.
However, I make it really easy so you can remove and reattach the grids when you need to open or clean your windows!
Supplies:
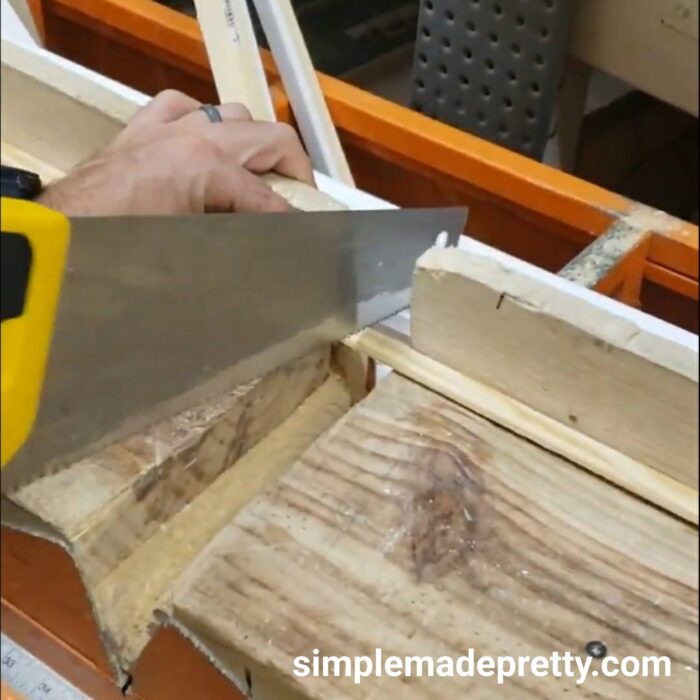
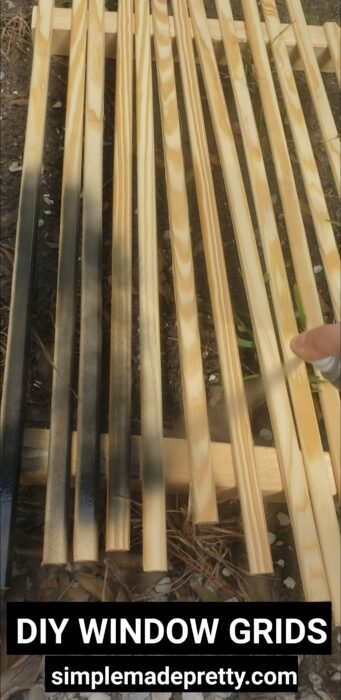
- Wood Trim (I used 1/4″ x 3/4″ pine)
- Paint to Match your windows
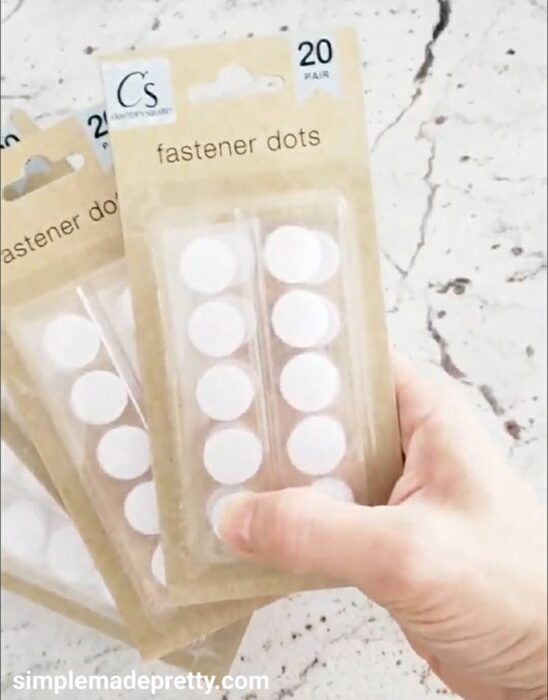
- Small Adhesive Velcro Pieces (mine are called fastener dots from Dollar Tree)
- Hand Saw
- Measuring Tape
Directions:
- Gather Supplies.

- Measure the window from top to bottom. Make sure you measure the height of the window where the velcro will be attached so you don’t see the velcro on the opposite side of the window. My velcro pieces were white but my muntin sticks were black, so if the velcro is not hidden, you would see the little white circle.
- Cut the wood trim according to your measurement. A hand saw is all you need but you can use a table saw if you prefer (I did this for some of mine and made several cuts at once to move things quickly). Home Depot has a cutting table in the store so if you have your measurements handy, you can cut all the pieces before transporting the wood trim!
- Paint the pieces that you cut… hopefully, your windows are the same size, otherwise, I recommend keeping track of which pieces fit in each window.
- I spray painted mine for a quick application.
- Before placing the muntin on the window, do a quick measurement to determine the placement of the muntin(s). Larger windows may need more than 1 muntin. I used an 8.5″ x 11″ piece of printer paper as a general idea for the size of the “squares” I wanted to create.
- Attach the adhesive velcro piece on the muntin top and bottom. I used the flat side against the glass and the raised side in the front.
- Attach the connecting velcro pieces to the window.
- Repeat for all the windows and/or doors as you desire.
- The velcro makes it possible to remove your muntins if you need to clean or open your windows.
- For the sliding glass door, I glued the pieces that overlapped so when we take down the muntins, it comes off the door as one large grid. The velcro is only on the frame of the door. We don’t use our sliding glass door so we’ve never had to take them down. Keep that in mind if you use a sliding glass door often! You could also try placing one of the grids on the exterior and one interior and that might allow you to open the door with ease.

 Home Depot has a cutting table in the store so if you have your measurements handy, you can cut all the pieces before transporting the wood trim!
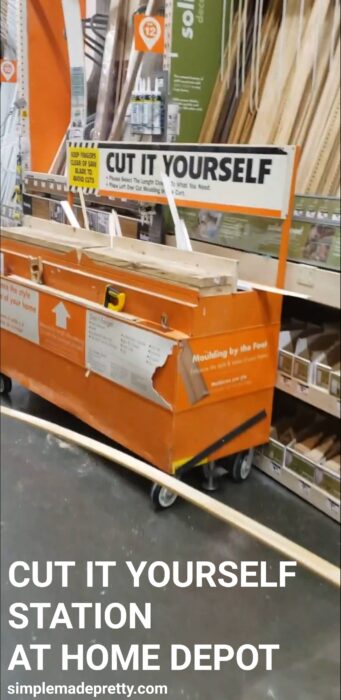

 I used the flat side against the glass and the raised side in the front.
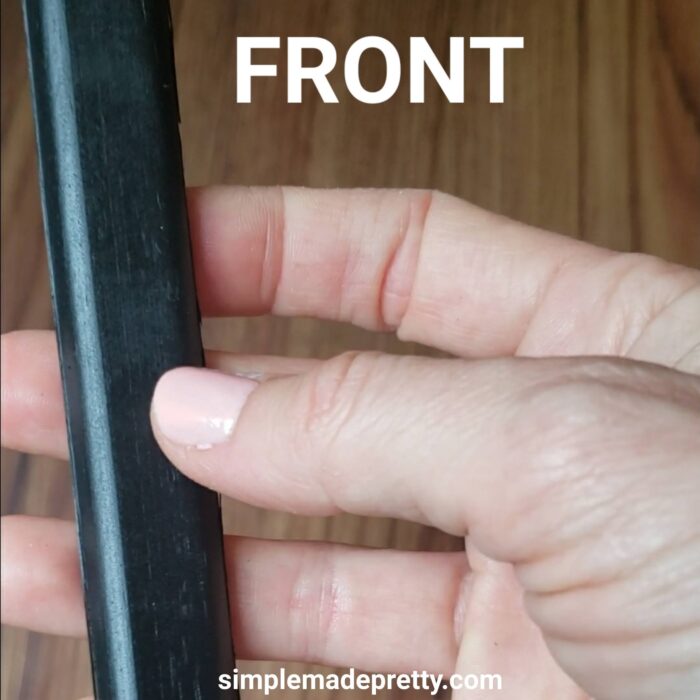
Wrap up to DIY Window Panes
These DIY Window Muntins are a cheap and easy way to update the look of your home in 1-2 days with minimal cost. I spent around $100 to update all of our windows and the sliding glass door. Our neighbors asked if we had new windows installed because they looked so good! If you want to try the black window trend with these DIY window panes, I recommend trying one window in your home. Once you see how cute and simple this project is, you will want to the rest of the windows too!
Watch the Video and Print the Instructions!
(This video was filmed for TikTok and is Vertical view ONLY)

DIY Window Muntins
Supplies
- Wood Trim (I used 1/4" x 3/4" pine)
- Paint to Match your windows
- Small Adhesive Velcro Pieces (mine are called fastener dots from Dollar Tree)
- Hand Saw
- Measuring Tape
Instructions
- Gather Supplies.
- Measure the window from top to bottom. Make sure you measure the height of the window where the velcro will be attached so you don't see the velcro on the opposite side of the window. My velcro pieces were white but my muntin sticks were black, so if the velcro is not hidden, you would see the little white circle.
- Cut the wood trim according to your measurement. A hand saw is all you need but you can use a table saw if you prefer (I did this for some of mine and made several cuts at once to move things quickly). Home Depot has a cutting table in the store so if you have your measurements handy, you can cut all the pieces before transporting the wood trim!
- Paint the pieces that you cut... hopefully, your windows are the same size, otherwise, I recommend keeping track of which pieces fit in each window. I spray painted mine for a quick application.
- Before placing the muntin on the window, do a quick measurement to determine the placement of the muntin(s). Larger windows may need more than 1 muntin. I used an 8.5" x 11" piece of printer paper as a general idea for the size of the "squares" I wanted to create.
- Attach the adhesive velcro piece on the muntin top and bottom. I used the flat side against the glass and the raised side in the front. Attach the connecting velcro pieces to the window.
- Repeat for all the windows and/or doors as you desire.
- The velcro makes it possible to remove your muntins if you need to clean or open your windows.
- For the sliding glass door, I glued the pieces that overlapped so when we take down the muntins, it comes off the door as one large grid. The velcro is only on the frame of the door. We don't use our sliding glass door so we've never had to take them down. Keep that in mind if you use a sliding glass door often! You could also try placing one of the grids on the exterior and one interior and that might allow you to open the door with ease.
Video
Don’t forget…
Pin this post with the DIY Window Muntins
More Popular Budget-Friendly DIY Ideas…
Here are related articles that you might also like!
Over The Door Organizer Dollar Tree DIY
Learn how to make a cute and functional over-the-door organizer that I made using Dollar Tree supplies. I shared this over the door organizer shown in our pantry on Instagram and YouTube recently and I knew it would be pretty popular (because I was also in love with how it turned out!) so I wanted to share this tutorial on my blog as well. This back of the door storage organizer is made with Dollar Tree supplies. I’m also giving my readers some FREE Printable Pantry labels and Blank Labels in this post!
–>>Keep reading to learn how to make this Over The Door Organizer Dollar Tree DIY!
Dollar Tree Farmhouse Wall-Mounted Mug Rack DIY
DIY these popular farmhouse mug racks made using Dollar Tree supplies! I shared these DIY wall mug racks on Instagram and I knew they would be pretty popular (because I was also in love with how they turned out!) so I wanted to share this tutorial on my blog as well. These mug racks are made with Dollar Tree supplies.

–>>Keep reading to learn how to make this Dollar Tree Farmhouse Wall-Mounted Mug Rack DIY!
DIY Dollar Store Farmhouse Ladder
If you’ve seen those farmhouse ladders used for various home decor ideas, you probably know how much they cost in high-end decor stores. I got lucky and found a large antique ladder at a yard sale but I wanted an extra farmhouse ladder to use as a planter outside so I made my own! The best part about this DIY farmhouse ladder is that it’s made using items for less than a few dollars! This ladder was so easy that I made a mini tea towel ladder (yes, tea towel ladders are a thing!) for just $3!
–>>Keep reading to learn how to make a DIY Farmhouse Ladder For $3!
21 Ways to Use Dollar Tree Wooden Houses
If you are lucky enough to find these Dollar Tree wooden houses, stock up because they can be used in many ways! I first spotted these Dollar Tree houses in Spring of 2019 and I shared a few ways I used these Dollar Tree houses in decor. I put together this post with Dollar Tree houses DIY ideas from some of my favorite Dollar Tree crafters who use the Dollar Tree houses shadow box in many different ways.
–>>Keep reading to see how you can use the Dollar Tree mini houses in your home decor!

Psssssttt…Right now I’m offering FREE access to our Digital Resource Library to all of our newsletter subscribers. Your private access includes dozens of free printable crafts, home decor and organization guides. Hurry up and grab your freebies here! (Access instructions are sent after subscribing).
Disclaimer: This post may contain affiliate links or a sponsored post. All opinions are always 100% mine and I don’t partner with any product or company that I don’t use and love. Please see our Full Disclosure for more information.

 12 Must-Have Cricut Beginner Tools and Accessories