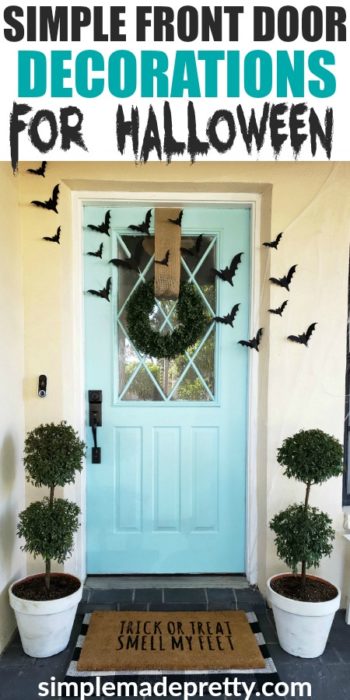
Front Porch Decorating Ideas for Halloween
Transforming your front porch into a Halloween haven doesn’t have to be a daunting task! With a few clever and budget-friendly ideas from Simple Made Pretty, you can easily create a spook-tacular entrance that delights trick-or-treaters and impresses your neighbors. Whether you’re a DIY enthusiast or just looking for some quick and easy decoration tips, this guide will help you conjure up a festive and inviting atmosphere. Dive in and discover how to turn your porch into a Halloween masterpiece with minimal effort and maximum impact! Keep reading to see this Simple Halloween Front Porch Decor!

This post was first published on October 14, 2018, and updated to reflect recent Halloween decor trends. The original post is below!
SHOP OUR HALLOWEEN FRONT PORCH DECOR

Spooktacular Halloween Front Porch Decor on a Budget: Dollar Tree & Cricut DIY Ideas
Halloween is right around the corner, and it’s the perfect time to transform your front porch into a haunted haven without breaking the bank. With a little creativity and some help from Dollar Tree and Cricut, you can create an eerie and enchanting entryway that will impress all of your trick-or-treaters.
Here are some simple and affordable DIY ideas to get you started:
Hey Boo Welcome Mat
Creating a HEY BOO welcome mat using Cricut from Simple Made Pretty is a delightful DIY project that adds a personalized touch to your doorstep, perfect for celebrating the spooky season.
This project is great for crafters of all levels, as it involves using a Cricut machine to cut out a stencil with the “HEY BOO” design. Once the stencil is ready, it’s simply a matter of placing it on a plain doormat and painting over it to bring the design to life.
The result is a charming and festive welcome mat that screams Halloween cheer, impressing guests and trick-or-treaters alike. Simple Made Pretty offers step-by-step instructions and tips to ensure your mat turns out perfectly, making it a fun and rewarding craft to tackle.

>>Find the tutorial for this welcome mat here!
Spooky Butterflies
Creating paper cut butterflies or Halloween bats using a Cricut machine can add an enchanting or spooky touch to your decor, and Simple Made Pretty offers a fantastic tutorial to guide you through the process.
The tutorial breaks down each step, from selecting the right paper and designs to setting up your Cricut machine for precise cuts. Whether you’re aiming to create a whimsical butterfly garden for a spring event or eerie bats for a Halloween party, the detailed instructions ensure even beginners can achieve professional-looking results.

With the Cricut’s precision and the clear guidance from Simple Made Pretty, your DIY decorations will be both stunning and effortless to make.
>>Find the tutorial for the Cricut paper bats here!
Pumpkin Decals
Creating DIY Cricut pumpkin decals with inspiration from Simple Made Pretty is a fun and creative way to personalize your fall decorations. Using a Cricut cutting machine, you can design and cut intricate or simple decals to adorn your pumpkins without the mess of traditional carving.
This method allows for endless customization, from spooky Halloween motifs to elegant autumn leaves or your favorite monograms. By following the easy-to-understand tutorials from Simple Made Pretty, even beginners can achieve professional-looking results. These decals not only add a unique touch to your seasonal décor but also make for great family crafting activities or gifts for friends and neighbors.

>>Find the tutorial for the Cricut pumpkin decals here!
Fall Wreath
Creating a DIY fall wreath for your Halloween front porch decor can be a fun and rewarding project, especially with the easy-to-follow guide from Simple Made Pretty.
This delightful wreath combines autumnal elements such as faux leaves, mini pumpkins, and a splash of spooky flair with small bats or spiders to capture the Halloween spirit.
Start by selecting a sturdy wreath base, then use a hot glue gun to attach your chosen decorations, layering textures and colors for a full, vibrant look. This personalized touch not only adds charm to your front porch but also showcases your creativity, making your home the standout of the neighborhood this season.
To complete your haunted porch, consider adding some real or faux pumpkins, hay bales, and spooky sound effects. And don’t forget the classic cobwebs and skeletons, which you can also find at Dollar Tree! With these simple Dollar Tree and Cricut DIY projects, you’ll have a haunted front porch that’s both festive and frugal. Happy haunting and happy crafting!

SHOP OUR HALLOWEEN FRONT PORCH DECOR
Here is our Halloween Front Porch Decor that was Featured in Women’s World Magazine in 2019.
All the sources are listed below 🙂
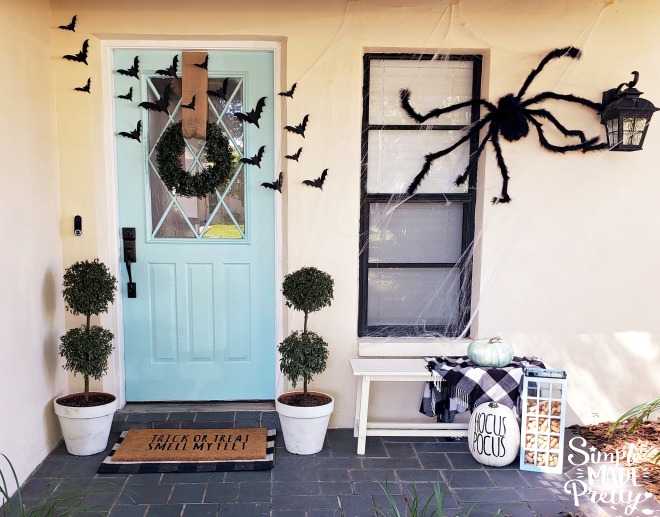
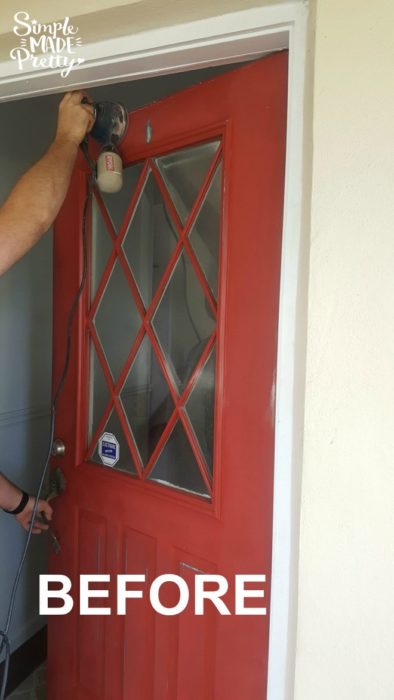
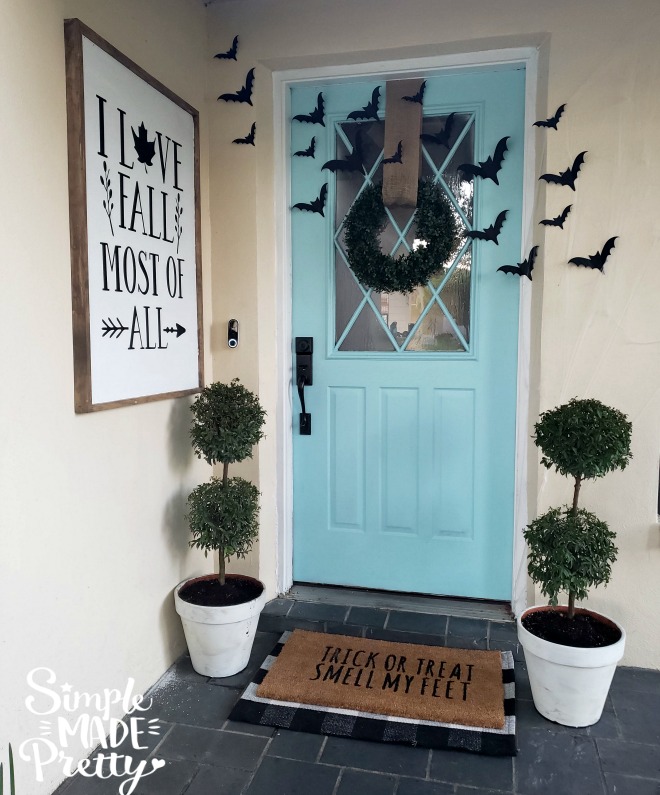
This is the paint color I used for our teal front door in case you were wondering. It’s a little bit brighter teal than some farmhouse teals but since we live 2 miles from the beach, I wanted a beach teal 🙂
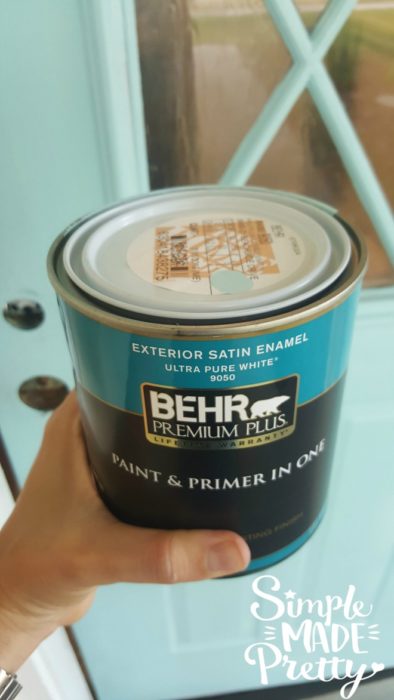
We painted the front door shortly after moving in. It was red when we bought the house but this is the first house we’ve owned without an HOA that I could finally paint teal!
I’d like to paint the house this Fall but for now, it’s a light yellow. We bought this house just a few months ago and I’m still getting used to decorating the teal front door and the front porch area. All of our previous homes had stairs leading to the front door so decorating a 1-level home is a bit different for me 🙂
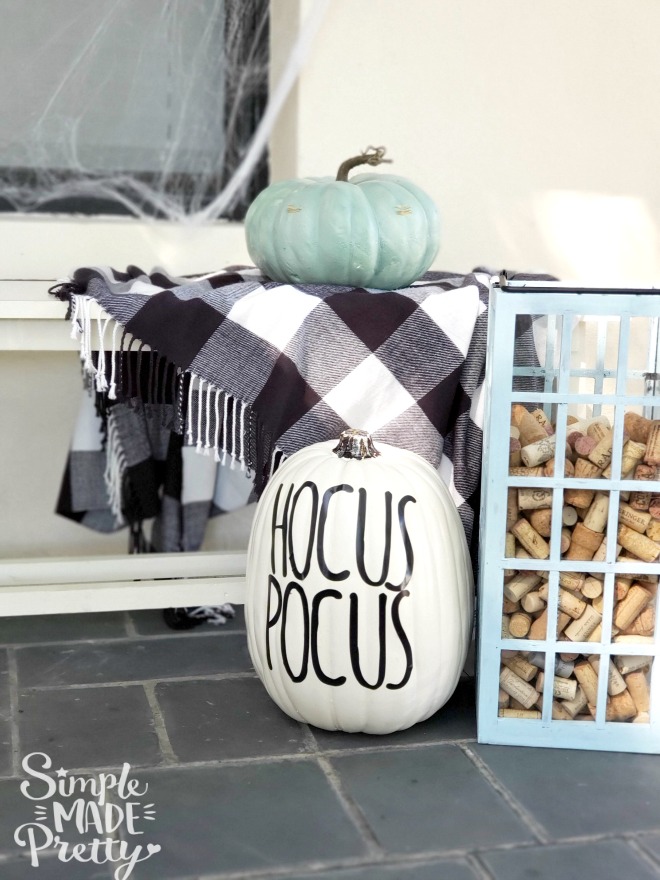
I wanted to keep the front door Halloween decor simple this year by using items I already had like the Rae Dunn inspired Halloween pumpkins pictured below.
You can find a full tutorial and free file to make the Rae Dunn Halloween pumpkins here!
I placed a white bench that I use in our office out on the porch for Halloween with a buffalo check throw and an over-sized lantern filled with wine corks.
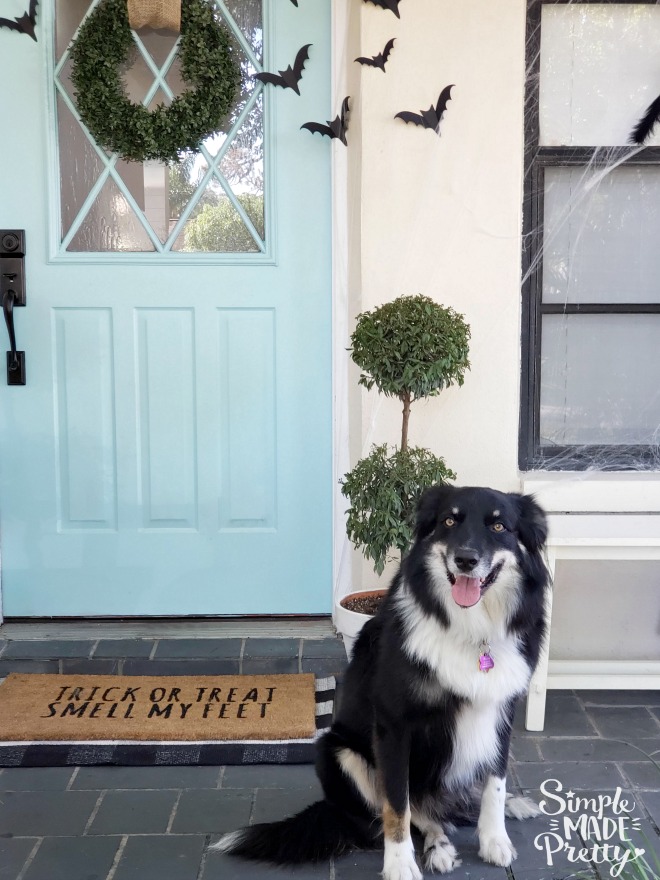
If you think you need to go out and buy a new fall wreath for a front door, think again! I used a simple faux boxwood wreath hung by burlap ribbon. I used a 3M hook on the inside of the door and tied the burlap ribbon around it so it looks like a bow on the inside. A faux boxwood wreath can be used during any season of the year and reduces the overload of seasonal decor 😛
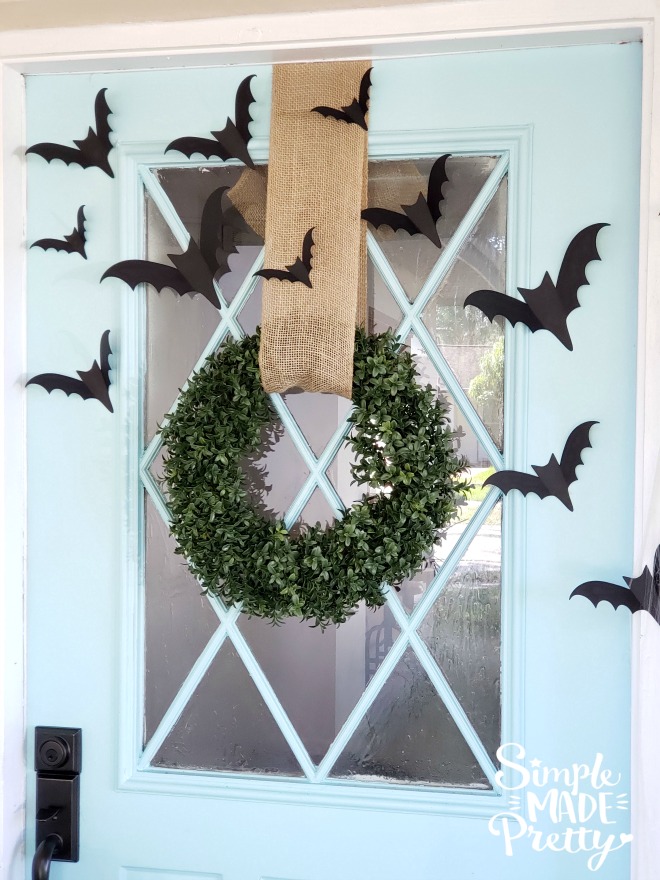
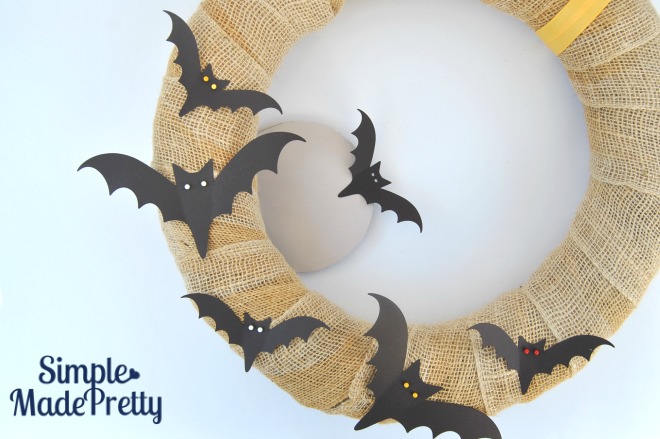
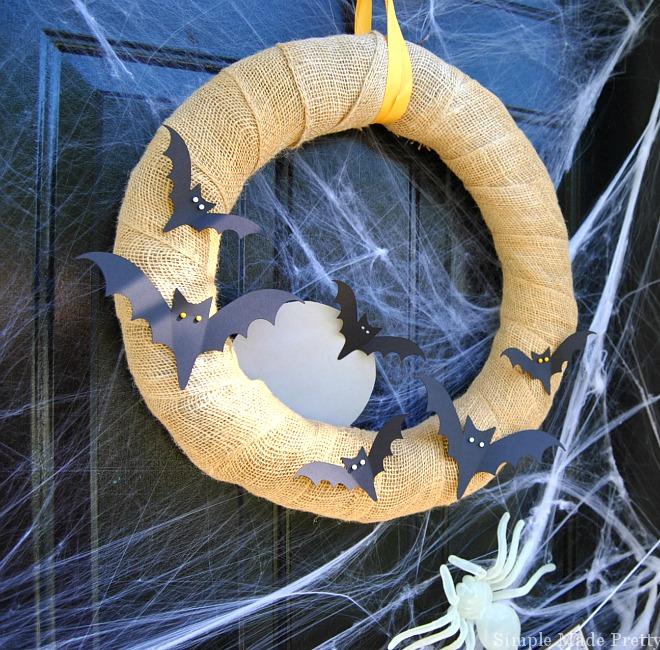
I used my Cricut Explore Air to create the bats on the front door but you can grab the FREE printable bats in my library and cut by hand. If you have a Cricut, I highly recommend a Cricut Access Membership so you get access to hundreds of Halloween images!
I use these bats every year in my Halloween decor. I attached them to the door and walls with masking tape! I used them in our family room this year and you can see them in this post!
I also used them for a #5minutecraft burlap ribbon wreath here!
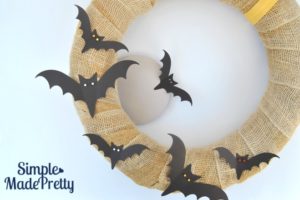
Once you have the bats cut and after Halloween, just place them in a sturdy envelope or plastic bag and put them with the rest of your seasonal Halloween storage to save for next year!
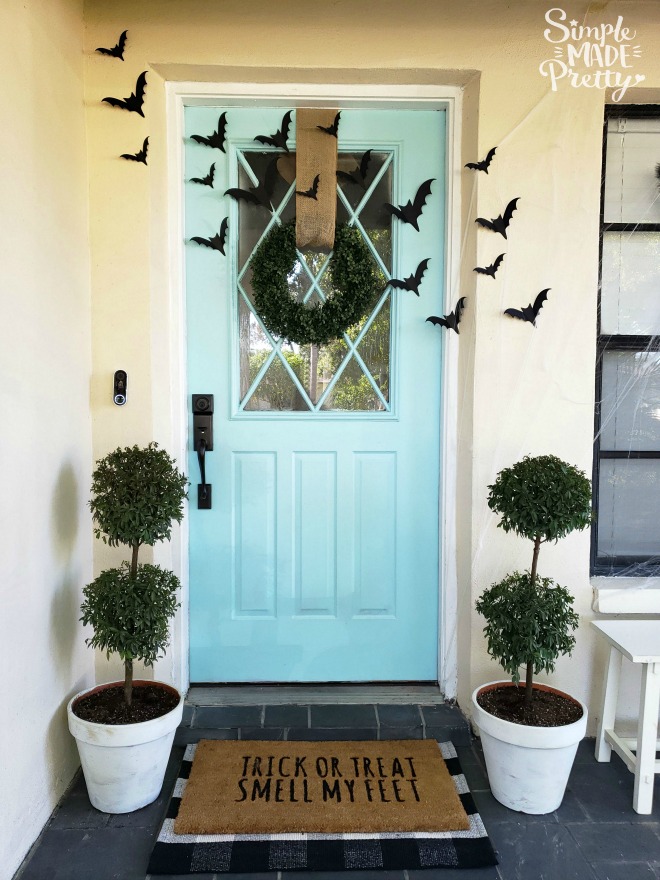
I have to admit, I’m totally clueless when it comes to plants. Especially since we moved from Virginia to Florida, I wasn’t sure which plants I could pot that would actually survive in the heat here. I saw another blogger that lives in Florida had some boxwood type trees potted by her front door so that’s what I went with! I painted some terracotta post with white chalk paint and called it a day. I’m keeping my fingers crossed that they survive! If you live in FL, please leave a comment what types of potted outdoor plants you recommend, I would love to know!
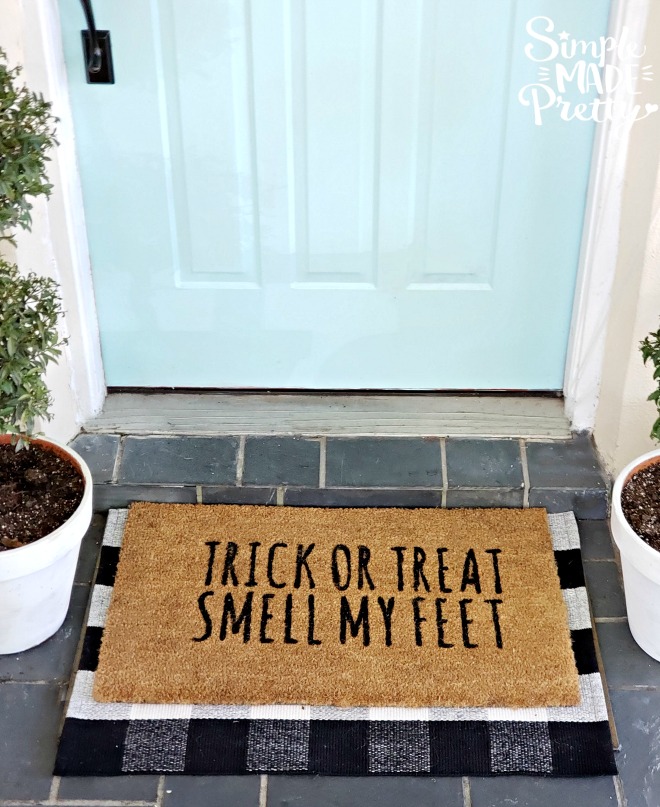
I used a fun Halloween welcome mat that I made using my Cricut Explore Air machine and did the layering decor trick with this buffalo check rug.
You can find the full tutorial and free file to make the “Trick or Treat, Smell My Feet” doormat in this post.
I also added a giant spider and a fake spider web next to the front door. I put one on our garage too (not shown).
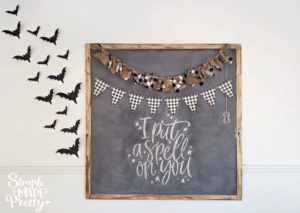
I also had time to make a Farmhouse style sign to hang outside by the front door for Fall. I repurposed another sign that I made last year and added non-permanent vinyl cut with my Cricut Explore Air. I plan to remove the vinyl and update the farmhouse sign every season for our outdoor decor!
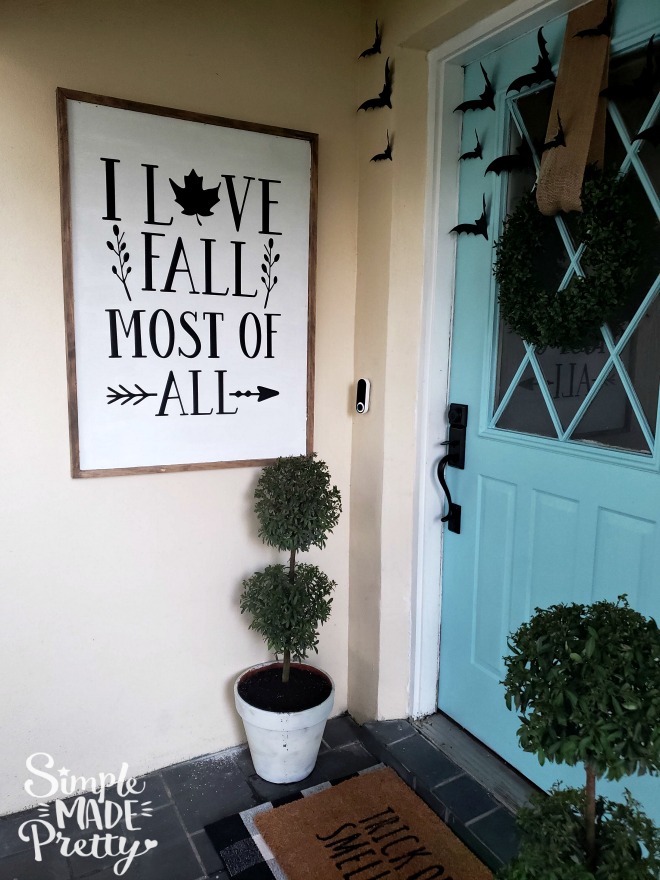
This is the first time I decorated an outdoor space with a huge sign or artwork like this and I’m really loving it! My neighbors probably love it too 😉
Read how to make your own Farmhouse style signs for only $12 in this post!
I hope you enjoyed reading about the DIY Halloween decor ideas I used for our Halloween front porch. I didn’t need to go out and spend a bunch of money of decorations since I repurposed things I already had and made the rest. This Halloween front porch can be recreated by almost anyone with the right tools and supplies. Be sure to check out my full list of recommendations for home decor and crafting here!
Sources:
- Buffalo Check Rug (this one is washable and I have one for our Kitchen door too!)
- Trick or Treat Smell My Feet Door Mat (a DIY that you can learn more about here)
- Teal Door Paint Color
- Faux Boxwood Wreath (mine is old but this one is similar)
- Wide Burlap ribbon
- Boxwood Trees (these are smaller but similar)
- Free Printable Bats
- Fake Spiderweb
- Giant Fake Spider
- White Bench (mine old is from Home Goods)
- 13″ Cream Craft Pumpkin
- Buffalo Check Throw Blanket
- Over-sized Lantern (mine is old from Home Goods, was brown and I painted teal)
- Wine corks (old – saved from all the wine we drink in our house, HAHA!)
Pin it for later…
Psssssttt…Right now I’m offering FREE access to our Digital Resource Library to all of our newsletter subscribers. Your private access includes dozens of free printable crafts, home decor and organization guides. Hurry up and grab your freebies here! (Access instructions are sent after subscribing).
Disclaimer: This post may contain affiliate links or a sponsored post. All opinions are always 100% mine and I don’t partner with any product or company that I don’t use and love. Please see our Full Disclosure for more information.
Front Porch Decorating Ideas for Halloween
 DIY Laser Cut Wooden Luggage Tags
[…] –>>You can see a Before picture of our Front Door HERE. […]