DIY Large Gnomes
Raise some Christmas magic! We show you how to build giant gnomes from Dollar Tree items. Giant your Christmas decorations and dazzle friends and neighbors with an adorable gnome. These step-by-step instructions show you how to turn a dollar store cheap pillow and fabric into a HUGE gnome. Keep reading and watch the video below to learn Dollar Tree DIY Large Gnomes Step-by-Step Instructions!
These life-size Christmas gnomes are made using mostly Dollar Tree supplies and are no-sew gnomes, using my favorite Surebonder Glue Gun.
This shop has been compensated by Surebonder. All opinions are mine alone.
If you’re curious (or in a hurry)…
It’s an excellent brand glue gun and yet, you’ll also find that it is one of the cheapest options you’ll find online.
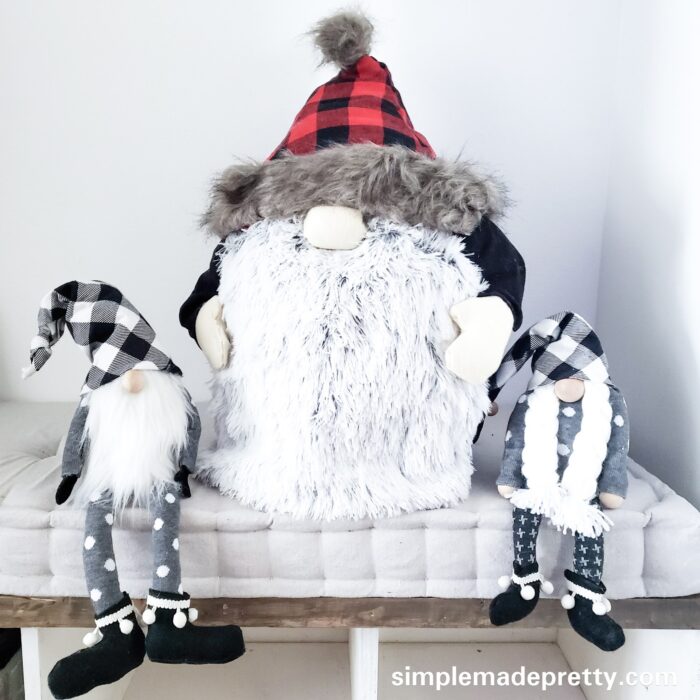
My DIY Dollar Store Gnomes were so popular that many of my followers asked me for a tutorial to make a giant gnome. In this post, I share How to Make a Large Christmas Gnome! I couldn’t find a good tutorial sharing how to make a large gnome so I made a detailed video sharing how to make a giant gnome below!
Be sure to check out my popular post to make DIY sock gnomes.
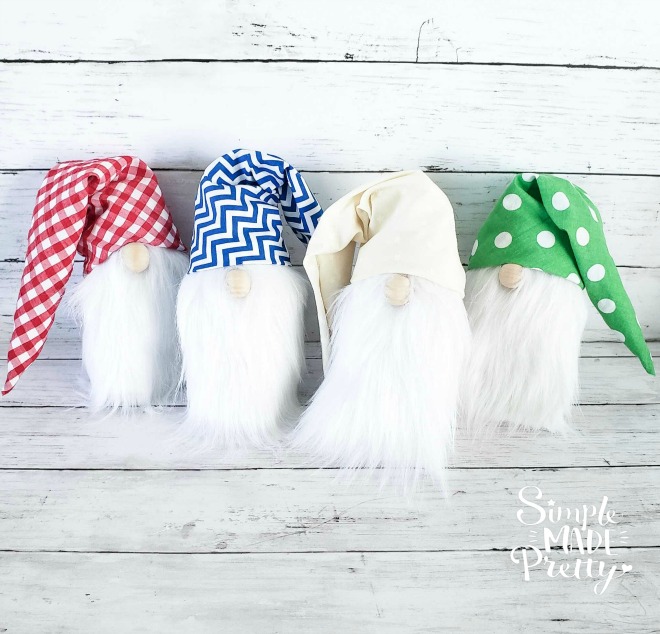
DIY Sock Gnomes
see how to make gnomes using socks!
FIND THE TUTORIAL HERE
Everything you need to make this gnome can be found at Dollar Stores or by using items you already have in your home. The fur for the beard can be found in the craft section at Micheal’s or Hobby Lobby but you can also use fur pillows, a fur blanket, or a fur rug found at Dollar Tree, Dollar General, or Five Below.
Use some leftover sewing supplies to decorate your gnomes… like pom poms, rickrack trim, lace, ribbon, and more!
Here are more popular gnomes tutorials you can find on my blog.
Use a sock gnome DIY to create an adorable gnome wreath as I did in this post!
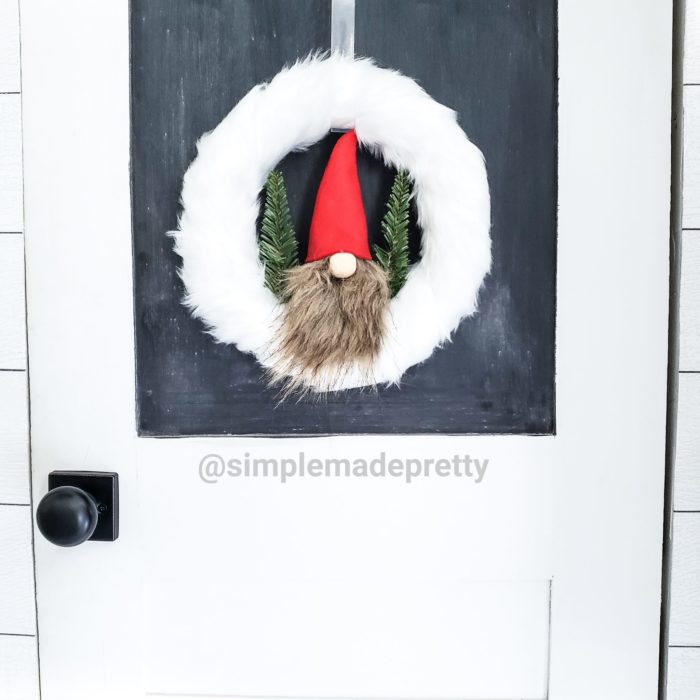
DIY Gnome Christmas Wreath
learn how to make this gnome wreath!
FIND THE TUTORIAL HERE
Create a huge gnome to use as a gnome door hanger or gnome Christmas Tree topper like the one I made in this post!
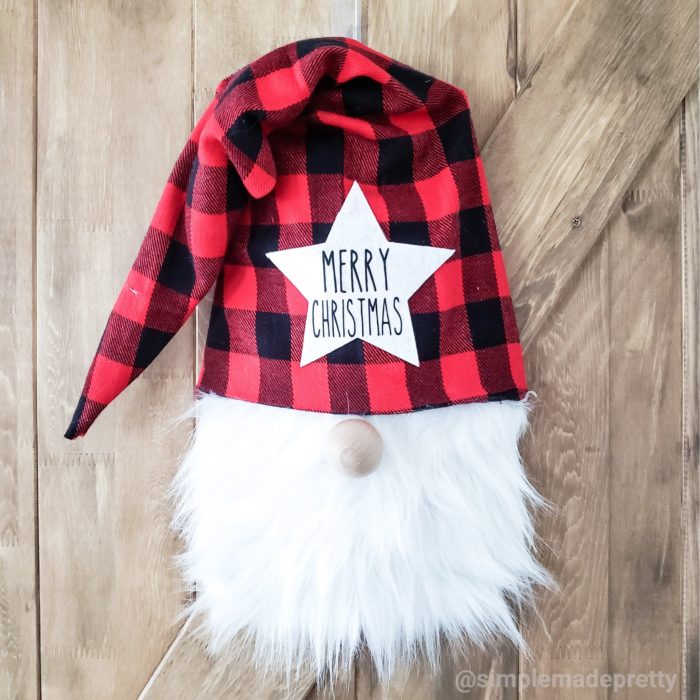
DIY Gnome Christmas Tree Topper or Door Hanger
learn how to make this gnome door hanger!
FIND THE TUTORIAL HERE
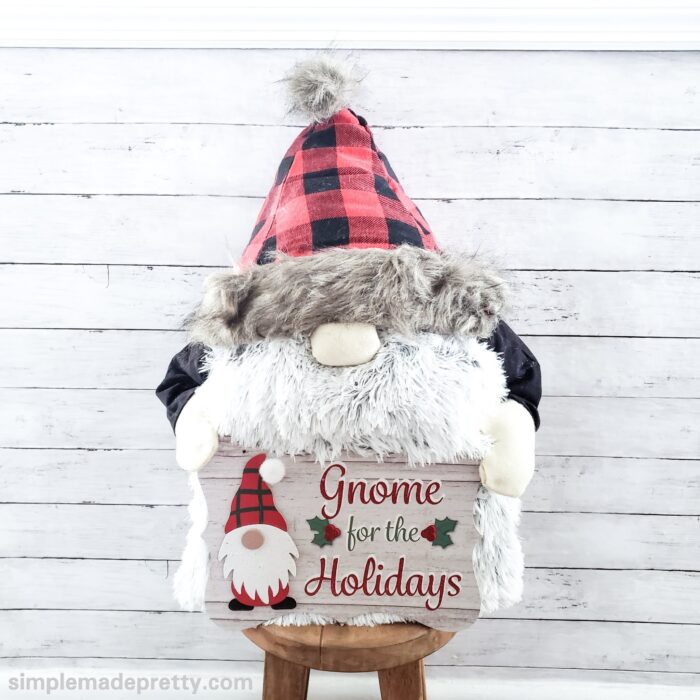
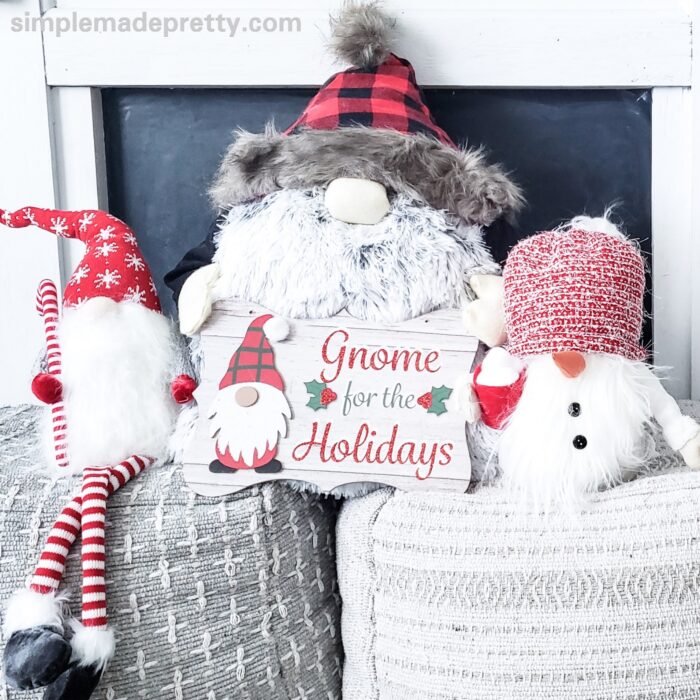
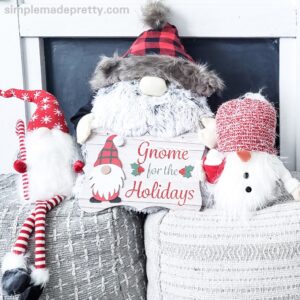
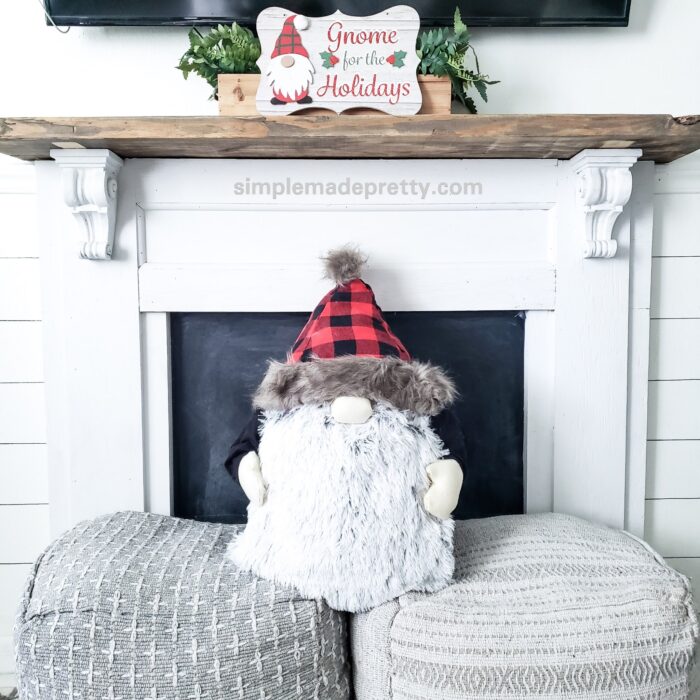
This huge Gnome can be used as a door sign or a Christmas Tree Topper! I made it to hang on our door but then we decorated our tree and I ended up using it as a tree topper. Genius, right?
Want to see my latest DIY videos in Real-Time? Follow me on Instagram and YouTube!
–>>You can follow me on Instagram here
I’m including a detailed video below sharing how to add arms and legs to sock gnomes. Be sure to watch the video to make a sock gnome in this post.
How do you make big gnomes?
The trick to make a big gnome is to use bigger supplies and more stuffing.
For this large gnome tutorial, I used a standard size bed pillow and a small t-shirt.
How do you make a large Christmas gnome?
Make a large Christmas gnome by following this tutorial and adding Christmas colors, Christmas fabrics, and textures.
What can I use for a gnome nose?
I typically use a wooden bead for a gnome nose, but in this tutorial, I used a piece of felt with pillow stuffing, tied in a ball.
Let’s get started so you can see how easy and affordable it is to make these adorable giant gnomes!
How To Make a Large Gnome
These Dollar Store Large gnomes are so easy, you will find yourself making an entire tribe of gnomes!
Supplies:
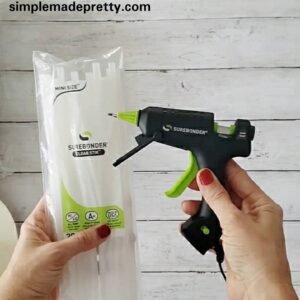
- Surebonder High Temp Mini Glue Gun
- Clear Mini Glue Sticks
- Scissors
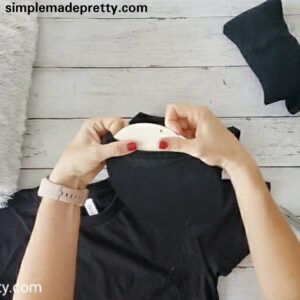
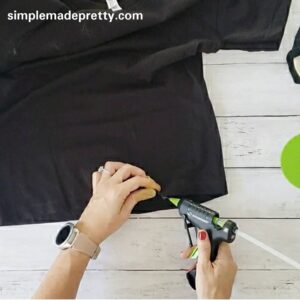
- 1 Small T-shirt (I used a black shirt)
- 2 Pieces of Felt (I used cream color)
- 1 Standard Size Pillow (or pillow stuffing)
- Fur (you can use a fur pillow, fur rug, craft fur, or fur table runner)
- 1 or 2 Hats (mine are from the Christmas section at Dollar Tree)
- 4 Athletic Socks (I used black socks from Dollar Tree)
- Sand (this is optional to add weight to the bottom and you can use craft sand, beans, or rice)
- Wood circle plaque (this is optional to create a flat surface for the bottom of the gnome, mine is from Dollar Tree)
- Finger Protectors (to prevent glue gun burns on fingertips)
Directions:
- Gather Supplies.

- If using sand for weight on the bottom of the gnome, place the bags of sands inside a sock. I did this to protect the sand from spilling and to keep the weight from shifting on the bottom of the gnome.
- Place the wood plaque inside a sock as well. I did this with the intention of using it to create a flat surface for my gnome to sit.
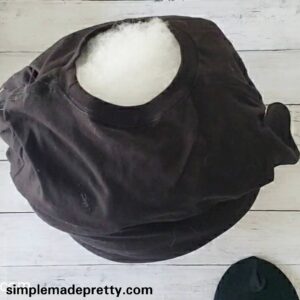
- Use your Surebonder glue gun to glue the bottom of the t-shirt together.
- Place the sand on the bottom of the t-shirt and start stuffing your gnome shirt.
- Use your Surebonder glue gun to attach the sock plaque to the bottom of the t-shirt.
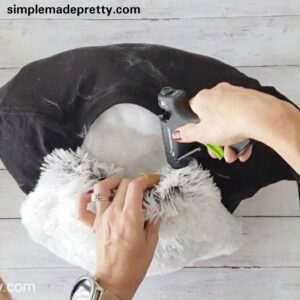
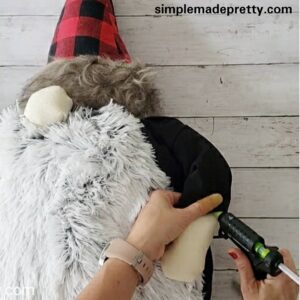
- Attach the fur to the neck of the gnome using your glue gun. I used a fur pillow from Five Below. I cut the pillow open, removed the stuffing, and attached the cut end to the neck. I did not cut the rest of the pillow to avoid fur getting everywhere! Otherwise, cutting the pillow would yield another large gnome beard 🙂
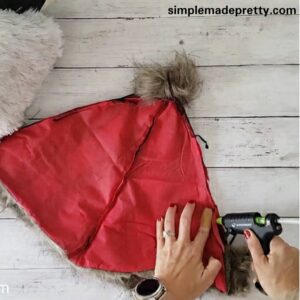
- Stuff the hat with pillow stuffing. I used 2 Christmas hats that I cut open and glued together to create 1 large hat.
- Attach the hat to the gnome using your glue gun (leave an opening for the nose).
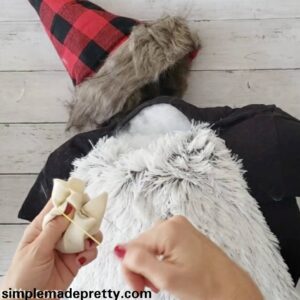
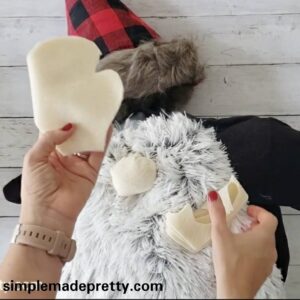
- Cut a felt square for the nose.
- Stuff the nose with stuffing and use a rubber band to create a felt ball.
- Use your glue gun to attach the nose to the beard just under the hat.
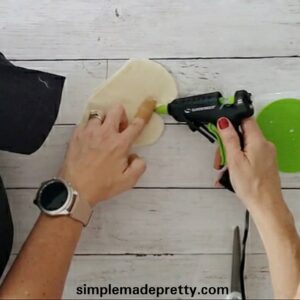
- Cut 4 felt mittens.
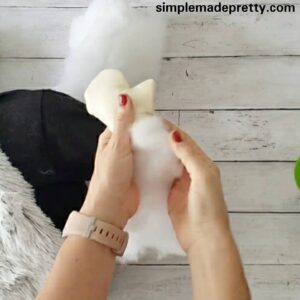
- Glue 2 mittens together and flip right side out.
- Stuff the mittens and glue gun inside the sleeves of the gnome shirt. Make sure you stuff inside the sleeves to create the arms.
- Admire your new large gnome!
- My gnome measures 22 inches tall and 15 inches wide.
- If you’d like your gnome to hold an item in his mittens: you can use tape or small square mounting tape inside the mittens.


I hope you enjoy making these no-sew large gnomes! If you’d like to see more DIY gnome ideas, be sure to follow me on Instagram and subscribe to my YouTube channel.
–>>You can follow me on Instagram here
Did you make this DIY large Gnome or a similar one? I would love to see it! Send me a picture on Facebook, Instagram, or email and I’ll share with my followers 🙂
A Note About Using High-Temperature Glue Guns
High-temperature glue guns should be used with caution and children should not use high-temperature glue guns.
I highly recommend wearing finger protectors when using glue guns to protect your fingers from burns. Do not use your hands to hold glued items together or you could sustain burns on your hands as well.
A detailed tip on a glue gun makes application easier and in my opinion, might reduce the chance for burns.

Print the instructions and Watch the Video to Make a Large Gnome:
DIY Large Gnome
Supplies
- Surebonder High Temp Mini Glue Gun
- Clear Mini Glue Sticks
- Scissors
- 1 Small T-shirt (I used a black shirt)
- 2 pieces Felt (I used cream color)
- 1 Standard Size Pillow (or pillow stuffing)
- Fur (you can use a fur pillow, fur rug, craft fur, or fur table runner)1 or 2 Hats (mine are from the Christmas section at Dollar Tree)
- 4 Athletic Socks (I used black socks from Dollar Tree)
- Sand (this is optional to add weight to the bottom and you can use craft sand, beans, or rice)
- Wood circle plaque (this is optional to create a flat surface for the bottom of the gnome, mine is from Dollar Tree)
- Finger Protectors (to prevent glue gun burns on fingertips)
Instructions
- Gather Supplies.
- If using sand for weight on the bottom of the gnome, place the bags of sands inside a sock. I did this to protect the sand from spilling and to keep the weight from shifting on the bottom of the gnome.
- Place the wood plaque inside a sock as well. I did this with the intention of using it to create a flat surface for my gnome to sit.
- Use your Surebonder glue gun to glue the bottom of the t-shirt together.
- Place the sand on the bottom of the t-shirt and start stuffing your gnome shirt.
- Use your Surebonder glue gun to attach the sock plaque to the bottom of the t-shirt.
- Attach the fur to the neck of the gnome using your glue gun. I used a fur pillow from Five Below. I cut the pillow open, removed the stuffing, and attached the cut end to the neck. I did not cut the rest of the pillow to avoid fur getting everywhere! Otherwise, cutting the pillow would yield another large gnome beard 🙂
- Stuff the hat with pillow stuffing. I used 2 Christmas hats that I cut open and glued together to create 1 large hat.
- Attach the hat to the gnome using your glue gun (leave an opening for the nose).
- Cut a felt square for the nose.
- Stuff the nose with stuffing and use a rubber band to create a felt ball.
- Use your glue gun to attach the nose to the beard just under the hat.
- Cut 4 felt mittens. I cut mine by placing 4 layers of felt together and cutting all 4 at once.
- Glue 2 mittens together and flip right side out.
- Stuff the mittens and glue gun inside the sleeves of the gnome shirt. Make sure you stuff inside the sleeves to create the arms.
- Admire your new large gnome! My gnome measures 22 inches tall and 15 inches wide. If you'd like your gnome to hold an item in his mittens: you can use tape or small square mounting tape inside the mittens.
Video
DIY No-Sew Floor Poufs
see how to make these floor poufs using Surebonder Glue Guns!
FIND THE TUTORIAL HERE
Want to see more Dollar Tree DIY videos?
–>>Subscribe to my YouTube channel here!
More Popular Dollar Store DIY Ideas
DIY Burlap Baskets using Plastic Dollar Store Bins
Tidy up your home with some DIY Burlap Baskets using Plastic Dollar Store Bins! These DIY Dollar Store baskets are simple to make using basic supplies from the Dollar Tree but look like they are from Pier One! If you are looking for storage baskets from the Dollar Store but don’t like the plastic baskets, try this burlap fabric DIY project!
Over The Door Organizer Dollar Tree DIY
Learn how to make a cute and functional over-the-door organizer that I made using Dollar Tree supplies. I shared this over the door organizer shown in our pantry on Instagram and YouTube recently and I knew it would be pretty popular (because I was also in love with how it turned out!) so I wanted to share this tutorial on my blog as well. This back of the door storage organizer is made with Dollar Tree supplies. I’m also giving my readers some FREE Printable Pantry labels and Blank Labels in this post!
–>>Keep reading to learn how to make this Over The Door Organizer Dollar Tree DIY!
Dollar Tree Farmhouse Wall-Mounted Mug Rack DIY
DIY these popular farmhouse mug racks made using Dollar Tree supplies! I shared these DIY wall mug racks on Instagram and I knew they would be pretty popular (because I was also in love with how they turned out!) so I wanted to share this tutorial on my blog as well. These mug racks are made with Dollar Tree supplies.
–>>Keep reading to learn how to make this Dollar Tree Farmhouse Wall-Mounted Mug Rack DIY!
DIY Dollar Store Farmhouse Ladder
If you’ve seen those farmhouse ladders used for various home decor ideas, you probably know how much they cost in high-end decor stores. I got lucky and found a large antique ladder at a yard sale but I wanted an extra farmhouse ladder to use as a planter outside so I made my own! The best part about this DIY farmhouse ladder is that it’s made using items for less than a few dollars! This ladder was so easy that I made a mini tea towel ladder (yes, tea towel ladders are a thing!) for just $3!
–>>Keep reading to learn how to make a DIY Farmhouse Ladder For $3!
$1 Tiered Tray DIY
I bet you’ve seen those beautiful farmhouse style tiered trays and you may be wondering how you can DIY a tiered tray using Dollar Store materials. Well, it’s so simple that you might end up addicted to making a 2 tier serving tray that you make a whole bunch for your home!
–>>Learn how to make a tiered tray for just a $1 with this Dollar Tree hack!
Pin this Gnome DIY for later

Psssssttt…Right now I’m offering FREE access to our Digital Resource Library to all of our newsletter subscribers. Your private access includes dozens of free printable crafts, home decor and organization guides. Hurry up and grab your freebies here! (Access instructions are sent after subscribing).
Disclaimer: This post may contain affiliate links or a sponsored post. All opinions are always 100% mine and I don’t partner with any product or company that I don’t use and love. Please see our Full Disclosure for more information.
 Dollar Tree Cricut DIY Halloween String Lights