Homemade Christmas Ornaments with Photos
Christmas is just around the corner, and it’s time to start thinking about decorating your home for the holidays! One of the most fun and rewarding ways to do this is by making homemade Christmas ornaments using Dollar Tree supplies and other craft supplies. Keep reading and watch the video to learn how to make these Dollar Store Homemade Christmas Ornament Ideas. Download the Free printables in my library by subscribing below.
In case you’re in a hurry…
It’s Mystery Box Day!
I received this box filled with Dollar Tree goodies for the October Mystery Box Challenge to create some DIY projects for you all!
My box came to me from Courtney from Creative on the Cheap and I sent a box to Val from Auntie CooCoo.

What is the Mystery Box Challenge?
The Mystery Box challenge was created by Courtney from Creative on the Cheap.
Every other month, she gathers talented YouTube creators to join in this challenge, and all the videos are run in a loop. So after you watch my video, be sure to jump over to Val’s channel and see what I sent in her mystery box and be sure to watch the loop until you get back to Courtney’s video.

My Dollar Tree Mystery Box Items:
My box included the following Dollar Tree items:
- Plaid Vinyl Roll
- Flocked Floral Pick
- Wicker Basket
- Truck with Tree Ornaments
- Gingerbread Men Ornaments
- Mini Ornament Signs
- Small Wood Ornament Figures
- Dollar Tree Chalkboard Easel
- Wood Blank Sign
- Small Wooden Taper Candleholders
- Dollar Tree Yellow Sponge Dish Brush(challenge item #1)
- Dollar Tree Sport Arm Band Smartphone Case (challenge item #2)
And I have to use Red OR Green Yarn and a Button in a project!
Additional Supplies Used:
- Hot Glue Gun
- Hot Glue Sticks
- White Glitter (optional)
- Puff Paint
- Aileen’s Fast Grab Tacky Glue
- Ribbon
- Wood Beads
- Craft Paint
- Felt
- Extra Fine White Glitter
These items were challenging for sure but I think I came up with some adorable Christmas Ornaments using the Mystery Box items. Most of the items in the box were from Hobby Lobby or Dollar Tree. You can find a variety of items at Dollar Tree that can be used to create unique and beautiful Christmas ornaments. Some ideas include clear plastic ornaments that can be filled with glitter, small Christmas trees that can be decorated with mini ornaments, and festive ribbons that can be used to create bows for your ornaments.
To get started with your homemade Christmas ornaments, gather your supplies and choose a theme or color scheme. For example, you could create a set of ornaments in red and green, or you could create a set of ornaments with a winter wonderland theme.
Easy Christmas Ornaments to Make
These Christmas ornament ideas are easy to make and give to others or sell for some extra cash during the holidays. Homemade Christmas ornaments can be given to friends and family as gifts, used in your own Christmas home decor, or sold at craft fairs (or Etsy shops).
Christmas Countdown Dollar Tree Chalkboard Easle Ornament Project
In this tutorial, I use the Chalkboard Easle and Truck Ornament from the Mystery Box (plus the Yarn and Button Twist!).
If you’re looking for a fun and easy Christmas ornament project, consider creating a countdown chalkboard easel using supplies from the Dollar Tree. This project is a great way to add a personal touch to your holiday decor, and it’s also a fun activity to do with family and friends.

Supplies:
- Green Yarn
- Black Buttons
- Puff Paint
- Aileen’s Fast Grab Tacky Glue
- Red Paint
- Green Puff Paint
- Red Rick Rack
- Chalk
- Thickers (or other Stickers)
Directions:
- Start by wrapping green yarn around the top of the easel and tying a bow.
- I painted the truck in red and I used green puff paint for the tree.
- Then glue black buttons to the tuck so they look like tires.
- Once the truck is dry, glue it to the bottom corner of the easel.
- I used some thick stickers from my stash to spell out “days ’till” under the yarn.
- Then I added a piece of red Rick rack to the top to give it more color.
- The yarn is the perfect spot to hold a small piece of chalk too!
This project is a great way to add some holiday cheer to your home, and it’s also a fun way to countdown to Christmas.
Christmas Cardstock Paper Bauble Ornaments Craft
In this next tutorial, I’m using the Christmas Cardstock paper stack from the Mystery Box.
Christmas is a time for warmth, love, and sharing. One of the best ways to spread joy during the holiday season is by making your own Christmas decorations. One easy and fun decoration to make is Christmas cardstock paper bauble ornaments. These ornaments are a great way to use up leftover cardstock paper and can be customized to match any color scheme or design.

Supplies:
- Christmas Cardstock Paper
- Upholstery Needle
- Floral Wire
- Wooden Beads
Directions:
- First, cut a 6-inch piece of floral wire.
- Then cut 3/4 inch strips of the 6 x 6 inch cardstock. If you have a larger piece of cardstock, then try cutting 1/2-inch strips.
- Use an upholstery needle and a foam board to puncture holes in the strip on each end and in the center.
- Thread 2 beads on the floral wire and wrap the wire around the lower bead to keep it in place.
- Then thread the wire through the paper strips with the paper facing down.
- Next, thread the wire through the ends of each strip creating loops in a counterclockwise direction.
- Place another wood bead on top to secure the paper and twist the wire to create a loop at the top.
These cardstock paper bauble ornaments are a great way to add a personal touch to your Christmas decorations while also being an affordable and easy craft project.


Wooden Nativity Christmas Ornament Project
In this tutorial, I use the small wooden taper candleholders from the Mystery Box.
If you’re looking for a fun and easy Christmas craft project, a wooden nativity ornament might be just the thing! This project is perfect for all ages and only requires a few supplies.
To get started, you’ll need some wooden craft shapes in the shape of the characters in the nativity story. You can usually find these at your local craft store or online.

Supplies:
- Wood Beads
- Twine
- Aileen’s Fast Grab Tacky Glue
- Wood Star Ornament
- Dollar Tree Jenga Block
- Small Wooden Taper Candleholders (or old-fashioned clothespins)
- White Felt
Directions:
- I used large wood beads and glued them to the wood candle holders to create Mary and Joseph figures.
- Then I took a Dollar Tree jenga block and glued a small wood bead to the top.
- I used Dollar Tree felt to wrap the Jenga block to make a baby Jesus figure.
- Glue the felt in place and then wrap baby Jesus around Mary and Joseph using twine.
- Then glue them to the wood star ornament and let it dry.
- You can also wrap brown felt around Joseph, blue felt around Mary, or paint them to add color.
This is a great project to do with kids, and it’s a wonderful way to celebrate the true meaning of Christmas.
Happy Holidays Simple Wreath Ornament DIY
In this tutorial, I use the mini basket, floral pick, and mini ornament signs.
What a lovely idea to create a simple wreath ornament. Making your own ornaments is a wonderful way to add a personal touch to your holiday decor. Here are some easy steps to create your own simple wreath ornament DIY.

Supplies:
- Mini Basket
- Twine
- Floral Pick
- Mini Ornament Signs
- Ribbon
Directions:
- I started by separating the floral pick into a smaller piece.
- Then I inserted the stem into the basket to attach it.
- I made a tiny ribbon bow and glued it to the mini ornament sign.
- Then I glued the sign to the basket and let it dry.
- I added a piece of twine to the top to hang it as an ornament.
This Wreath ornament is a quick and easy Christmas craft that anyone can do in under 5 minutes.
Fa La La La Vinyl Plaid Christmas Tree Ornament Farmhouse Sign Project
In this tutorial, I use the farmhouse wood sign and the plaid vinyl from the Mystery Box.
If you’re looking for a fun and festive DIY project to get into the holiday spirit, why not create this Fa La La La Vinyl Plaid Christmas Tree Sign? This project is perfect for anyone who loves rustic and cozy decor that’s also a little bit modern.
This Fa La La La Vinyl Plaid Christmas Tree Ornament Farmhouse Sign is sure to add a touch of festive cheer to any space!

Supplies:
- Wood Sign
- Plaid Vinyl
- Dollar Tree Gold Star Ornament
- Thicker Christmas Stickers
- Scissors
Directions:
- Use scissors to cut a triangle shape in the plaid vinyl and attach it to the wood sign.
- Cut a small square to use as the tree trunk and attach to the sign.
- Next, use some stickers such as these Thickers to add a cute message to the sign.
- Finish by adding a gold glittery star to the top like this one from Dollar Tree.
This sign is small enough to hang on a Christmas tree, use as wall art in your home for the holidays, or give as a gift.
Mickey D’s French Fries DIY Ornament
In this tutorial, I use Challenge Item #1 – a Dollar Tree Yellow Sponge Dish Brush from the Mystery Box.
When I started looking at the dish brush, all I saw was french fries so I went with it!
This easy-to-make ornament is a fun way to show off your love for McDonald’s and add a unique touch to your holiday decor.
It’s a fun and quirky way to show off your love for fast food and bring some extra cheer to your holiday season.

Supplies:
- Crafter’s Square Red Cardstock
- Dollar Tree Yellow Sponge Dish Brush
- Red Ribbon or Bias Tape
- Hole Puncher
- Scissors
- Scoring Blade
- French Fries Box Template FREE PRINTABLE
Directions:
- Cut a free printable french fries box template like this one offered at simplemadepretty.com.
- Trace and cut the template on Crafter’s Square red cardstock.
- Use a scoring blade and fold the sides.
- Glue the sides to create a french fry box and let dry.
- Next, remove the yellow sponge from the dish brush and glue it inside the french fries box.
- Use a hole puncher on the back of the back and string red ribbon or bias tape to create an ornament.
- Add a Dollar Tree white felt heart sticker to the front to complete the look of the ornament.
If you’re a fan of fast food, you might want to consider making a French Fries DIY ornament for your Christmas tree this year.
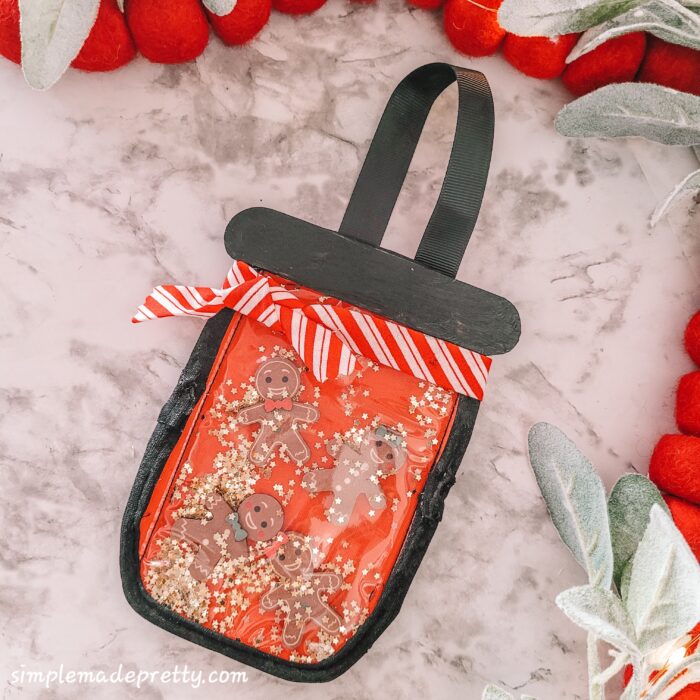
Mason Jar Gingerbread Family Shaker Ornament DIY
In this tutorial, I use the Gingerbread Men Ornaments and Challenge Item #2 – a Sport Arm Band Phone Case from the Mystery Box.
Can you believe I used a Dollar Tree sports armband phone case for this project?
Neither can I!
This adorable ornament is not only easy to make, but they are also a great way to get the whole family involved in the holiday spirit. Not only are they a fun and festive addition to your Christmas tree, but also make great gifts for family and friends.
Supplies:
- Sport Arm Band Smartphone Case
- Gingerbread Men Ornaments
- Dollar Tree Jumbo Glitter or Glitter Shakers
- Scrap Fabric or Ribbon
- Hot Glue Gun
- Hot Glue Sticks
- Pinking Sheers
Directions:
- First, I used a Cricut spatula to remove the bow from this gingerbread man because I wanted to create 2 gingerbread girls to represent our family of four. So I glued the bow to the head instead of having a bowtie.
- Then I cut the straps off the armband and started ripping the binding back because I wanted to reuse it.
- Next, I cut the armband more to resemble a mason jar shape.
- Then I used my hot glue gun to reattach the binding on the sides. Make sure to wear finger protectors when using hot glue.
- Next, I placed each gingerbread person inside. These ornaments are sticky on the back which is what I wanted.
- Then I added some jumbo glitter to the inside to create a shaker effect.
- To create the look of the mason jar lid, I cut a large craft stick to size and hot glued it to the top.
- I painted it black to match the rest of the sides.
- Next, I hot-glued a black ribbon to the back.
- I used a scrap piece of Dollar Tree peppermint fabric to wrap around the top and used pinking sheers to cut the ends.
This Mason Jar Gingerbread Family Shaker Ornament isn’t perfect but it turned out better than I expected.
Winter Christmas Mug Ornament Project
In this tutorial, I use the Small Wood Ornament Figures from the Mystery Box.
The holiday season is a time of joy and warmth, and one of the best ways to spread the holiday cheer is through DIY projects. If you’re looking for a fun and easy project, why not try making these Winter Christmas Mug Ornaments?

Supplies:
- Wood Mug Ornaments
- Felt Hearts in White
- Tube Confetti
- Small Wood Ornament Figures
- Aileen’s Fast Grab Tacky Glue
- Wood Snowflake Ornament
- Red, White, Green, Pink, and Brown Craft Paint
- Paint Brushes
- White String
- White Glitter
Directions:
- Start by painting all of the wood ornaments being used in this project. I painted the mugs, candy canes, gingerbread men, and snowflakes. This a great craft project if you like detailed painting!
- Once everything is dry, glue the gingerbread men and candy canes to the top of the mugs. Make sure to keep the ornament hole clear to access later.
- Then use white felt heart stickers (which are from Dollar Tree during Valentine’s Day) and glue them to the top to resemble whipped cream. Please note, that I did not remove the sticker backing so the hearts were more vibrant. I wish I had done this to the Fries ornament too.
- Glue the white snowflake to the front of the mug next.
- Then, dot some glue on the hearts and sprinkle some red tube confetti on top. I also used some pink shaker pieces.
- To finish it off, I used Mod Podge on the candy cane and gingerbread man, then sprinkled some white glitter on top to resemble sugar.
- Tie white string at the top to complete these mug ornaments.
These Winter Christmas Mugs and Gingerbread Men and Candy Canes Ornaments are perfect for adding a touch of holiday spirit to your home or for giving as a thoughtful and personalized gift to your loved ones.
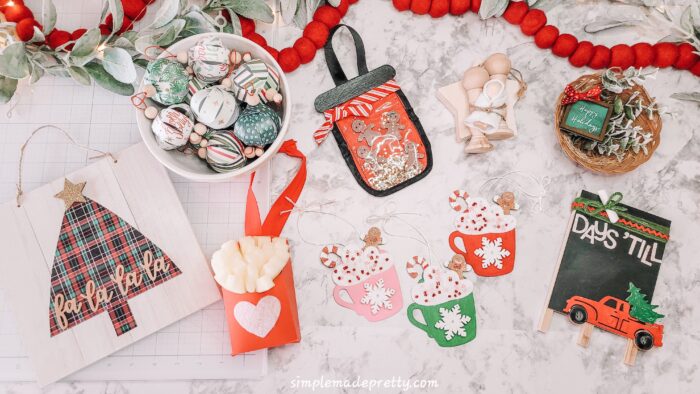
As a reminder, here are all of the Mystery Box items that I used in my video.
And here are all of the Christmas ornaments I created using these Mystery Box items!
The Mystery Box Challenge Continues
Well, I survived another Mystery Box challenge and I absolutely adore everything I created, I hope you did too!
Please let me know in the comments which one was your favorite!
Don’t forget to jump over to Val’s channel and see what I sent in her mystery box and be sure to watch the loop until you get back to Courtney’s video.
Wrap up about DIY Handmade Christmas Ornaments
In conclusion, creating homemade Christmas ornaments using Dollar Tree supplies and other craft supplies is a fun and rewarding way to get into the holiday spirit. Whether you’re a seasoned crafter or just starting out, there are endless possibilities for creating unique and beautiful ornaments that will bring joy to your home for years to come.
***Grab the Free Printable FRIES BOX Template***
New here?
If you are new to the Simple Made Pretty Community, you’ll need to sign up below to gain access to my private digital resource library where I house all of my free printable crafts, decor, checklist, & more in one convenient place!

Returning?
Welcome back! If you’ve already subscribed to Simple Made Pretty, just check your last email from me with the password to log into the library below (the instructions are sent in every email I send).

WATCH THE VIDEO ON YOUTUBE
Pin these Dollar Store Christmas Ornaments tutorials for later…

Here are More Christmas Dollar Tree DIY Ideas You Might Like…
Mystery Box Challenge: Amazing Dollar Tree Christmas Decor Crafts
The Step By Step Guide To Making A Christmas Ornament Garland
Psssssttt…Right now I’m offering FREE access to our Digital Resource Library to all of our newsletter subscribers. Your private access includes dozens of free printable crafts, home decor and organization guides. Hurry up and grab your freebies here! (Access instructions are sent after subscribing).
Disclaimer: This post may contain affiliate links or a sponsored post. All opinions are always 100% mine and I don’t partner with any product or company that I don’t use and love. Please see our Full Disclosure for more information.
 9 Fall Free Printables