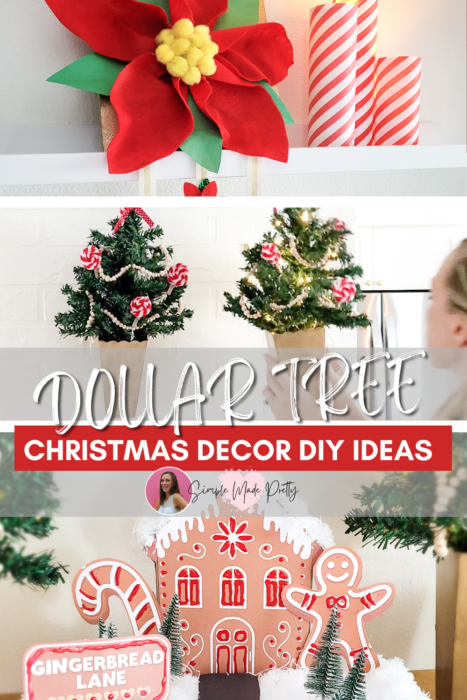
DIY Christmas Decor Crafts On A Budget (With Pictures)
Are you looking for the best DIY Christmas crafts? Here are some DIY Christmas decor crafts on a budget. Make your own decorations rather than buy them and spend less. It’s not only budget-friendly, but it’s a great way to get a custom look. All of the best DIY Christmas crafts are right here! Keep reading and watch the video to learn how to make these Amazing Dollar Tree Christmas Decor Crafts. Download the Free printables in my library by subscribing below.
In case you’re in a hurry…
It’s Mystery Box Day!
I received this box filled with Dollar Tree goodies for the October Mystery Box Challenge to create some DIY projects for you all!
My box came to me from Whitney from Whiskey & Whit. I sent a box to Jennifer at Little Bit of Calm and Crazy.
What is the Mystery Box Challenge?
The Mystery Box challenge was created by Courtney from Creative on the Cheap.
Every other month, she gathers talented YouTube creators to join in this challenge, and all the videos are run in a loop. So after you watch my video, be sure to jump over to Jennifer’s channel and see what I sent in her mystery box and be sure to watch the loop until you get back to Whitney’s video.
You’ll see a lot of excellent Dollar Tree craft ideas and I hope you’ll be inspired to create something too.
This is my first mystery box and it’s filled with Dollar Tree items this round. Whitney sent me 2 challenge items that I have to use and I also have to use a pipe cleaner and a clothespin in a project for this challenge.
My Dollar Tree Mystery Box Items:
My box included the following Dollar Tree items:
- Small Wooden Dowels
- Wooden House (similar)
- Pumpkin Pie Sign
- Construction Paper
- Red Felt
- Red & Green Puff Paint
- Styrofoam Wreath Form
- Wooden Circle Plaque
- Mini Bottle Brush Christmas Trees
- Door Stoppers (challenge item #1)
- Pop Corn Buckets (challenge item #2)
And I have to use a pipe cleaner and a clothespin in a project!
These items were challenging for sure but I think I came up with some adorable Christmas decorations using the Dollar Tree Mystery Box items.
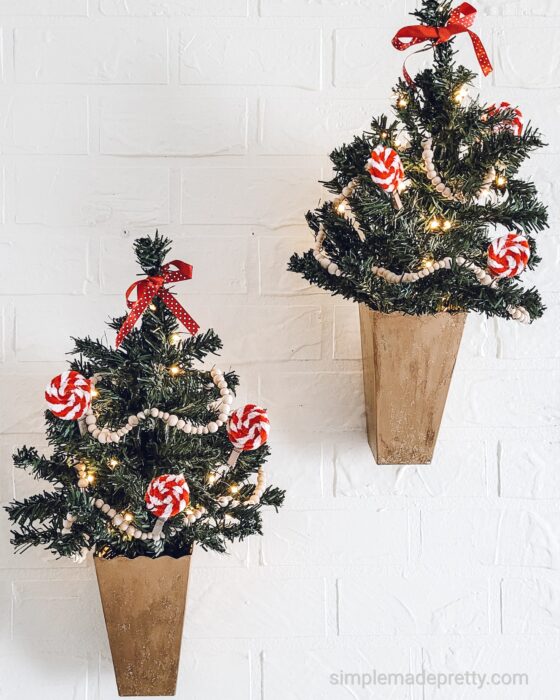
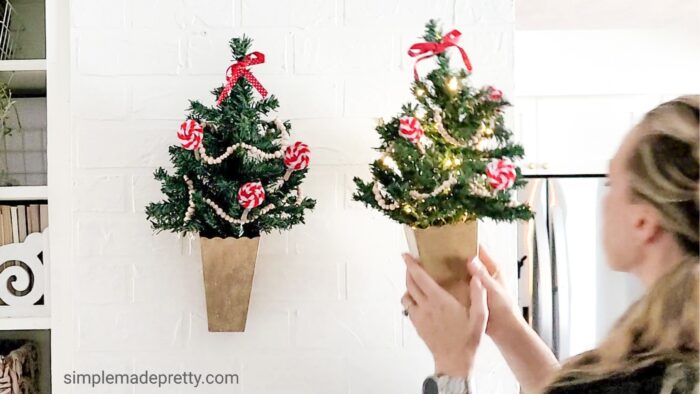
Wall-Mounted Peppermint-themed Christmas Trees
In this tutorial, I use Popcorn Buckets, Door stops, Pipe Cleaners, and Clothespins.
Supplies:
- Dollar Tree Popcorn Buckets
- Door stops
- Gold Spray Paint
- Brown Craft Paint (optional)
- Gold Glitter Paint (optional)
- Christmas Trees
- Red & White Striped Pipe Cleaners
- Craft Clothespins
- Hot Glue Gun
- Hot Glue Sticks
- E6000 Glue
- Ribbon
- Wood Beads (optional)
- Fishing line (optional)
Directions:
- Glue the doorstop to the back of the popcorn bucket to create a container that could hang on the wall.
- I’ll show later that E6000 is the best choice to get the doorstopper to stay glued to the plastic bucket.
- Spray-paint the buckets a metallic gold and set them aside to dry.
- Take 2 Dollar Tree Christmas trees and put them together to create a fuller tree and start fluffing them. I used some packing tape to attach the trunks together and tied a few branches together.
- Make some decorations for the trees using red and white striped pipe cleaners and clothespins.
- Curl the pipe cleaner around itself to create a faux peppermint candy.
- Use a hot glue gun to hold it together in the middle and around the sides.
- Use hot glue to attach the peppermint to the top of a clothespin to create an ornament.
- Repeat these steps until you make the desired amount of ornament clips.
- I decided my trees needed something extra so I grabbed some fishing line and Dollar Tree beads that I’ve been collecting and started making mini bead garlands. This was a little time-consuming so it’s the perfect craft to sit and watch your favorite Christmas movie while you string beads 🙂
- I wanted my buckets to look more bronze so I used some brown craft paint with gold glitter paint to achieve the look I was going for.
- Use tissue paper inside the buckets to hold the trees steady.
- Add Dollar Tree fairy lights to the trees. The battery package sits nicely inside the buckets so you can easily turn the lights on and off.
- Decorate the trees with the DIY peppermint clips, wood beads, and some red ribbon at the top to finish the look.
- Display them on the wall and enjoy!
These turned out better than I expected and are another option if you lack table space in your home and want to hang small trees like this.
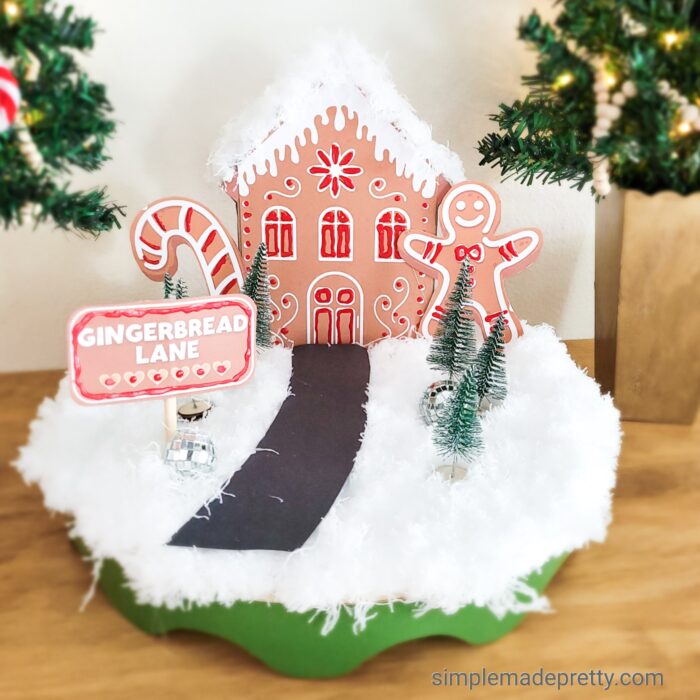
Dollar Tree Gingerbread House Display Tray
In this next tutorial, I’m using the Styrofoam Wreath Form, Wood Circle Plaque, Wooden House, Red Puff Paint, Construction Paper, Mini Bottle Brush Christmas Trees, and Small Wooden Dowels.
Supplies:
- Styrofoam Wreath Form
- Wood Circle Plaque
- Wooden House (similar)
- Red Puff Paint
- Construction Paper
- Mini Bottle Brush Christmas Trees
- Small Wooden Dowel
- Classroom Border Paper in Green
- White Microfiber Duster/Mop Pad
- Aileen’s Fast Grab Tacky Glue
- Hot Glue Gun
- Hot Glue
- White Glitter (optional)
- Free Printable Gingerbread Craft Kit
Directions:
- Glue the styrofoam wreath to the wooden plaque using tacky glue.
- Use Classroom Border Paper in Green and cut it to fit the edge to hide the wreath from underneath. I used tacky glue and my hot glue gun so it could dry quickly.
- Take 2 Dollar Tree essentials reusable mop pads on top of the display tray to look like fluffy snow.
- Cut the corners to fit and keep the corner pieces to use later.
- Remove the chalkboard plaque from the wooden house. It was glued on there pretty good so I did what I could since I knew I’d cover it up anyway.
- Print and cut the Gingerbread printables for this project available in my blog library for FREE! I printed mine on regular printer paper but I recommend heavy cardstock if you have it.
- Cut the gingerbread pieces and glue the house to the front and back sides.
- Use some brown construction paper for the sides of the house and glue them as well.
- Take one of the small wooden dowels, cut 2 inches off, and glue the Gingerbread Lane sign to it.
- Decorate these Gingerbread printables using puff paint. I let these dry overnight while laying flat and they turned out super cute. You could also mod-podge them and sprinkle a little white glitter to give the appearance of sugar!
- Attach the house to the tray using hot glue.
- Cut a driveway to the house using black construction paper and hot glue it in place.
- Hot glue the fake snow to the tray and use the extra pieces to fill in the gaps.
- Glue some of the fake snow to the roof of the house.
- Place the Bottle Brush Christmas Trees, a Gingerbread person, a candy cane, and the sign around the display and hot glue it all in place.
- I added some Dollar Tree mini disco ball ornaments to my display but I think this would look cute if you were to add a white picket fence and a mini red truck in the driveway! My son actually ran and got his toy cars to try them out when he saw this Dollar Tree Gingerbread House Display Tray!
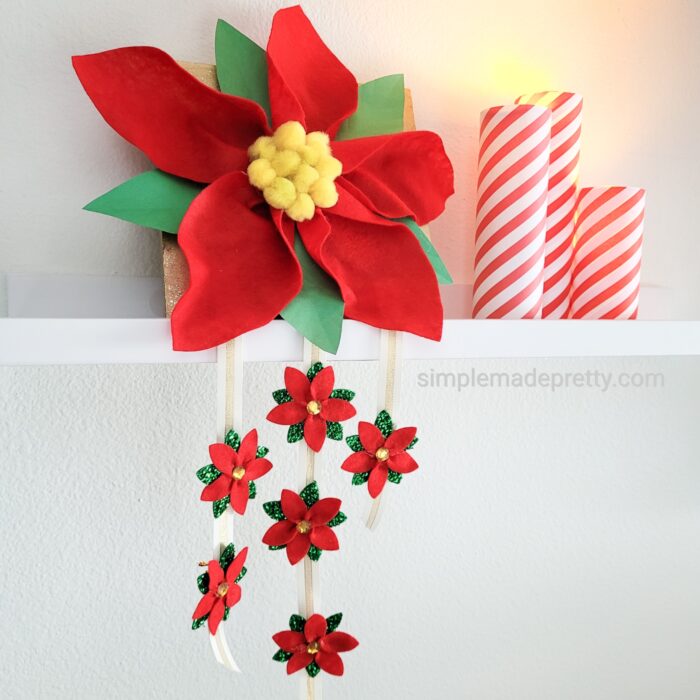
Hanging Poinsettia Wall Art DIY
In this tutorial, I use the Pumpkin Pie Sign, Red Felt, and Construction paper.
Supplies:
- Pumpkin Pie Sign
- Red Felt
- Construction paper
- Yellow Pom Poms
- Ribbon
- Mini Poinsettias
- Gold Spray Paint
- Free Printable Poinsettia Template
Directions:
- I started by using white construction paper and glued it to the front.
- Print and cut the poinsettia template. I created a FREE template available in my blog library so you can recreate this project.
- Use a flat edge tool, like a Cricut scraper tool, to create make the leaves look realistic by scoring lines and curling the leaves. I’m surprised at how realistic these paper leaves look using Dollar Tree construction paper!
- Use red felt to create the poinsettia petals.
- Use a little hot glue to curl and glue the middle of the petal together.
- Repeat these steps and assemble the leaves and flowers to look like a large poinsettia and glue them together.
- Cut a yellow circle using construction paper and glue it in the center.
- Hot glue some yellow pom poms on top.
- This is when I decided to spray paint the sign gold to give it some glam.
- Hot glue the poinsettia to the center.
- Cut the ribbon into 3 pieces of various lengths.
- Hot glue the ribbon strips to the bottom of the sign, hidden under the poinsettia.
- Attach the mini poinsettias to the ribbon using the twist ties on the back.
This Poinsettia looks great hanging on a wall or sitting on a shelf with the mini poinsettias dangling below.
The Mystery Box Challenge Continues
Well, I survived my first Mystery Box challenge and I absolutely adore everything I created, I hope you did too!
Don’t forget to jump over to Jennifer’s channel and see what I sent in her mystery box and be sure to watch the loop until you get back to Whitney’s video.
Wrap up about DIY Dollar Tree Christmas Decorations
If you are on a tight budget for Christmas, you might want to try these DIY Christmas decor crafts, which take only a few dollars to create, and you don’t need any special tools or materials. Create lovely decorations, perfect for your home and your friends. Keep your home looking festive this Christmas, with these inexpensive decorations that you can make easily with things around the house.
***Grab the Free Printable Gingerbread Craft Kit & Poinsettia Template***
New here?
If you are new to the Simple Made Pretty Community, you’ll need to sign up below to gain access to my private digital resource library where I house all of my free printable crafts, decor, checklist, & more in one convenient place!

Returning?
Welcome back! If you’ve already subscribed to Simple Made Pretty, just check your last email from me with the password to log into the library below (the instructions are sent in every email I send).

WATCH THE VIDEO ON YOUTUBE
Pin this Dollar Tree Christmas Decor Ideas for later…
Here are More Christmas Dollar Tree DIY Ideas You Might Like…
The Step By Step Guide To Making A Christmas Ornament Garland
Psssssttt…Right now I’m offering FREE access to our Digital Resource Library to all of our newsletter subscribers. Your private access includes dozens of free printable crafts, home decor and organization guides. Hurry up and grab your freebies here! (Access instructions are sent after subscribing).
Disclaimer: This post may contain affiliate links or a sponsored post. All opinions are always 100% mine and I don’t partner with any product or company that I don’t use and love. Please see our Full Disclosure for more information.
 Discount Christmas Decor For Your Entryway