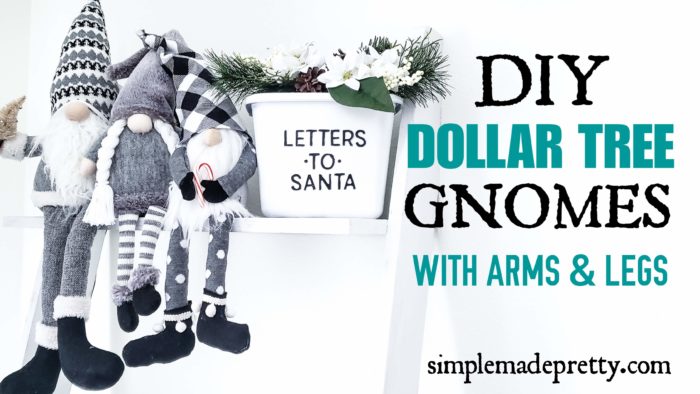
DIY Dollar Tree Sock Gnomes with Arms and Legs Tutorial
Gnomes have become one of the most loved decorations in farmhouse and holiday decor. From tiered trays to mantels and shelves, these whimsical characters add charm to any space.
This tutorial shows you how to make DIY sock gnomes with arms and legs using affordable supplies — many of which can be found at Dollar Tree. The result is a fun and customizable craft that works for Christmas decor, seasonal decorating, or handmade gifts.
Once you make your first gnome, you might find yourself making dozens more.

🔽 WATCH ON YOUTUBE 🔽
🎥 Watch the 6-minute video above — then scroll for more freebies, links & resources below!
What are sock gnomes?
Sock gnomes are small decorative figures made from socks filled with rice or sand and decorated with fabric hats and beards.
Do gnomes need sewing?
No. Many gnome tutorials use hot glue, making them beginner-friendly crafts.
What supplies do you need for sock gnomes?
Common materials include socks, rice or sand for filling, faux fur for the beard, fabric for the hat, and small craft pieces for arms and legs.
Where can you display gnome decor?
Gnomes are popular on tiered trays, shelves, mantels, entry tables, and holiday displays.
These DIY gnomes are made using mostly Dollar Tree supplies and are no-sew gnomes, however, you can hand stitch or use a sewing machine to make these Dollar Store gnomes.
How To Make Gnomes from Socks
Today I’m sharing some popular DIY Gnomes with arms and legs that you can make using Dollar Tree supplies. These Farmhouse style gnomes are easy to Do It Yourself using affordable items found at Dollar Tree Stores. Decorate tiered trays, shelves, mantles, and more with these cute gnomes!
The original tutorial explains how to make sock gnomes with arms and legs using Dollar Tree supplies.
–>>This post has been very popular with my readers and shows how to make Dollar Tree Gnomes with socks!

Everything you need to make some gnomes can be found at Dollar Tree (I found the beard craft fur at Michael’s or Hobby Lobby but Dollar Tree has FUR PILLOWS that you can use for the beard too!)
Once I learned how to make arms and legs for my Sock Gnomes, I quickly became addicted to making these gnomes!
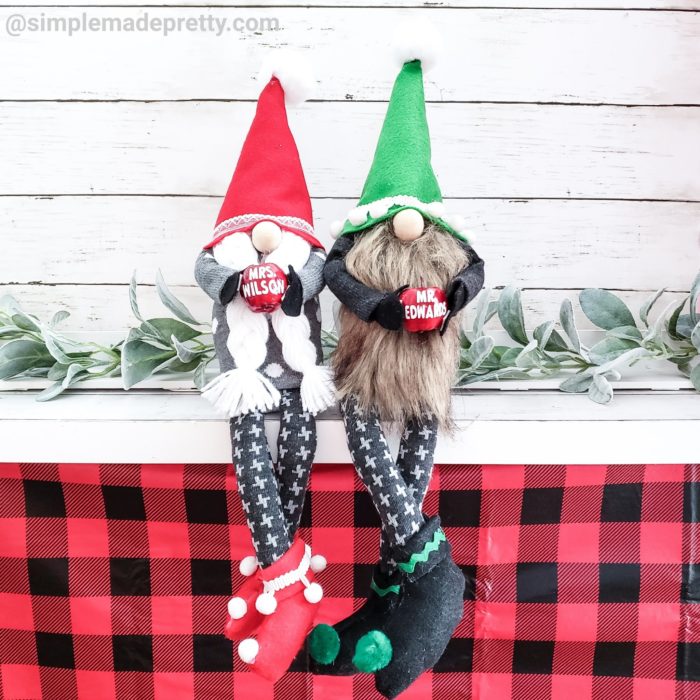
I made some gnomes to give as teacher gifts to my kid’s teachers for Christmas. The apple in their hands came from a Dollar Tree floral stem and I added a Cricut vinyl with the teacher’s names.
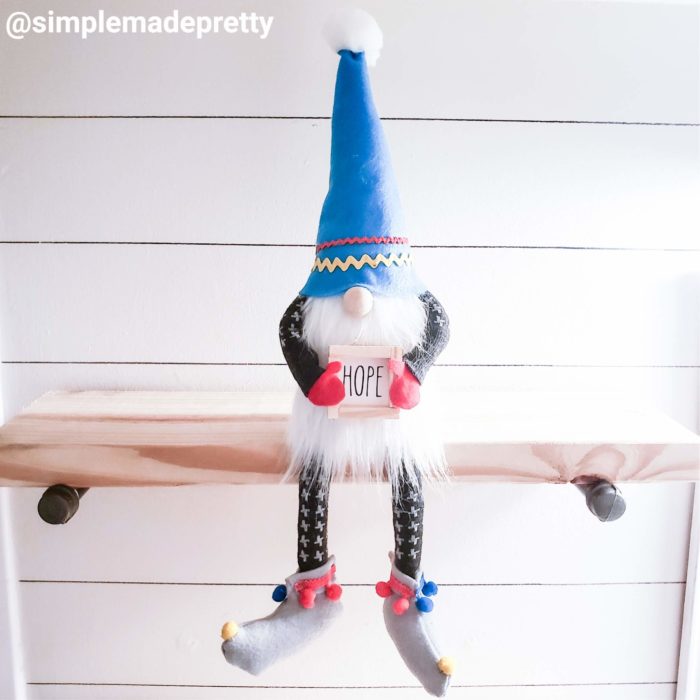
I made another gnome to give as a Christmas gift and I made a little farmhouse sign for him to hold using Dollar Tree Jenga Blocks, foam board, and a printable. This was so easy and cute to put together! The recipient loved this little gnome!
The fun part about making these gnomes is deciding what colors and accessories to add to the gnomes.

For the gnome in this tutorial, I was able to use Pom Pom Ribbon from a Dollar Tree pillow as accents on his boots and they turned out so cute!
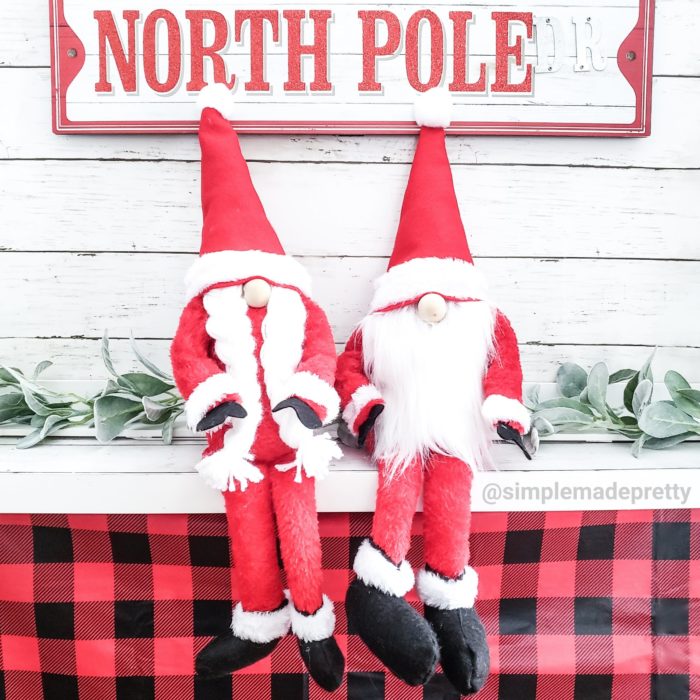
I also made some Santa and Mrs. Claus Gnomes using a Dollar Tree Christmas Stocking for their suits! I sewed their suits instead of glue, just to see which was easier, and honestly, they are both pretty easy so the way you make yours just depends on which one you are comfortable with.
Many people have asked for a tutorial for the female gnome braided hair… it’s 45 pieces of yarn, 17 inches in length, braided… that’s it!
Use some leftover sewing supplies to decorate your gnomes… like pom poms, rickrack trim, lace, ribbon, and more!
How do you Make a Sock Gnome?
Once you learn how to make these SOCK GNOMES, the possibilities are endless!
You can learn to add arms, hands, legs, and feet to your sock gnome-like I am sharing in this tutorial.
Use a sock gnome DIY to create an adorable gnome wreath as I did in this post!
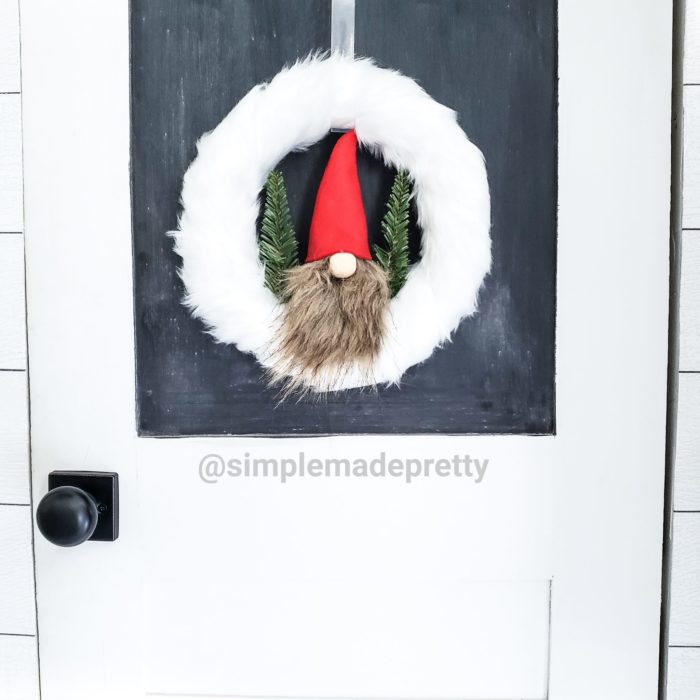
I made this gnome wreath using a Dollar Tree Styrofoam wreath, fur ribbon, a DIY sock gnome, and Target One Spot bottle brush trees. This Gnome wreath was inspired by a wreath that I saw at Home Goods but I knew I could make it myself using Dollar Store supplies!
Create a huge gnome to use as a gnome door hanger or gnome Christmas Tree topper like the one I made in this post!

This huge Gnome can be used as a door sign or a Christmas Tree Topper! I made it to hang on our door but then we decorated our tree and I ended up using it as a tree topper. Genius, right?
Want to see my latest DIY videos in Real-Time? Follow me on Instagram and YouTube!
–>>You can follow me on Instagram here
I’m including a detailed video below sharing how to add arms and legs to sock gnomes. Be sure to watch the video to make a sock gnome in this post.
I also include a free printable Gnome poem/card for Craft & Create Club Members Only. Become a member to access the printables!
Let’s get started so you can see how easy and affordable it is to make these adorable gnomes!
How To Make Gnomes With Arms and Legs
These Dollar Tree gnomes are so easy, you will find yourself making an entire tribe of gnomes!
Supplies:
- glue gun
- scissors
- men’s dress socks
- 1 piece of felt (I used black)
- small pillow (or pillow stuffing)
- wire (optional – if you want the arms to be bendable)
- duct tape (optional – if you want the arms to be bendable)
- 1 Sock Gnome already made
- Free Printable Boots and Mitten Template (Download Here)
Directions:
Gather Supplies. Go here to learn how to make the gnome body before adding arms and legs. 
Cut the top ankle of the sock off (so you have the foot of the sock left). 
Cut both the foot and top pieces in half. 
Use a glue gun or hand-stitch to create a seam on the inside of the cut pieces. 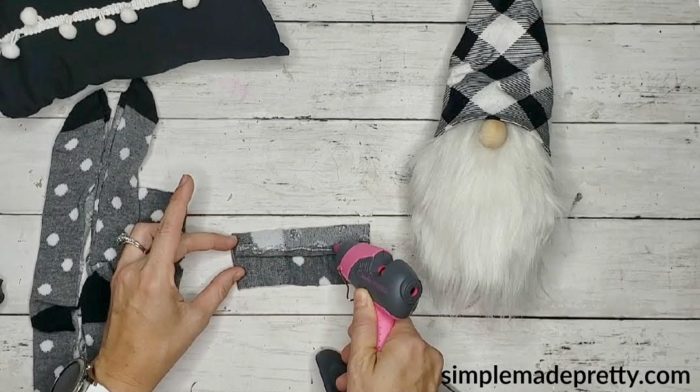
Fold the pieces right side together (like you are making a tube) and glue/stitch together. 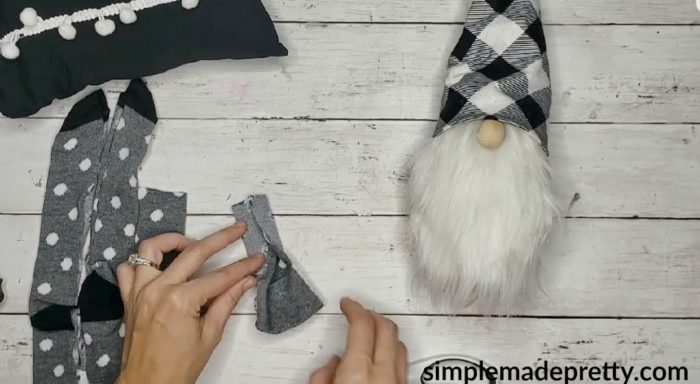
Follow these steps until you have 2 arms and 2 legs and let the glue cool completely before handling.
Turn the tubes right side out. 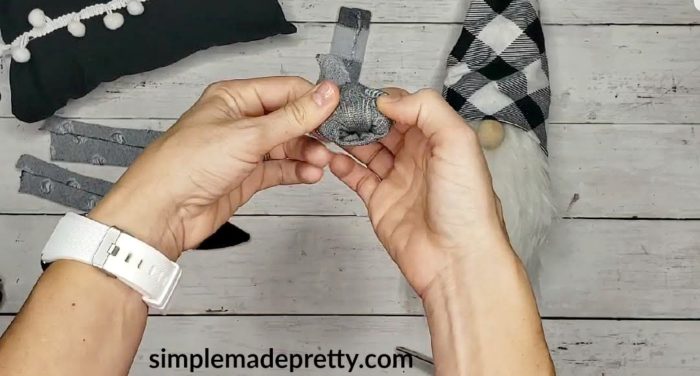
Cut the pillow open and use the stuffing to stuff the tubes. 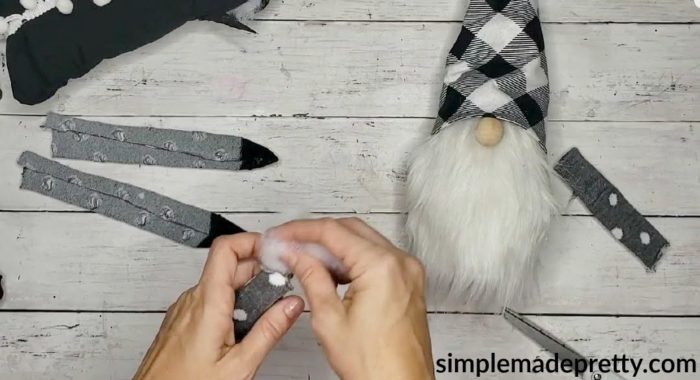
Use the Free Printable Template to cut the boots and the mittens.
Glue/sew the boots together leaving the ankle open (otherwise it will be difficult to turn right-side-out). 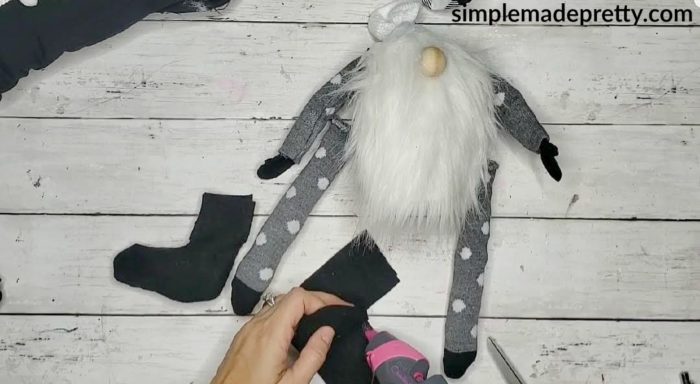
Turn the boots right side out and stuff the boots with pillow stuffing.
Glue the bottom leg to the inside of the boot and add glue around the sides of the boot to attach to the leg.
Add ribbon to the boots if desired.
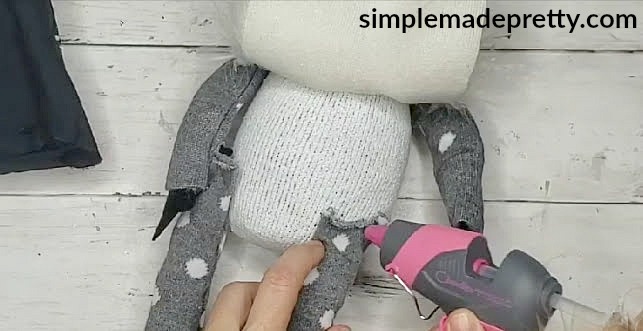
Attach the legs to the bottom of the sock gnome body. This is where you can make it fancy and add a ribbon above the leg so you don’t see the raw edge or cut open a hole in the sock, slip the leg in the hole, and glue inside the sock. For this gnome I glued the legs right to the front, however, I’ve been attaching the legs in a more polished way after this first one.
Glue the mittens to the inside of the arm sleeve. 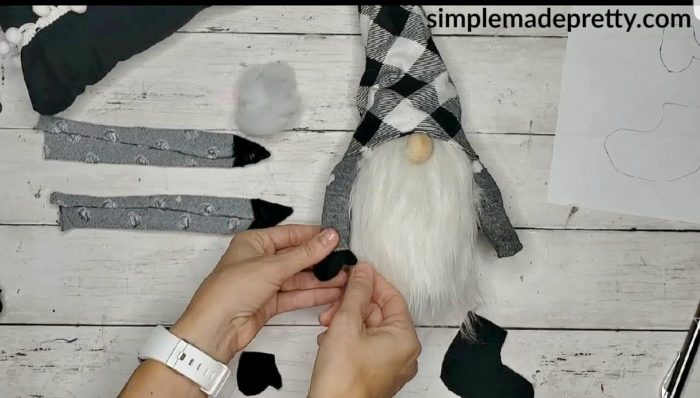
For bendable arms: cut 1-5 pieces if Dollar Tree wire the same length of the arms. Wrap the ends together with duct tape so the wires do not stick out of the arms. Place the wires inside the arms. 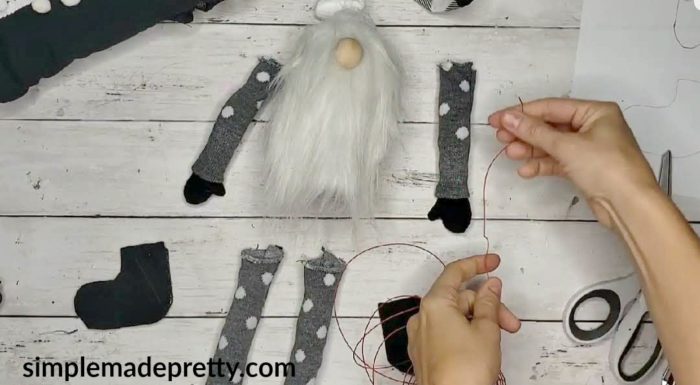
Glue the arms to the top of the gnome right next to where the beard or hair attaches.
Glue the hat to the gnome to finish the gnome!
If you’d like your gnome to hold an item in his mittens: you can use masking tape or small square mounting tape inside the mittens.
Wrap-Up
These DIY sock gnomes are one of those projects that instantly bring personality to your decor. With simple materials and a little creativity, you can customize colors, hats, and accessories to match any season or holiday.
Whether you’re decorating a tiered tray, creating handmade gifts, or simply enjoying a fun craft afternoon, these adorable gnomes are guaranteed to make you smile.
I hope you enjoy making these gnomes with arms and legs using Dollar Tree supplies! If you’d like to see more DIY gnome ideas, be sure to follow me on Instagram and subscribe to my YouTube channel.
–>>You can follow me on Instagram here
Did you make this DIY Gnome or a similar one? I would love to see it! Send me a picture on Facebook, Instagram, or email and I’ll share with my followers 🙂
DOWNLOAD THE FREE PRINTABLE TEMPLATE

More Popular Dollar Tree DIY Ideas
DIY Burlap Baskets using Plastic Dollar Store Bins
Over The Door Organizer Dollar Tree DIY
–>>Keep reading to learn how to make this Over The Door Organizer Dollar Tree DIY!
Dollar Tree Farmhouse Wall-Mounted Mug Rack DIY
–>>Keep reading to learn how to make this Dollar Tree Farmhouse Wall-Mounted Mug Rack DIY!
DIY Dollar Store Farmhouse Ladder
–>>Keep reading to learn how to make a DIY Farmhouse Ladder For $3!
$1 Tiered Tray DIY
–>>Learn how to make a tiered tray for just a $1 with this Dollar Tree hack!

Psssssttt…Right now I’m offering FREE access to our Digital Resource Library to all of our newsletter subscribers. Your private access includes dozens of free printable crafts, home decor and organization guides. Hurry up and grab your freebies here! (Access instructions are sent after subscribing).
Disclaimer: This post may contain affiliate links or a sponsored post. All opinions are always 100% mine and I don’t partner with any product or company that I don’t use and love. Please see our Full Disclosure for more information.
 40 DIY Dollar Store Christmas Decorations