How to Build a Fireplace Bump Out
I always felt like our family room was missing something until the hubby and I built a faux fireplace as the centerpiece for the room. We loved our DIY faux fireplace so much that we decided to install an electric fireplace wall with a TV and mantel. This DIY fireplace wall transformed the space into a comfy, modern family room! The wifi-enabled fireplace from Touchstone Home Products was the perfect addition to this DIY fireplace wall with TV. Keep reading and watch the video to see our DIY Fireplace Build Out!
This post was first published on Sept. 20, 2021, and updated with recent pictures and how we decorated our family room around our fireplace wall. Several years later it’s still one of the BEST DIY projects we ever did in our home!
If you’re curious (or in a hurry)…
The Touchstone Sideline Elite® Electric Fireplace is an affordable fireplace with WiFi-enabled smart technology, several colors, features, and a sleek frame around the fireplace.

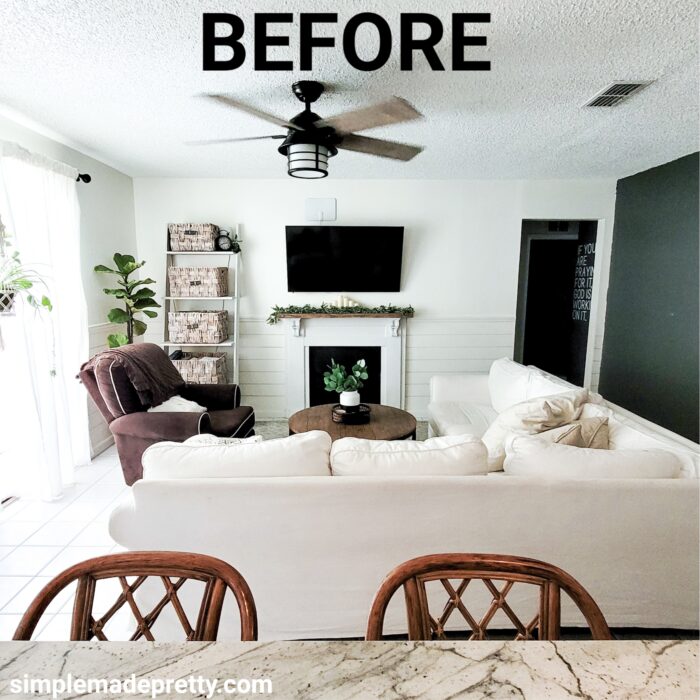
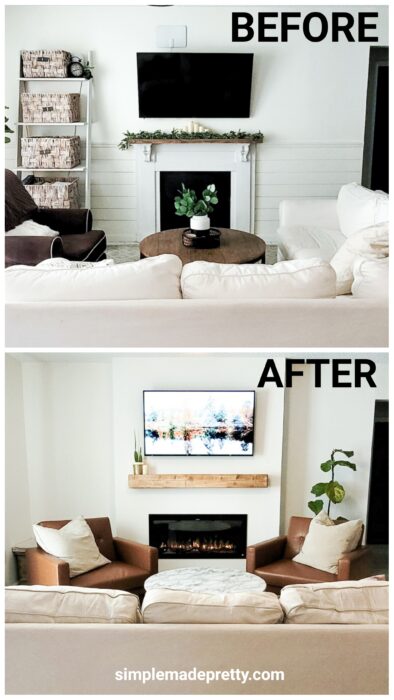
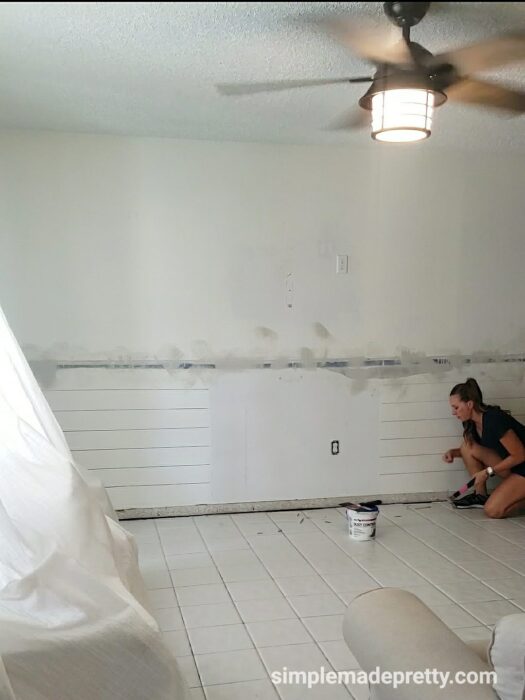
This is what our family room looked like before we remodeled it (this picture was taken a few weeks before demolition)…
Shop our Family Room Decor:

How much does it cost to build a fireplace surround?
The total cost for our fireplace surround was $240 (not including the cost of the electric fireplace and tools that we already had).
How do you build a fireplace wall?
Build a fireplace wall by following the instructions below. We measured the wall, build a wood frame according to those measurements, built a supportive frame for the electric fireplace, and used drywall to finish the wall. See my tutorial below for more steps!
How do you frame a fireplace?
I’m including a full tutorial below on how to frame a fireplace!

Watch the video below to see a quick Before and After of our DIY Fireplace Bump Out Exterior!
How to Build a Fireplace Surround
Supplies:
- Touchstone Electric Fireplace
- (16) 2’x4′ 96″ Prime Stud
- Deckmate Screws
- Surge Power Outlet (if adding electricity for TV above the fireplace)
- Level
- Miter saw
- Table saw
- Nail gun
- 18-Gauge Brad Nails
- Clutch Clamp
- Drill
- Sander
- Sandpaper
- (3) 1×4 6ft pine board
- (2) 4’x8′ Drywall
- Drywall joint tape
- Drywall corner bead
- Drywall corner bead adhesive
- 1-1/4″ Coarse Drywall screws
- Baseboard
- Baseboard
- Shoe Molding
- Spackling
- 6″ Flexible Joint Knife
- 8″ Taping knife
- Mud pan
- Power mixer
- Construction adhesive
- Face Masks
- Electrical wire
- Electrical box
- electrical box cover
- Caulk
- Wood filler
- Flat TV Bracket
Directions:
- Gather Supplies.
- Demolish or remove items on the wall where you wish to place the fireplace bump-out. In our case, we removed a fake fireplace from the wall, a chair rail, and the baseboards. We also took a TV down that was hanging on the wall.

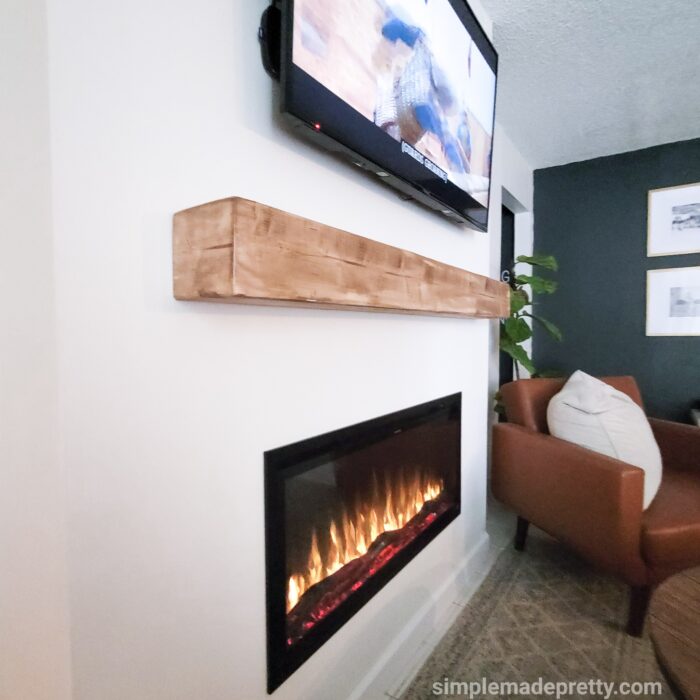
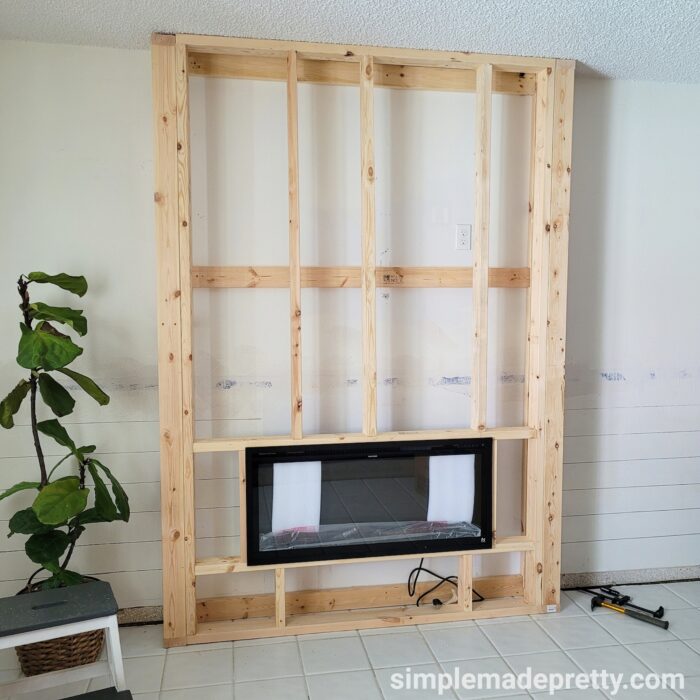
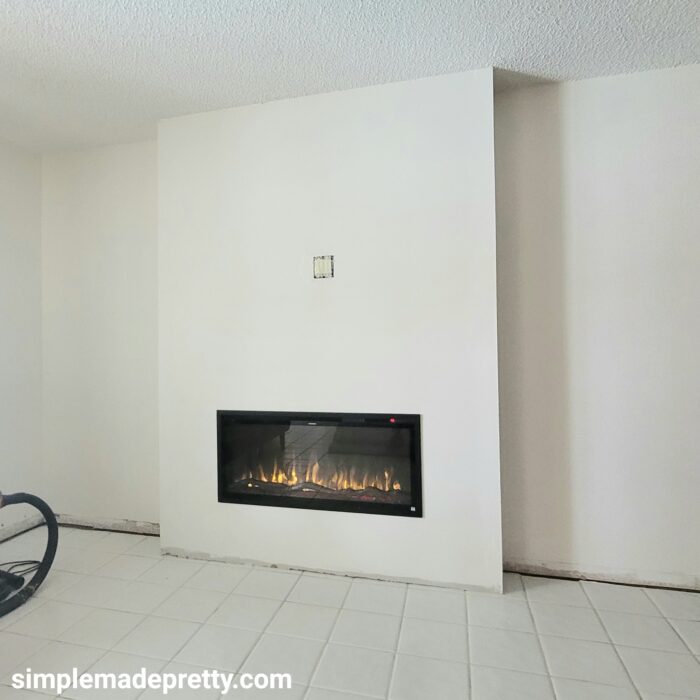
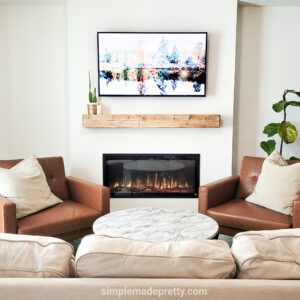
- Mark your measurements on the wall where you want to install the fireplace bump-out. Our bump-out measures 69.6″ L x 10″ D x 8′ H. Our fireplace is 12.5″ off the floor and 11″ above the fireplace is the mantel. The TV bottom is 7.5″ above the mantel. The Mantel is 5.5″ on all sides and is 48″ from the floor.
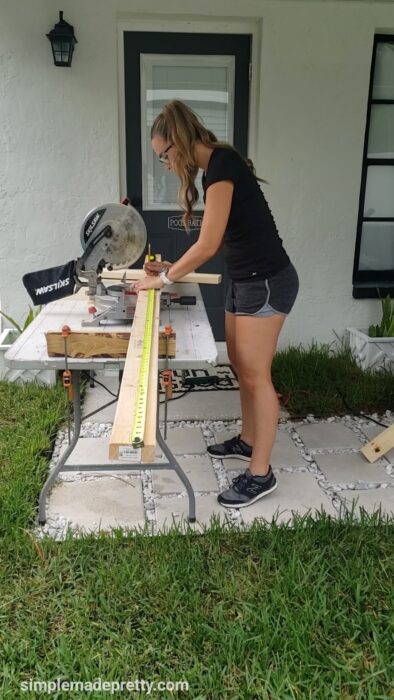
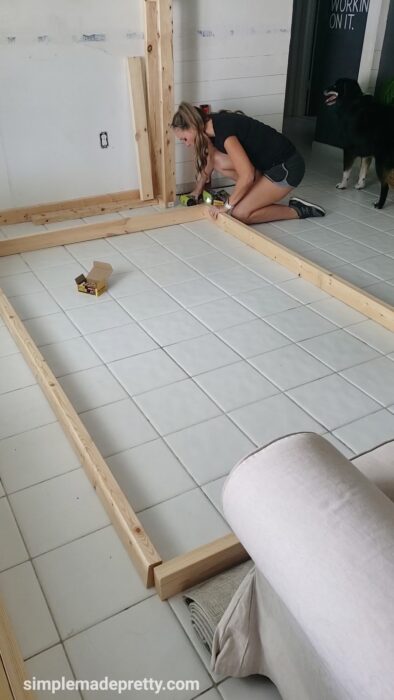
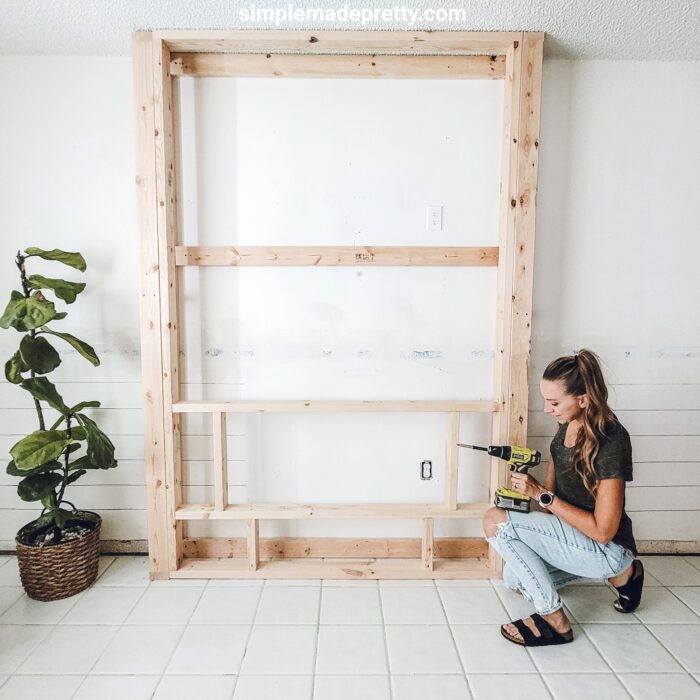
- Measure and cut the 2 x 4 wood to create a frame.

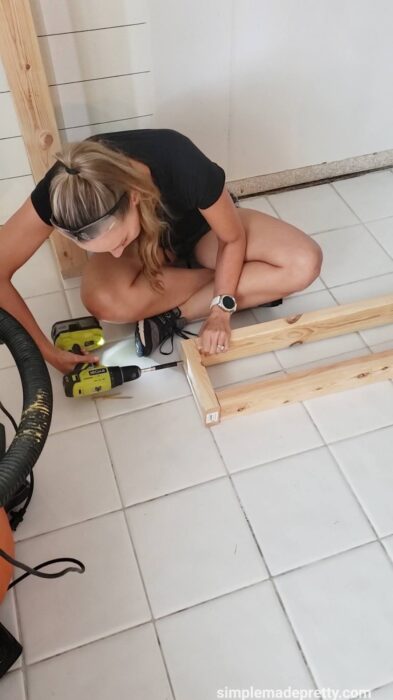
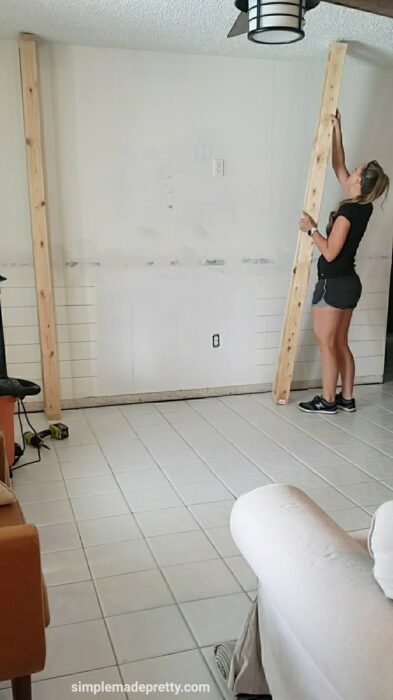
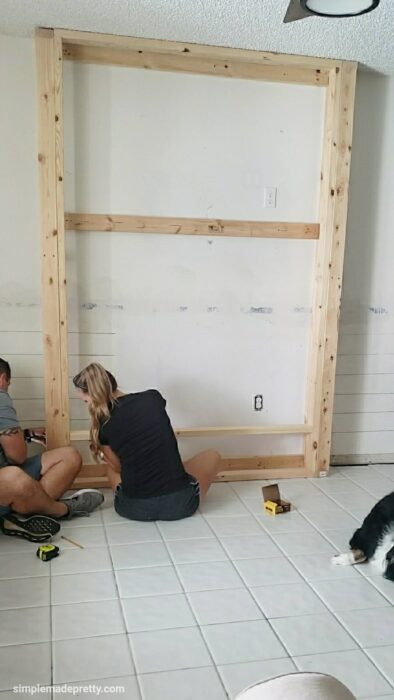
- Build the side frames first and attaching them to the wall with 2×4’s in the middle attached to the back wall for extra bracing and stability.

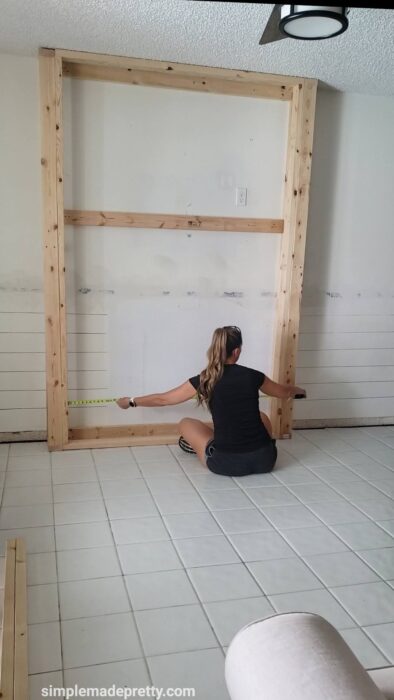
- Build the frame for the front.
- Check to make sure it fits between the side frames and measure where to build the fireplace insert frame.
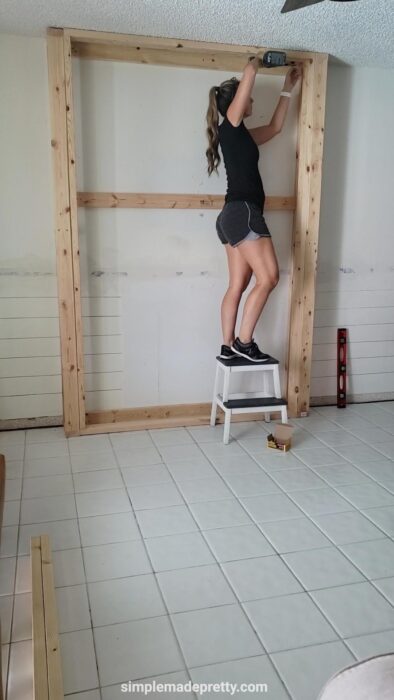
- Remove the front frame and add the cross braces where the fireplace will sit and tack it in place once again.

- Set the fireplace in the opening to check for clearance, if you need to make adjustments just remove the front frame and adjust until the opening is just right. Complete the rest of the bracing studs for the rest of the wall and secure the front frame in place.
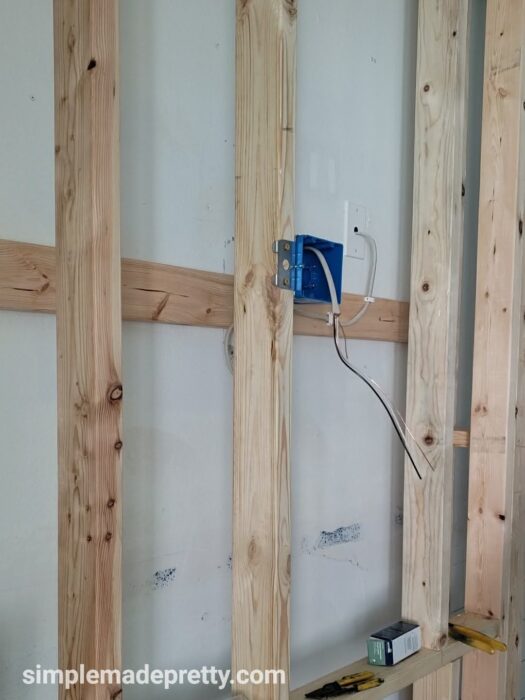
- Run the wires for the electrical box and wire the outlets, of course making sure the electricity to the outlet is turned off at the electrical panel. Install the electrical box for the TV (my hubby did this part because he has electrical experience/training). I recommend figuring out where your TV bracket will be and install the electrical box a couple of inches above the bracket and on the side where the tv connections will be. I chose to install surge protector outlets for a little extra peace of mind even though we have a whole house surge protector.
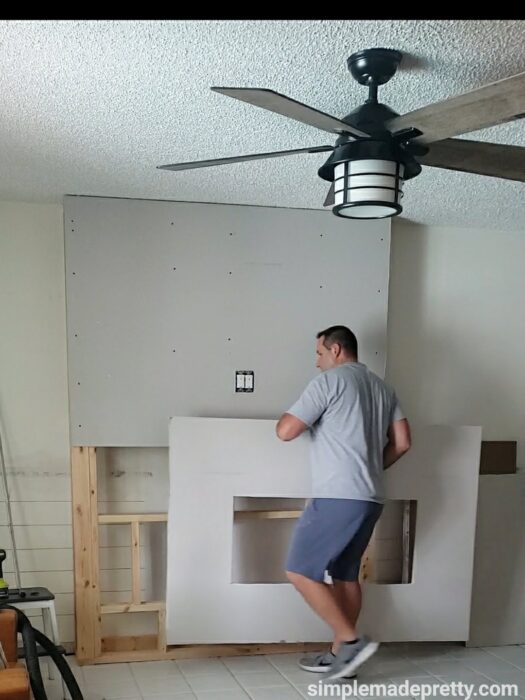
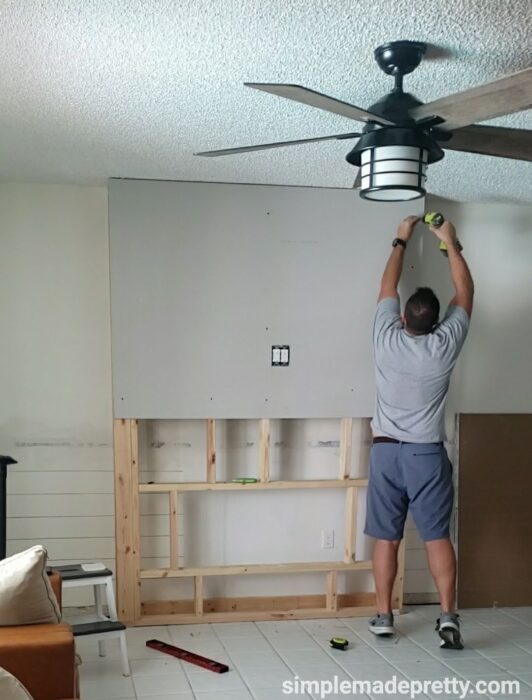
- Cut the drywall for the front. Start with the top and work down and measure where your electrical box/fireplace openings are and cut the opening for these before attaching the drywall. Once the openings are cut, mark the location of the studs on the front of the drywall to allow for easy attachment with the 1-1/4″ coarse drywall screws.
- Attach the drywall to the studs. I use the coarse screws over fine thread when attaching drywall to wood. The fine thread should be used if you are screwing the drywall into metal/aluminum studs.

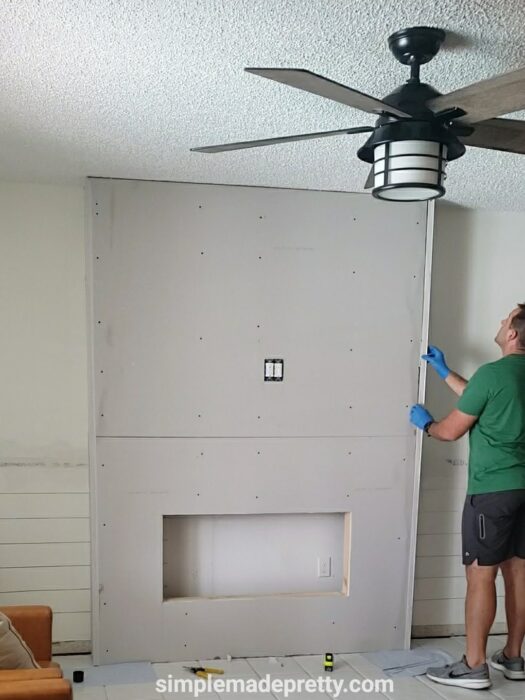
- Spray the drywall corner beads with the spray adhesive and attach them to the corners of the bump-out. Allow the adhesive to dry while you attach the drywall joint tape to all the other joints.
- Mix your joint compound using your power mixer until you have a consistency of pudding for your initial coat.
- Using your mud pan and your 6′ mud knife, add mixed joint compound to all the joints that are taped and cover all screw heads and corner beads.

- Allow to dry and then lightly sand the areas.
- Mix a new batch of joint compound to a little thicker than pudding consistency and apply a second coat to even out areas and smoothing rough areas.
- Once the new coat has dried, sand again, and if you need to do a third coat of joint compound in some areas now is the time. If it is smooth, then you are ready to paint or add texture and paint.
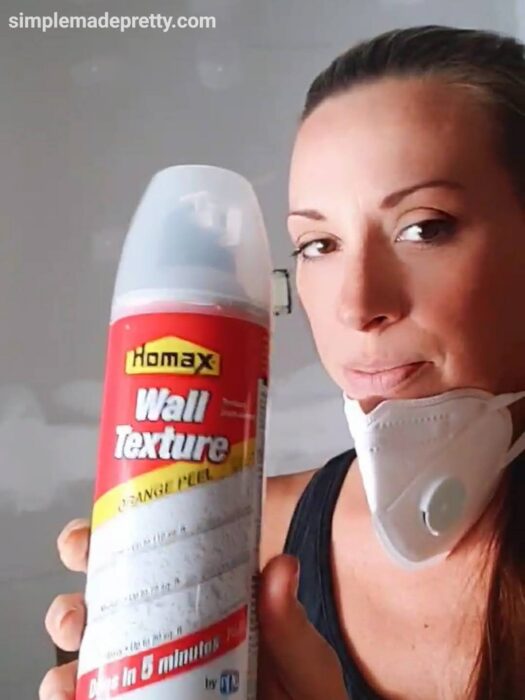
- Our walls are textured so I sprayed texture over the new addition.
- Paint the new wall. I painted ours, Benjamin Moore Simply White.
- Plug the power cord from the fireplace in and then slide the fireplace into position.
- Follow the instructions from Touchstone Products Electrical Fireplace to secure it.
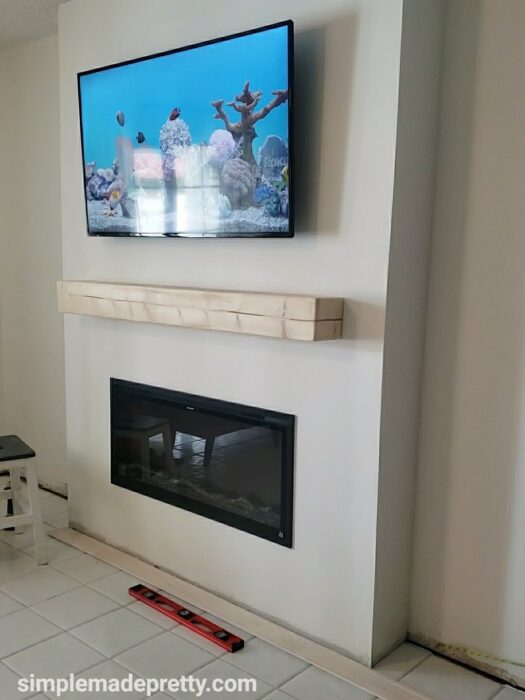
- Attach the 2 x 4 base for the mantel and slide the mantel on and secure it. (FIREPLACE MANTEL TUTORIAL is coming soon!).
- Attach the bracket for the tv to the studs and hang the tv.
- Cut your floorboards/baseboards and shoe molding to length using your miter saw, install using a nail gun. My corners are not perfect so I filled them with wood putty and sanded them. Once they are painted, you can not tell there was a gap or they did not line up perfectly. Caulk the top where the baseboard meets the drywall.
- Turn on your fireplace and enjoy!


Wrap up about our Fireplace Frame DIY
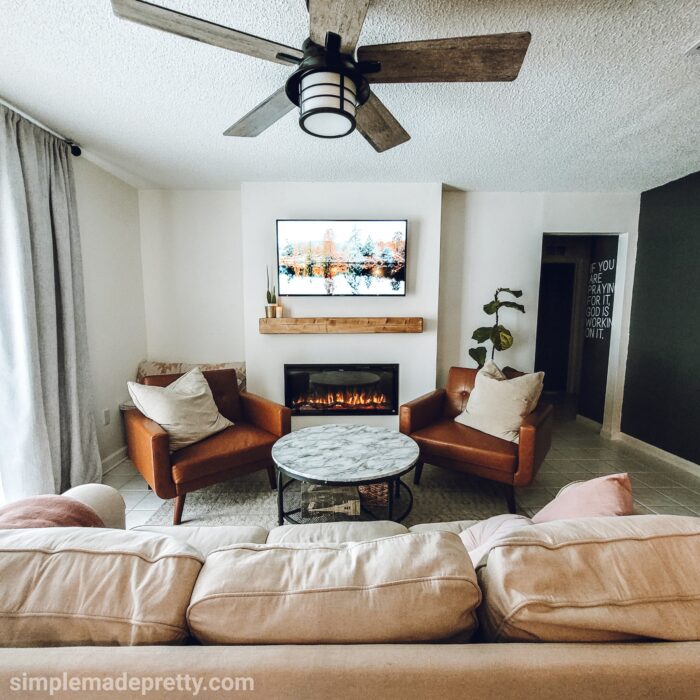
I hope you enjoyed this DIY Fireplace Bump Out tutorial! My hubby and I teamed up on this project… while he did the electrical and the drywall, we both did the demolition, building the frame, and I did the painting and finishing touches. The entire process took 5 days, 2-3 hours each day. If I didn’t have him there to help, it probably would’ve taken me 10 days, lol. That said, if I can do a fireplace build-out project like this, anyone can! I love how easy this electric fireplace was to set up and can’t wait to enjoy some cozy nights at home!
Don’t forget…
The Touchstone Sideline Elite® Electric Fireplace is an affordable fireplace with WiFi-enabled smart technology, several colors, features, and a sleek frame around the fireplace.
Shop Our Family Decor:
- Touchstone Fireplace
- Leather Arm Chairs
- Family Room Rug
- Family Room Coffee Table
- Marble Contact paper (used on top of the coffee table)
- Family Room Ceiling Fan
- Wall Paint Color: Benjamin Moore Simply White
- Trim Color: Off-the-shelf White Glidden
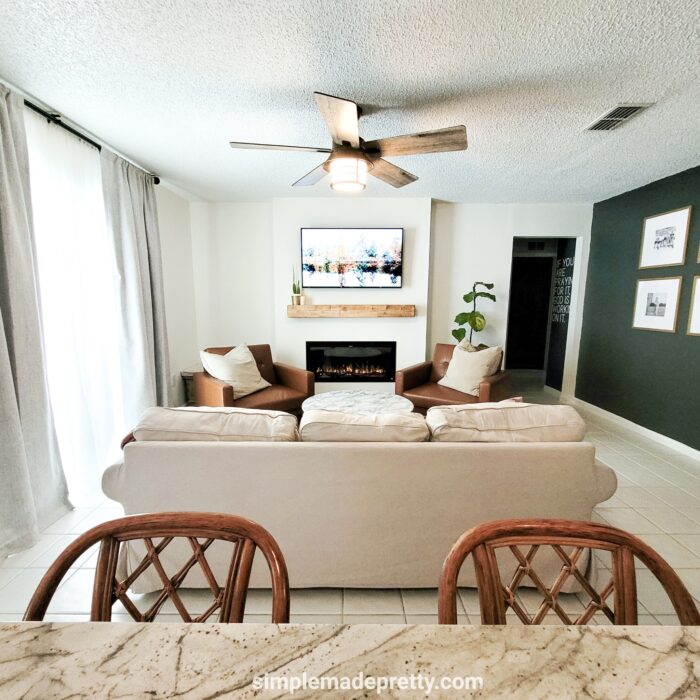
Here is our family room and fireplace decorated for Fall

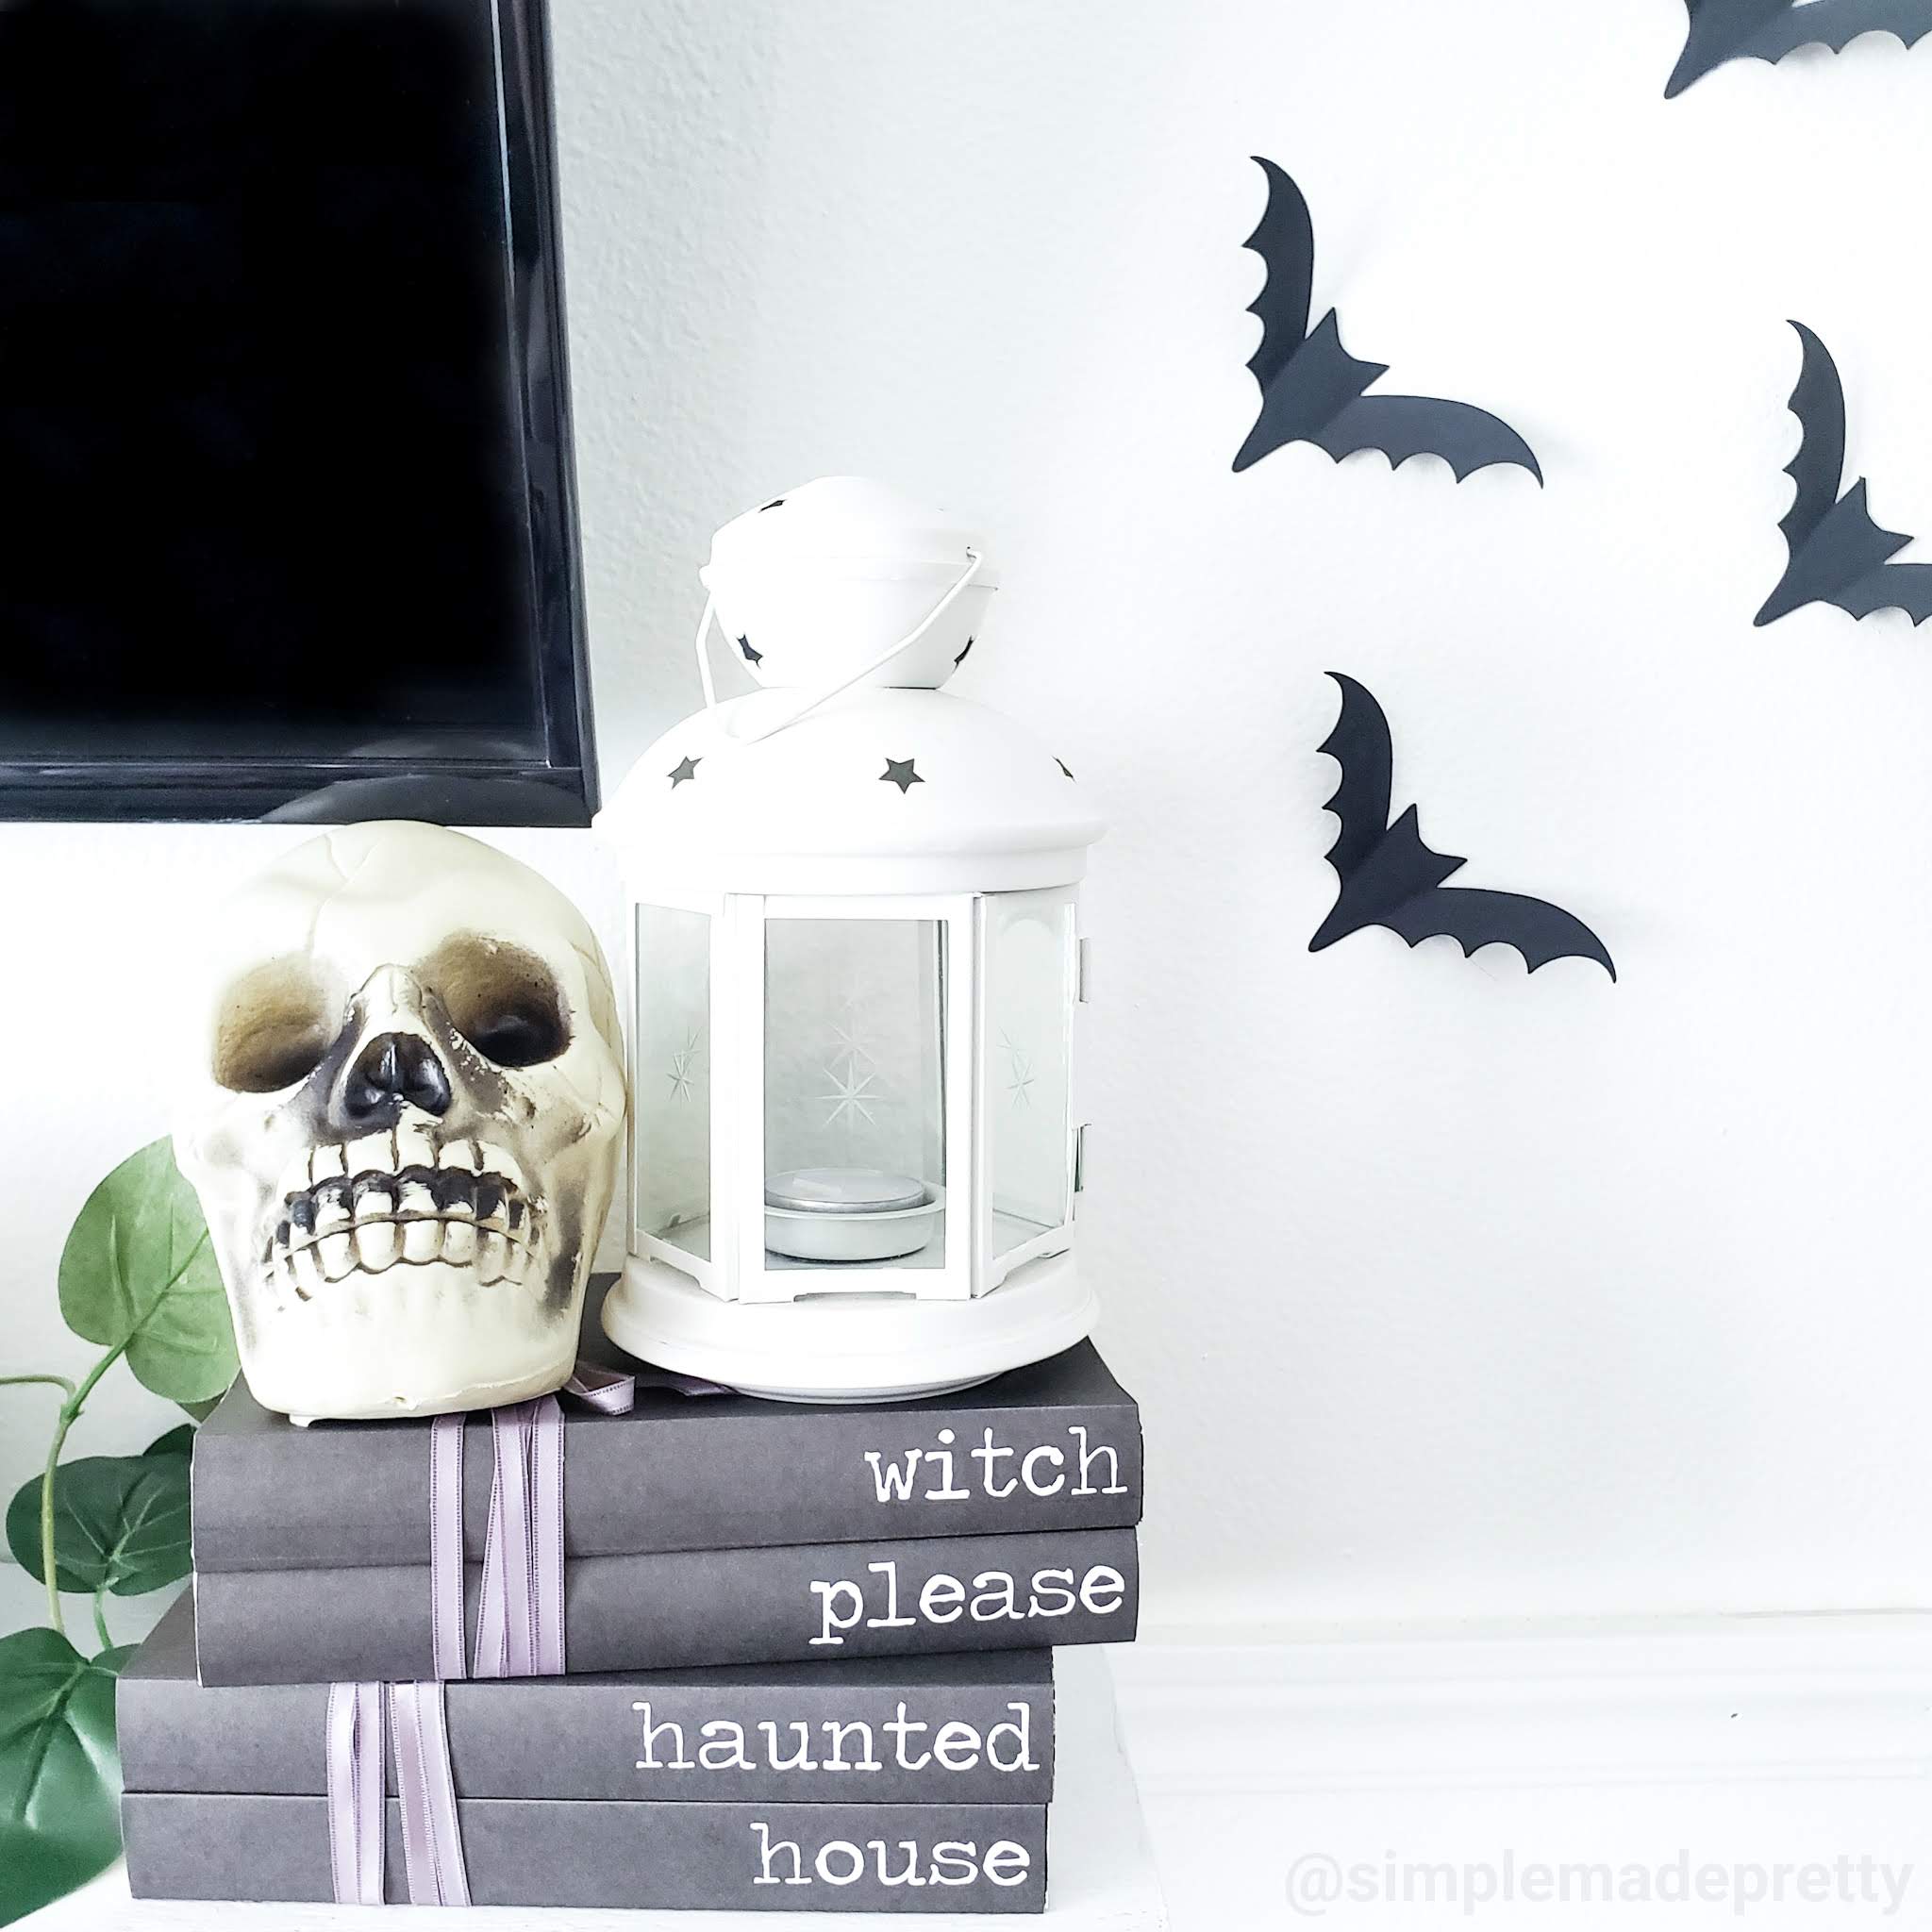
Here is our family room and fireplace decorated for Halloween

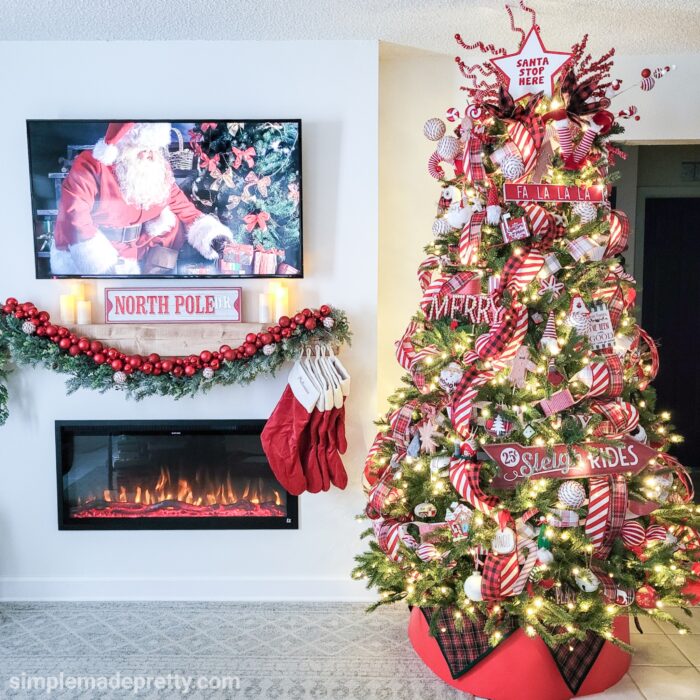
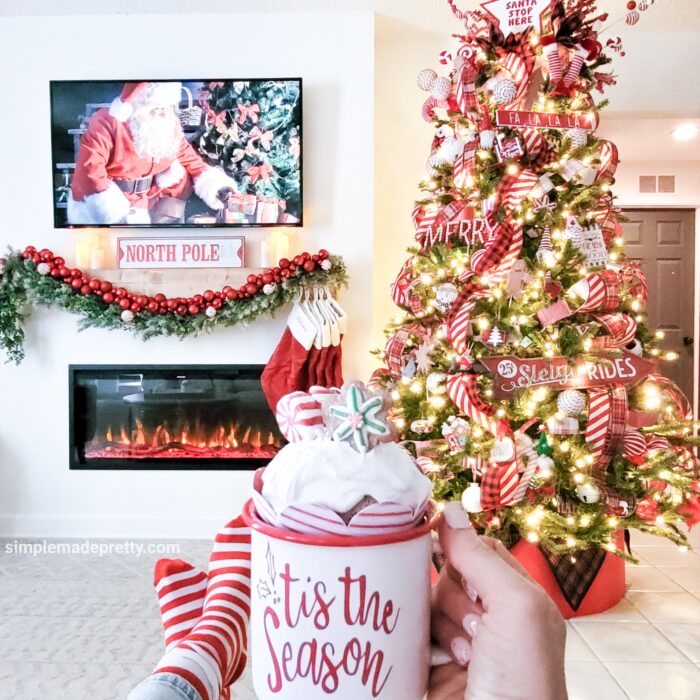
Here is our family room and fireplace decorated for Christmas


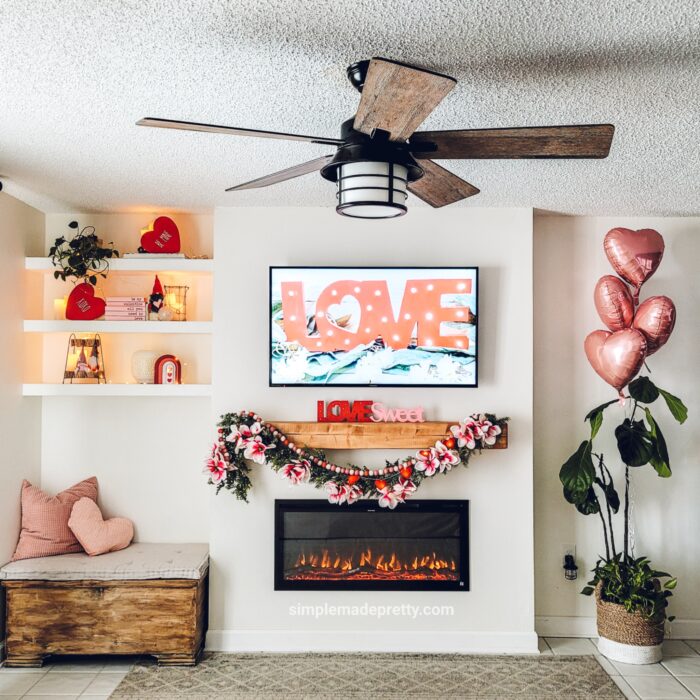
Here is our family room and fireplace decorated for Valentine’s Day
Here is our family room and fireplace decorated for Summer

Watch the video and print the supply list for this family room fireplace remodel
DIY Fireplace Wall with TV
Supplies
- Touchstone Electric Fireplace
- (16) 2'x4' 96" Prime Stud
- Deckmate Screws
- Surge Power Outlet (if adding electricity for TV above the fireplace)
- Level
- Miter saw
- Table saw
- Nail gun
- 18-Gauge Brad Nails
- Clutch Clamp
- Drill
- Sander
- Sandpaper
- (3) 1x4 6ft pine board
- (2) 4'x8' Drywall
- Drywall joint tape
- Drywall corner bead
- Drywall corner bead adhesive
- 1 1/4" Coarse Drywall screws
- Baseboard
- Shoe Molding
- Spackling
- 6" Flexible Joint Knife
- 8" Taping knife
- Mud pan
- Power mixer
- Construction adhesive
- Face Masks
- Electrical wire
- Electrical box
- Electrical box cover
- Caulk
- Wood filler
- Flat TV Bracket
Instructions
- Gather Supplies.
- Demolish or remove items on the wall where you wish to place the fireplace bump-out. In our case, we removed a fake fireplace from the wall, a chair rail, and the baseboards. We also took a TV down that was hanging on the wall.
- Mark your measurements on the wall where you want to install the fireplace bump-out. Our bump-out measures 69.6" L x 10" D x 8' H. Our fireplace is 12.5" off the floor and 11" above the fireplace is the mantel. The TV bottom is 7.5" above the mantel. The Mantel is 5.5" on all sides and is 48" from the floor.
- Measure and cut the 2 x 4 wood to create a frame.
- Build the side frames first and attaching them to the wall with 2x4's in the middle attached to the back wall for extra bracing and stability.
- Build the frame for the front.
- Check to make sure it fits between the side frames and measure where to build the fireplace insert frame.
- Remove the front frame and add the cross braces where the fireplace will sit and tack it in place once again.
- Set the fireplace in the opening to check for clearance, if you need to make adjustments just remove the front frame and adjust until the opening is just right.
- Complete the rest of the bracing studs for the rest of the wall and secure the front frame in place.
- Run the wires for the electrical box and wire the outlets, of course making sure the electricity to the outlet is turned off at the electrical panel.
- Install the electrical box for the TV (my hubby did this part because he has electrical experience/training). I recommend figuring out where your TV bracket will be and install the electrical box a couple of inches above the bracket and on the side where the tv connections will be. I chose to install surge protector outlets for a little extra peace of mind even though we have a whole house surge protector.
- Cut the drywall for the front. Start with the top and work down and measure where your electrical box/fireplace openings are and cut the opening for these before attaching the drywall.
- Once the openings are cut, mark the location of the studs on the front of the drywall to allow for easy attachment with the 1-1/4" coarse drywall screws.
- Attach the drywall to the studs. I use the coarse screws over fine thread when attaching drywall to wood. The fine thread should be used if you are screwing the drywall into metal/aluminum studs.
- Spray the drywall corner beads with the spray adhesive and attach them to the corners of the bump-out.
- Allow the adhesive to dry while you attach the drywall joint tape to all the other joints. Mix your joint compound using your power mixer until you have a consistency of pudding for your initial coat.
- Using your mud pan and your 6' mud knife, add mixed joint compound to all the joints that are taped and cover all screw heads and corner beads. Allow to dry and then lightly sand the areas.
- Mix a new batch of joint compound to a little thicker than pudding consistency and apply a second coat to even out areas and smoothing rough areas.
- Once the new coat has dried, sand again, and if you need to do a third coat of joint compound in some areas now is the time. If it is smooth, then you are ready to paint or add texture and paint. Our walls are textured so I sprayed texture over the new addition.
- Paint the new wall. I painted ours, Benjamin Moore Simply White.
- Plug the power cord from the fireplace in and then slide the fireplace into position.
- Follow the instructions from Touchstone Products Electrical Fireplace to secure it.
- Attach the 2 x 4 base for the mantel and slide the mantel on and secure it. (FIREPLACE MANTEL TUTORIAL is coming soon!).
- Attach the bracket for the tv to the studs and hang the tv.
- Cut your floorboards/baseboards and shoe molding to length using your miter saw, install using a nail gun. My corners are not perfect so I filled them with wood putty and sanded them. Once they are painted, you can not tell there was a gap or they did not line up perfectly.
- Caulk the top where the baseboard meets the drywall.
- Turn on your fireplace and enjoy!
Video
Here are More Home Improvement Tips You Might Like…
How to pick the right paint colors
Have you ever had trouble picking the right paint colors for your home? Choosing the right paint colors for your home can be overwhelming. There are so many different “whites” and “grays” these days, how can anyone know they are making the right paint color choice?
That’s why I put together the best tips on How to Choose Interior Paint Colors in this post.
Every home is different… the entryway in our first home was much different than the entryway in our second home, and both of those were very different from the entryway in our third home! So I chose a different paint color for each entryway in all three of our homes. Not to mention, from the time that we bought our first home, to the time that we bought our third home, home paint color trends changed drastically. The colors that I used back then are no longer a trendy color and well, I just didn’t like the brown-ish tan that was in our first home, haha.
So if you need help choosing paint colors for the rest of your home, head on over to this post to see my paint-picking tips and what has worked for me in all three of our homes 🙂 My post with how to choose paint colors for your home is one of my most popular posts and readers have benefited from reading it before heading to the store to buy paint that ends up not working out.
I also have some ideas for choosing paint color combinations for bedrooms (with themes!)
Paint Versus Peel & Stick Wallpaper
Peel and stick wallpaper has become very popular recently since not everyone has access to tools to build their own Shiplap walls (thanks Chip and Joanna) or wants to tile an entire wall with subway tile. I love tiling but if I could slap up some wallpaper and call it a day, that would make me, the hubby, and my wallet happy!
You can find peel and stick wallpaper online at Target, Amazon, Home Depot, and more! I’ve linked my favorite peel and stick wallpaper and the ones I’ve used personally below.
How To Paint Kitchen Cabinets Without Sanding
If you love white farmhouse kitchens and want to paint your kitchen white, then you will love this post that teaches you How To Paint Kitchen Cabinets White Without Sanding! I’ll show you how to paint old kitchen cabinets and answer how much does it cost to paint kitchen cabinets (it’s much cheaper than you think!). I also have lots of pictures of painting kitchen cabinets before and after!
You don’t have to worry about how to paint kitchen cabinets without brush strokes because I have a secret in this post that reveals a step-by-step DIY tutorial with how to paint kitchen cabinets like a pro.
–>> Learn how to Paint Kitchen Cabinets without Sanding here!
Cheap Home Hacks that’ll Increase Value
Renovating a home can come with a high price tag if you’re not budgeting and deciding which updates bring the best return on investment. After selling our updated first home in just 4 years, we bought an even bigger house that needed a lot of updating. We sold our second home after 4 years while doing the much-needed work to produce a profit by following the same strategies we did in our first home.
If you enjoy updating your home, want to increase your home value or just want your home to look better, you should check out thee 10 Cheap Home Hacks That’ll Make Your House Look So Much Better.
Tour Our Homes
Take a Tour of our Second Home here
Psssssttt…Right now I’m offering FREE access to our Digital Resource Library to all of our newsletter subscribers. Your private access includes dozens of free printable crafts, home decor and organization guides. Hurry up and grab your freebies here! (Access instructions are sent after subscribing).
Disclaimer: This post may contain affiliate links or a sponsored post. All opinions are always 100% mine and I don’t partner with any product or company that I don’t use and love. Please see our Full Disclosure for more information.
 30 Dollar Tree Pumpkin Wreath Form Ideas