Dresser DIY Makeover
Thrifting has become an increasingly popular way to find unique furniture pieces at affordable prices. One of the most satisfying projects for thrift store enthusiasts is giving old and outdated dressers a new lease on life through creative makeovers. In this blog post, we will delve into the step-by-step process of transforming a drab thrift store dresser into a sophisticated and modern piece that will elevate the aesthetic of any room. Keep reading to see this Sophisticated Dresser Thrift Store DIY Makeover!

In case you’re in a hurry…
Primary Bedroom Links
We recently updated our primary bedroom with a makeover! You can find links to everything below! Follow me on the LTK app so you can shop my posts anytime.

What’s New in the Primary Bedroom
I painted the walls Benjamin Moore Balboa Mist (I get Home Depot to color-match paint using the Glidden brand). It’s a light gray and beige color and is perfect in our bedroom since it’s a dark room. I don’t know WHY I painted our room dark green a few years ago! I guess I was trying a moody hue or boho theme and it just wasn’t me AT ALL! Well, live and learn. Now I know what I like and it’ll stay this color for a few years at least 😉 I found these matching dressers at a thrift store for $160 ($80 each).
We replaced ALL of the furniture. I was tired of the rattan dressers (which we found on FB marketplace for a steal). Rattan is really hard to keep clean and our bedroom get dusty fast! We sold the dressers and used that money to buy matching dressers from a local thrift store. I updated the dressers using the same paint and hardware as this makeup vanity desk!

Curtain Rods | Bamboo Blinds | Platform Bed
I added curtains. We had curtains in our bedroom 5 years ago and then I wanted a cleaner, minimalist look. My hubby also has a fear of dust collecting on curtains so we went without them for a while. The new curtains are repurposed from our family room.
We replaced the rug. There wasn’t anything wrong with the previous rug, in fact, I put it in my daughter’s bedroom. I just fell in love with the rug in my Craft Room Makeover so I got the same rug larger for our bedroom.
I added a makeup vanity. I had a vanity desk in our bedroom before but I could never get the furniture to quite fit the way I wanted. So I sat down and sketched a room layout with the furniture before I did anything else. Then I created a vision board in Canva with screenshots of the furniture and accessories I planned to use. I found this vanity of FB marketplace for $50. It’s solid wood and was in pretty good condition. It’s difficult to find anything made with solid wood these days and I didn’t want some particle board furniture in our bedroom.
–>> See the FULL Primary Bedroom Makeover in this post
Dressers Before the Makeover
The journey of a thrift store dresser makeover begins with selecting the right piece. Often, these dressers may have scratches, dings, outdated hardware, or a dull finish. However, these imperfections are merely opportunities for transformation. The first step involves assessing the dresser’s structure, ensuring it is sturdy and free from major damage. Next, the dresser is thoroughly cleaned and sanded to create a smooth surface for paint or stain to adhere to. At this stage, the dresser may look far from glamorous, but the potential for a stunning makeover is just around the corner.

Transforming a Thrift Store Dresser into a Sophisticated Modern Masterpiece
The DIY makeover process is where the magic happens. Depending on the desired outcome, one can choose to paint, stain, or even decoupage the dresser. For a sophisticated modern look, opting for a sleek monochromatic color scheme or a timeless wood stain can work wonders. Swapping out old hardware for contemporary handles or knobs can instantly modernize the dresser. Additionally, adding details such as geometric patterns, metallic accents, or even a pop of color can elevate the dresser’s design and make it truly unique. Finally, finishing touches such as a coat of protective sealant will ensure the dresser looks pristine for years to come.

How to Renovate a Vintage Wood Dresser
- To start, assess the dresser’s condition by checking for any structural damage, loose joints, or missing hardware.
- Once you have a clear idea of what needs to be repaired, begin by stripping off the old finish using sandpaper. This step is crucial for preparing the wood to receive a new finish.
- Sand the dresser to smooth out any imperfections and create a clean surface for staining or painting.
- Choose a finish that complements the dresser’s style and your desired aesthetic, whether it’s a rich stain to enhance the wood grain or a fresh coat of paint for a more modern look. I used Glidden’s EXTERIOR Flat Finish Paint and had the color matched at Home Depot. The color is Behr Carbon. I LOVE this color! I used this color on our Exterior home trim, windows, and my son’s dresser.
- Don’t forget to replace any broken hardware and consider adding new knobs or handles for a personalized touch. As mentioned above, I used these modern drawer pulls in champagne gold and chose the longest length ( 12 5/8 inches) to make a statement.
- Finally, apply a protective finish to seal and protect the wood, ensuring your renovated vintage dresser will continue to shine for years to come.
After the makeover is complete, the once-overlooked thrift store dresser is now a stunning focal point in the room. Its transformation into a sophisticated modern masterpiece showcases the power of creativity and vision. The dresser now exudes elegance and style, seamlessly blending into any contemporary or classic decor. Not only does this DIY project save money, but it also allows for personal expression and a sense of accomplishment. Whether used in a bedroom, living room, or entryway, the sophisticated modern dresser serves as a testament to the beauty of upcycling and the joy of breathing new life into old treasures.

Walls: BM Balboa Mist | Trim: Glidden off the shelf White | Doors: BM Gray
Decorating a Bedroom Dresser Top
To enhance the tranquil ambiance, incorporate elements of nature such as houseplants or nature-inspired artwork. Don’t forget about lighting – soft, warm lighting can instantly create a cozy and inviting atmosphere. Consider adding some candles or fairy lights for a touch of ambiance. Finally, personalize your space with meaningful decor items that bring you joy and peace.
- I used some Dollar Tree faux succulents in a thrift store flower pot to create cheap but upscale decor on our dresser.
- An Ikea table runner is used on our dresser top to blend the 2 dressers and add texture.
- I used battery-timed candles on our dresser to create a relaxing environment.
- Our Vizio TV above the dressers has tranquil images and music displayed to bring comfort.
- I used a vintage gold tray to keep things tidy on the dresser top.

Organize Clothes in a Vintage Wood Dresser
Organizing clothes in a vintage wood dresser can bring a sense of charm and functionality to your space. To start, consider grouping similar items to make it easier to find what you need. For example, you can separate your tops, bottoms, and accessories into different drawers or sections.
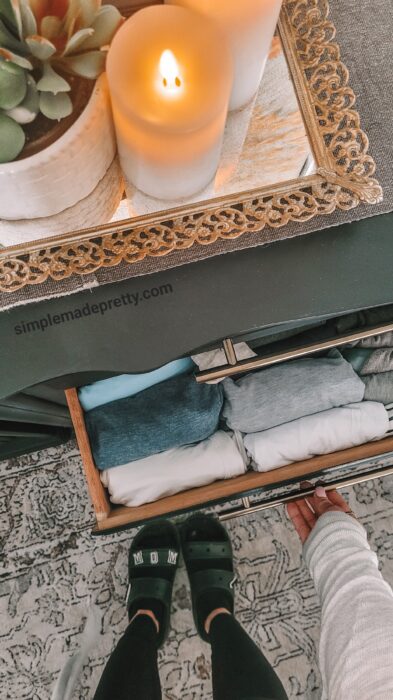
Utilizing drawer dividers or small storage bins can help keep smaller items like socks, underwear, or scarves neatly arranged. Folding clothes neatly and placing them vertically can also maximize space and visibility within the drawers. Additionally, using aromatic sachets or cedar blocks can help keep your clothes fresh and prevent any musty odors that may come with older furniture.
Lastly, don’t forget to regularly declutter and reorganize your dresser to maintain a streamlined and efficient system. By incorporating these tips, you can transform your vintage wood dresser into a stylish and functional storage solution for your clothes.
Add a Vizio TV Above Your Dressers
Adding a TV above your dressers can be a stylish and functional choice for your bedroom or living space. It can provide entertainment while getting ready in the morning or winding down at night. By mounting the TV above the dressers, you can save space and create a streamlined look in the room. It also allows for optimal viewing angles from different areas of the room, making it a versatile setup for watching movies, shows, or even working out with exercise videos. Additionally, having a TV in the bedroom can turn it into a cozy retreat where you can relax and unwind after a long day. Whether you enjoy catching up on your favorite show or watching the news in the morning, having a TV above your dressers can enhance your overall living experience.

I LOVE our Vizio TVs! My favorite feature is the Watch Free Channel on our Vizio TV. I leave the TV on one of the relaxing/zen channels while I’m in the bedroom. The tranquil beach or winter scenes with relaxing background music create a peaceful environment in our primary bedroom makeover. You can also watch cute puppies and other scenery from around the world which looks like artwork on the wall!
The Vizio WatchFree channel is a feature available on Vizio Smart TVs that provides access to a variety of free streaming content. It offers a selection of live and on-demand TV shows, movies, news, sports, and more, without the need for a subscription. Users can enjoy a range of channels and content through the WatchFree platform, making it a convenient option for those looking to explore entertainment options without additional costs. Vizio collaborates with various content providers to offer a diverse array of programming through the WatchFree channel, enhancing the viewing experience for Vizio TV owners.

Wrap Up About a DIY Vintage Dresser
In conclusion, the journey from a thrift store find to a sophisticated modern dresser is a fulfilling and rewarding experience. With a little creativity, patience, and DIY spirit, anyone can transform ordinary furniture into extraordinary pieces that reflect their style and personality. So next time you come across a neglected dresser at a thrift store, envision the possibilities and embark on a makeover adventure that will leave you with a one-of-a-kind masterpiece that you can proudly display in your home.
In case you’re in a hurry…
Pin This Post for Later…

ARTICLES YOU MIGHT ALSO LIKE…
Psssssttt…Right now I’m offering FREE access to our Digital Resource Library to all of our newsletter subscribers. Your private access includes dozens of free printable crafts, home decor and organization guides. Hurry up and grab your freebies here! (Access instructions are sent after subscribing).
Disclaimer: This post may contain affiliate links or a sponsored post. All opinions are always 100% mine and I don’t partner with any product or company that I don’t use and love. Please see our Full Disclosure for more information.
 10 Easter Free Printables