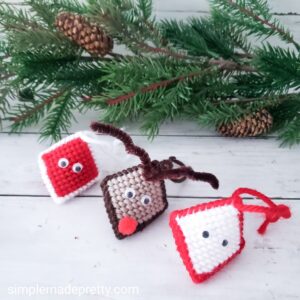
Hershey Kiss Ornaments
This plastic canvas kiss holder pattern is such an easy Christmas craft that kids can make them too! I learned how to make these free plastic canvas kiss patterns when I was a kid and I decided to teach my kids how to make these Hershey Kiss holder ornaments. This squeeze my cheeks pattern can be simple colors or you can add a pattern to create a reindeer kiss holder or squeeze my cheeks Santa. Keep reading and watch the video to learn how to make these DIY Hershey Kiss Ornaments!
Print
Pin
Yield: 1 Ornament
Cost: $1
Supplies
- Plastic Canvas
- Yarn in various colors
- Yarn Needle
- Scissors
- Glue
- Wiggly Eyes
Instructions
- Gather Supplies. I highly recommend using these Plastic Canvas Sheets.
- Cut 3 squares measuring by counting 10 squares on each side.
- Thread the yarn onto your needle by smooshing the tip of the yarn with your thumb and index finger into the needle.
- Start to weave in the upper right corner of one of the squares. Hold the "tail" in the back so you can weave around it to secure it in place. Stitch across to the left lower square.
- Continue to stitch down the row.
- Notice the back and how I stitched over the tail.
- When you reach the end of the row, continue to the next row as seen in the picture.
- Continue to stitch across using the same square as the previous row. Once you finish the entire square, finish with a triple stitch in the last holes and stitch through the back to tie and cut off the yarn.
- Complete these steps until you have 3 squares. Make the "lips" for the ornament by weaving the outline of 2 corners on 2 squares.
- Put one of the lip squares on the non-lip square, wrong sides together and stitch the other side (leaving the lip side open).
- Do the same with the last square until you have the 3-D ornament. Finish the stitch inside the corner of the mouth and tie/cut off.
- Use yarn to create a loop at the top to hang as an ornament.
- Use glue to attach wiggly eyes.
- Add a Hershey Kiss inside and enjoy!
Video
Did you make this project?Mention @simplemadepretty or tag #simplemadepretty!